


Hardware components | ||||||
 |
| × | 1 | |||
 |
| × | 1 | |||
| × | 1 | ||||
 |
| × | 1 | |||
 |
| × | 1 | |||
 |
| × | 1 | |||
 |
| × | 1 | |||
| × | 1 | ||||
_qM2soP8k8n.jpg?auto=compress%2Cformat&w=48&h=48&fit=fill&bg=ffffff) |
| × | 1 | |||
 |
| × | 4 | |||
Software apps and online services | ||||||
 |
| |||||
| ||||||
Hand tools and fabrication machines | ||||||
 |
| |||||
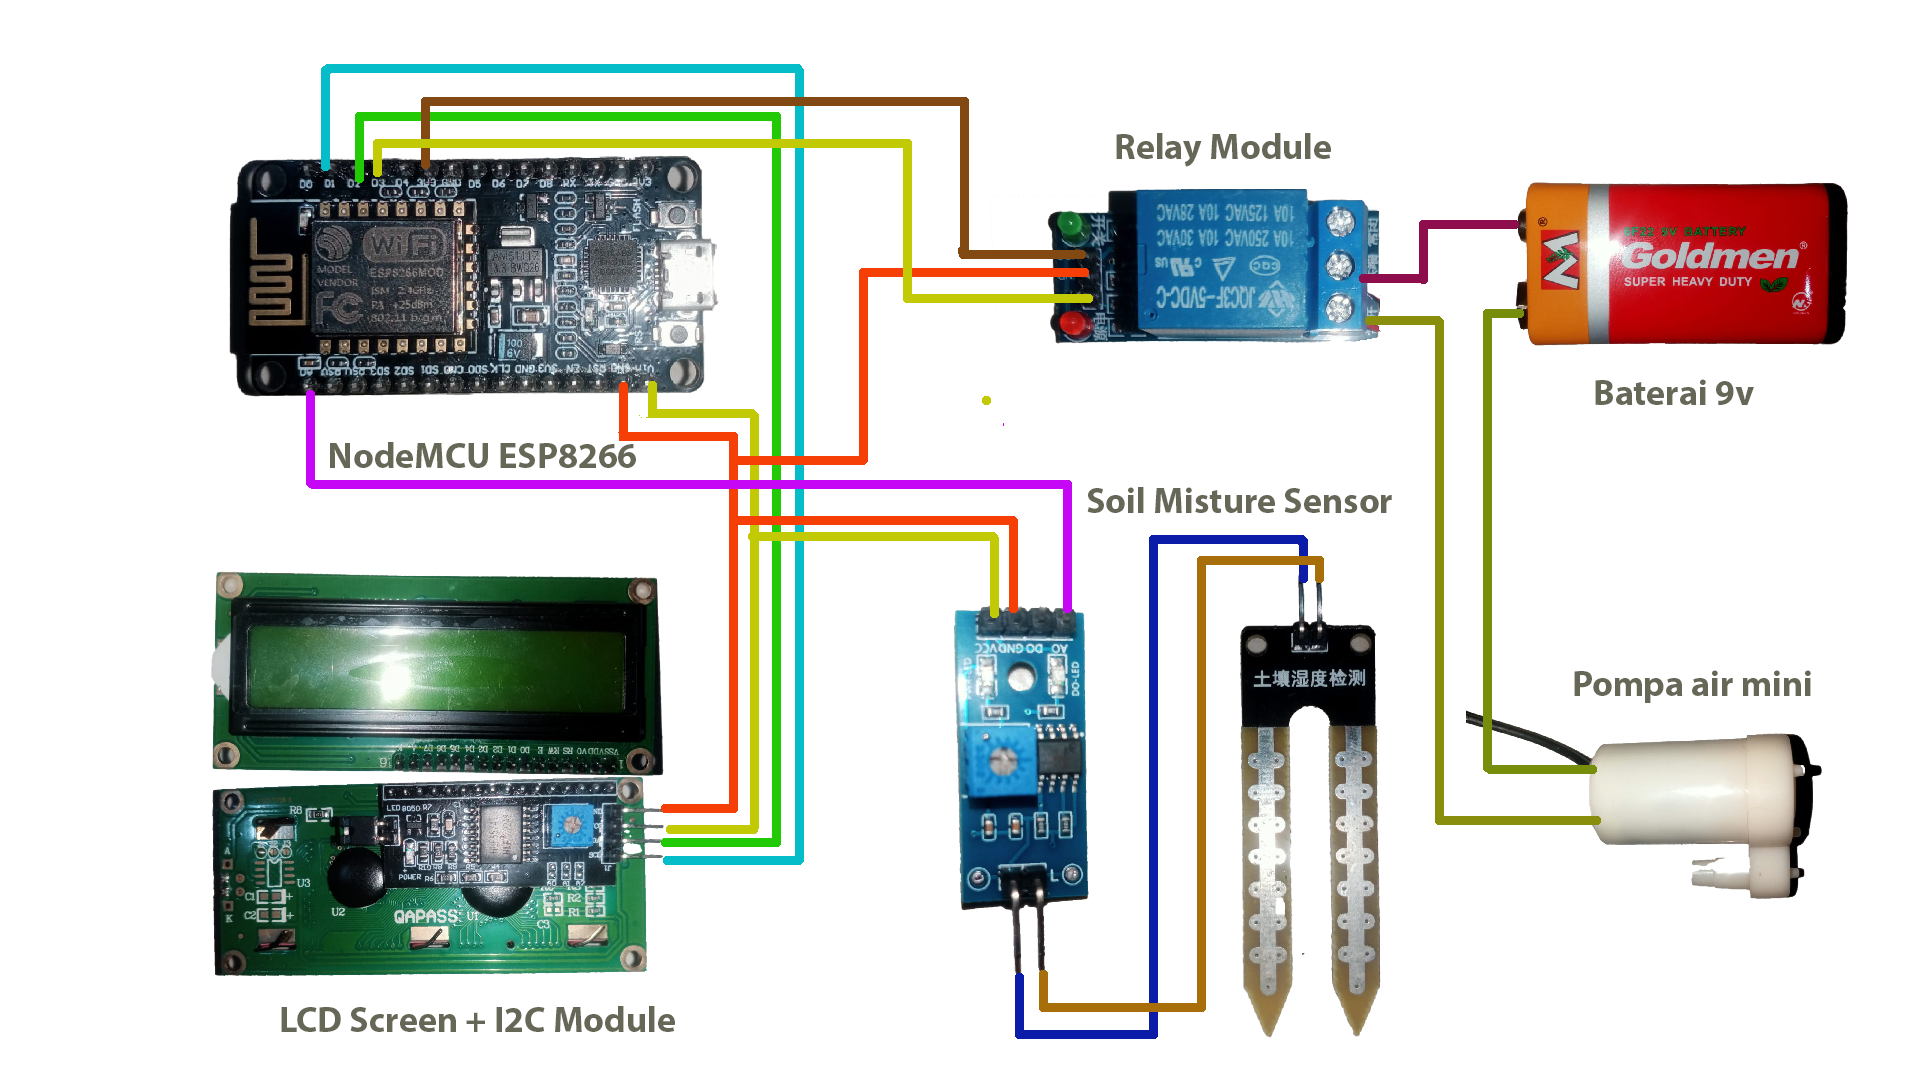
This project was created based on planting activities that require quite intense watering care. Having this tool will really help in regulating humidity and can also make the watering process easier from a distance.
1. NodeMCU ESP8266
2. Soil Moisture Sensor
3. LCD Screen + I2C module
4. Mini Water Pump
5. Relay module
6. Battery 9V
7. Breadboard
8. Jumper Cable Male-Male & Male-Female
9. USB cable
10. Battery Connector 9V
11. Mini Water Pipe
Procedure :- Plug the esp8266 into the breadboard
- connect VIn with pluss hole (+) using male to male cable
- then GND with min hole (-)
- Plug 4 male to female cables into the I2C already connected to the LCD screen
- then follow the following procedure:
GND-->mint(-)/GND
VCC-->pluss(+)/VIn
SDA-->D2
SCL-->D!
- Plug the soil moisture sensor into the breadboard
- connect the following points:
AO-->AO
VCC-->pluss(+)/VCC
GND-->min(-)/GND
- hubungkan relay dengan ketentuan beerikut:
GND-->min(-)/GND
VCC-->3V3
IN-->D3
- install the battery connector on the battery
- connect the positive cable to the center hole (COM)
- also connect the positive cable on water pump on the left relay (N.O)
- Finally connect the negative cable to the battery with the negative cable on the water pump
- Connect the ESP to the computer using USB cable
- Go to the Arduino IDE application and paste the following code
Before write the code, first install the following library:
- ESP8266wifi-master ( https://drive.google.com/file/d/1b-tHjcqBHVCgQKabdR19iGmo4E-pa2mW/view?usp=sharing )
- Blynk Library ( https://drive.google.com/file/d/1dbCZECyzjI7zxE_Q136jA9--dHELAGNt/view?usp=sharing )
- I2C Library ( https://drive.google.com/file/d/15-vg0hSKDJ9EafxvWnjkg-o3WERHccBx/view?usp=sharing )
/*Plant watering system with new blynk update
Home Page
*/
//Include the library files
#include <LiquidCrystal_I2C.h>
#define BLYNK_PRINT Serial
#include <ESP8266WiFi.h>
#include <BlynkSimpleEsp8266.h>
#include <Wire.h>
//Initialize the LCD display
LiquidCrystal_I2C lcd(0x27, 16, 2);
char auth[] = "";//Enter your Auth token
char ssid[] = "";//Enter your WIFI name
char pass[] = "";//Enter your WIFI password
BlynkTimer timer;
bool Relay = 0;
//Define component pins
#define sensor A0
#define waterPump D3
void setup() {
Serial.begin(9600);
pinMode(waterPump, OUTPUT);
digitalWrite(waterPump, HIGH);
lcd.init();
lcd.backlight();
Blynk.begin(auth, ssid, pass, "blynk.cloud", 80);
lcd.setCursor(1, 0);
lcd.print("System Loading");
for (int a = 0; a <= 15; a++) {
lcd.setCursor(a, 1);
lcd.print(".");
delay(500);
}
lcd.clear();
//Call the function
timer.setInterval(100L, soilMoistureSensor);
}
//Get the button value
BLYNK_WRITE(V1) {
Relay = param.asInt();
if (Relay == 1) {
digitalWrite(waterPump, LOW);
lcd.setCursor(0, 1);
lcd.print("Pompa is ON ");
} else {
digitalWrite(waterPump, HIGH);
lcd.setCursor(0, 1);
lcd.print("Pompa is OFF");
}
}
//Get the soil moisture values
void soilMoistureSensor() {
int value = analogRead(sensor);
value = map(value, 0, 1024, 0, 100);
value = (value - 100) * -1;
Blynk.virtualWrite(V0, value);
lcd.setCursor(0, 0);
lcd.print("Kelembaban :");
lcd.print(value);
lcd.print(" ");
}
void loop() {
Blynk.run();//Run the Blynk library
timer.run();//Run the Blynk timer
}- before upload this code there is the next step, namely creating widgets
For making widgets, I put them on my YouTube channel to make them easier to understand. Please watch the following video or go to my YouTube channel. good luck.
I hope this video will helps you


Comments