

Hardware components | ||||||
| × | 1 | ||||
| × | 1 | ||||
| × | 1 | ||||
| × | 1 | ||||
Software apps and online services | ||||||
 |
| |||||
IoD-09 Smart Watch project displays time, date and weather forecast information. This project works by initially requesting for the time via the UDP connection. Next, the weather information is requested via TCP connection to the Wunderground.com Weather API services, the received information is also saved to be displayed thereafter.
Using the time information requested earlier, the program independently counts and calculates the time every second. Every 30 seconds, the display changes and show either the time, date, or weather forecast information.
This project is also programmed to request for the time every hour to provide an accurate and updated time. The weather forecast information is updated every 9, 12, 15, 18, 21, and 24 hour.
How It Works- uSD Card
- uUSB Cable
- External Power Supply
- First, open the Arduino IDE, then go to the “File” tab, select “Preferences”
- On the text box, “Additional Boards Manager URLs:”, paste this line and hit the “OK” button: http://arduino.esp8266.com/stable/package_esp8266com_index.json
- Then, on the “Tools” tab, under the “Board” drop-down menu, open the “Board Manager”. After loading, scroll down and look for the “esp8266 by ESP8266 Community” board installer, remember to install the latest version.
- Manual modifications to add the ESP8266 boards are required since the stable Arduino build does not include changes since mid-2016. First, navigate to this location on your desktop PC, and open the file “boards.txt using an application such as Notepad++ or Wordpad (Notepad is not recommended):
C:\Users\[YOUR USERNAME]\AppData\Local\Arduino15\packages\esp8266\hardware\esp8266\2.3.0”
- At the end of the file, copy and paste the following text by starting a new line:
############################################################ gen4iod.name=4D Systems gen4 IoD Range gen4iod.upload.tool=esptool gen4iod.upload.speed=921600 gen4iod.upload.resetmethod=nodemcu gen4iod.upload.maximum_size=434160 gen4iod.upload.maximum_data_size=81920 gen4iod.upload.wait_for_upload_port=true gen4iod.serial.disableDTR=true gen4iod.serial.disableRTS=true gen4iod.build.mcu=esp8266 gen4iod.build.f_cpu=80000000L gen4iod.build.board=GEN4_IOD gen4iod.build.core=esp8266 gen4iod.build.variant=generic gen4iod.build.flash_mode=dio # flash chip: AT25SF041 (512 kbyte, 4Mbit) gen4iod.build.flash_size=512K gen4iod.build.flash_ld=eagle.flash.512k0.ld gen4iod.build.flash_freq=40 gen4iod.build.debug_port= gen4iod.build.debug_level= gen4iod.menu.CpuFrequency.80=80 MHz gen4iod.menu.CpuFrequency.80.build.f_cpu=80000000L gen4iod.menu.CpuFrequency.160=160 MHz gen4iod.menu.CpuFrequency.160.build.f_cpu=160000000L gen4iod.menu.UploadSpeed.115200=115200 gen4iod.menu.UploadSpeed.115200.upload.speed=115200 gen4iod.menu.UploadSpeed.9600=9600 gen4iod.menu.UploadSpeed.9600.upload.speed=9600 gen4iod.menu.UploadSpeed.57600=57600 gen4iod.menu.UploadSpeed.57600.upload.speed=57600 gen4iod.menu.UploadSpeed.256000.windows=256000 gen4iod.menu.UploadSpeed.256000.upload.speed=256000 gen4iod.menu.UploadSpeed.230400.linux=230400 gen4iod.menu.UploadSpeed.230400.macosx=230400 gen4iod.menu.UploadSpeed.230400.upload.speed=230400 gen4iod.menu.UploadSpeed.460800.linux=460800 gen4iod.menu.UploadSpeed.460800.macosx=460800 gen4iod.menu.UploadSpeed.460800.upload.speed=460800 gen4iod.menu.UploadSpeed.512000.windows=512000 gen4iod.menu.UploadSpeed.512000.upload.speed=512000 gen4iod.menu.UploadSpeed.921600=921600 gen4iod.menu.UploadSpeed.921600.upload.speed=921600
- Save the file and re-open the Arduino IDE, you should now see the new entry “4D Systems gen4-IoD Range” under the “Board” drop-down menu. Select the board to start.
- Using any web browser, open the 4D systems github page using this link: https://github.com/4dsystems/GFX4d
- Clone or download the repository.
- Install all the library to the Arduino IDE by going to the “Sketch” Tab, under the “Include Library” drop-down menu, select the “Add .ZIP Library” option.
- Go to the website, https://wunderground.com/api and follow the process in creating an account.
- Get the free membership or upgrade, if desired. Record and take note of the key that will be provided.
- Or you can go to the “Key Settings” tabs on the website.
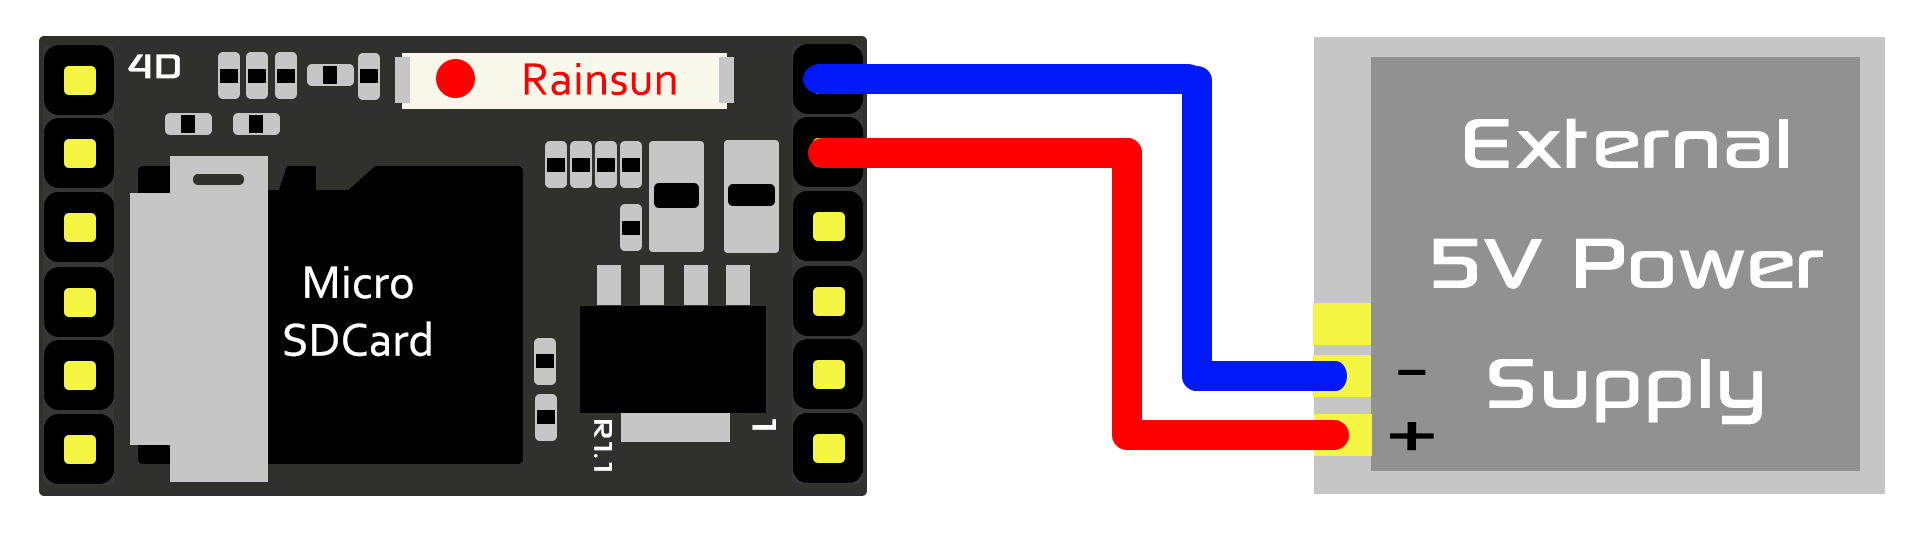
Build the circuit as shown in the diagram.
Download the project here.
Workshop 4 – 4D Arduino Extended Graphics Environment
Open this file using Workshop 4.
Step 3: Compile- Click on the “Build Copy/Load” button.
Note: This step could be skipped. However, compiling is essential for debugging purposes.
Step 4: Comp’n Load- Connect the display to the PC using a microUSB cable. Make sure that you are connected to the right port. Select the correct port using the drop-down box named “Arduino Comms”
- Now click on the “(Build) Copy/Load” button.
- Workshop 4 will prompt you to select a drive to copy the image files to a uSD Card. After selecting the correct drive, click OK.
- The module will prompt you to insert the uSD card.
- Unmount the uSD Card properly from the PC and insert it to the uSD Card slot of the display module.
- After inserting your uSD card to the gen4 display, the graphics will be immediately loaded.


Comments