

Hardware components | ||||||
 |
| × | 1 | |||
 |
| × | 1 | |||
| × | 1 | ||||
 |
| × | 1 | |||
 |
| × | 1 | |||
 |
| × | 1 | |||
 |
| × | 1 | |||
Software apps and online services | ||||||
 |
| |||||
 |
| |||||
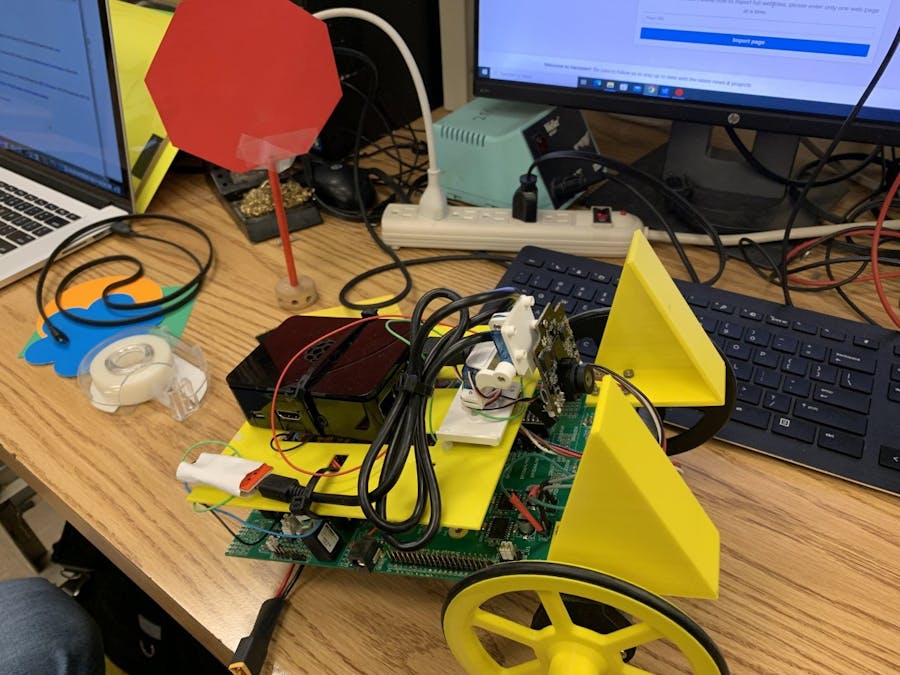
For our ME461 project we decided to make a semi autonomous robot. It takes input from a Wii remote via Bluetooth from a raspberry pi, tracks objects and acts accordingly from a Pixy camera, and uses an anti windup controller and a turning algorithm learned in class to control DC motors which is all implemented through a TMS320F28379D Launchpad that was sponsored from Texas Instruments.
After first learning how to program the Launchpad and its various features such as SPI communication, PWM, and the various timer interrupts, we were able to add our own components to the board from those that were already in our breakout board. We decided to add a raspberry pi that was communicated with through USB serial communication and a Pixy camera that was communicated through SPI. The Pixy camera has the ability to set multiple signatures (seven) that it can detect. A signature is a unique color and pattern that the Pixy can detect. In this project we have implemented functionality using three of the signatures and a function to get the location of each signature was added into the code.
On the raspberry pi, cwiid library was used in order to communicate with the Wii remote. A shell script was run connecting our raspberry pi to the specific address of the Wii remote. The buttons were mapped to specific buttons and events on the raspberry pi through an event library. Then, the button actions were processed and sent through serial as a binary string which was processed on the Launchpad.
In the code on the launchpad, we programmed it so a stop sign signature on the Pixy would make the robot stop for 4 seconds. A blue flower signature was used as a symbol to follow which was done by centering it and going forward with the Pixy. An orange signature was used as a yield sign which set our plus minus variable which controls the speed to a small value in order to slow down the robot in all directions. The directional pad on the Wii remote moves the robot, the a button starts a song, the plus and minus also increments this plus and minus variable, the home button puts the plus and minus at the default. The one and two button turn this autonomous mode on and off. The b button is yet to be implemented, but the variable is ready to be used in the code.
To connect the wii remote, first build and run the file "connectwii.sh" in terminal as a superuser after updating your wii remote's bluetooth address. After running, press the 1 and 2 buttons synchronously to make the wii remote discoverable. The wii remote should connect and the player 1 button should light up. To check that it is working correctly, there is a program that can be run in terminal with "jstest-gtk".
To get the output, run "evtest.py" in python2. In the evtest code, make sure your serial output is the correct device and your wii remote is on the correct device. This code sends the binary output of the wii remote as a string which can be interpreted through the launchpad. A feature that was not implemented was sending it as the actual binary and implementing a reconnect feature in the code. I also wanted to make it all inclusive in the python using the os library to run the shell script, but running the script twice breaks the system. The two references that I used in order to do most of the connection to Bluetooth and getting the output can be found here.
https://www.instructables.com/Wiimote-Controller-Configuration-for-Raspberry-Pi-/
https://ericgoebelbecker.com/post/raspberry-pi-and-gamepad-programming-
part-1-reading-the-device/and-gamepad-programming-part-1-reading-the-device
Pixy documentation for setting up signatures:
https://docs.pixycam.com/wiki/doku.php?id=wiki:v2:teach_pixy_an_object_2
Pixy documentation for communication over SPI
https://docs.pixycam.com/wiki/doku.php?id=wiki:v2:porting_guide


_3u05Tpwasz.png?auto=compress%2Cformat&w=40&h=40&fit=fillmax&bg=fff&dpr=2)

Comments