


Hardware components | ||||||
 |
| × | 2 | |||
| × | 1 | ||||
 |
| × | 2 | |||
 |
| × | 1 | |||
 |
| × | 5 | |||
| × | 1 | ||||
Software apps and online services | ||||||
| ||||||
| ||||||
 |
| |||||
| ||||||
| ||||||
Introduction and Overview
Ever get tired of leaving your house for the day only to come back to it with all of your lights on? Maybe it was your roommates, or maybe it was yourself. Either way, it is wasting energy and more importantly your hard earned cash! We devised a solution to this problem that allows you to remotely turn off your lights from anywhere with just the use of your smartphone. It is a relatively simple project to build and is very user friendly! LightAlert allows you to send a text from anywhere asking if your lights are "on?" to an If This Than That (IFTTT) number. From here IFTTT will send a trigger to the first of two particle photons asking if it is sensing light in the room. If it is not, then the photon will send a signal to IFTTT, which in turn will alert you through a notification that the lights are off. On the other hand if the first photon does detect light, then a separate signal will be sent directly to the second photon alerting it that the lights are on. The second photon will trigger a relay connected in series to your wall power and disconnect the light for you! IFTTT will then send you a message alerting you that the lights have been turned off.
LightAlert in Action
Though this video was taken from inside my house, remember that LightAlert can be used to turn off your lights from anywhere! We currently have the second photon circuit in place of the manual switch in my room, but you can also implement it in series with your light switch. This would allow full manual use of your lights while you are home, but still allow you to toggle the lights off while you are away. If you wish to keep the light switch attached, make sure to leave the relay normally connected (NC) so that the circuit is then dependent on the manual switch.
Photoresistor Chart
Chart 1 above is a record of the published voltage readings from the first photon over a span of about ten minutes. As you can see, specifically in the beginning, the voltage does not have to read "0" in order for the light to be off. It is imperative that the code of the first photon accounts for about a 6-bit buffer in which it will still publish the light value as "off." This means values like seen before 21:40 of this chart will not be mistaken for the lights being on.
Above in Chart 2 we can see the time at which the relay received the signal to turn on. A value of "1" represents the relay being switched on (circuit disconnected) while a value of "0" represents the relay being turned off (back to NC.) This chart differs from Chart 1 as there are no fluctuating values to record due to its simple Boolean function.
Pictures of the build
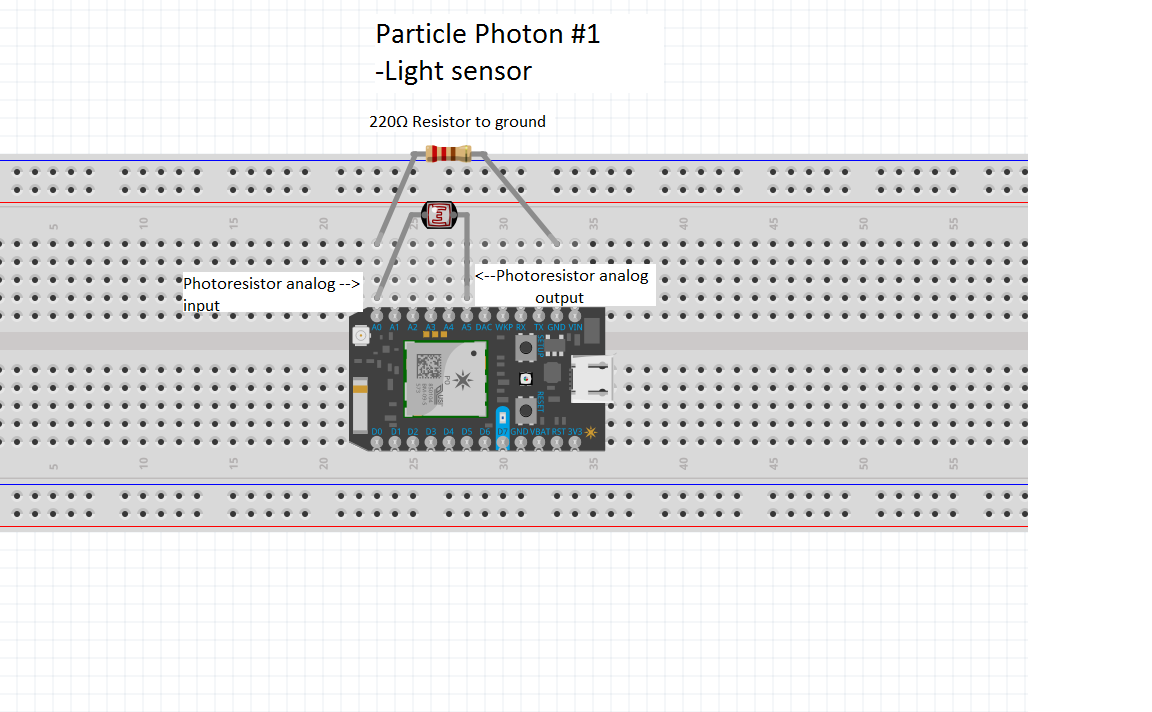
Seen in the second picture of Slideshow 1 is photon 1 attached above the light bulb of my ceiling fan. It is placed as such to receive the most accurate reading from the light bulb, but this also makes the photon incapable of being plugged into a wall outlet. To solve this problem, tape or Velcro a rechargeable battery pack to the motor of the fan to provide power to photon 1.
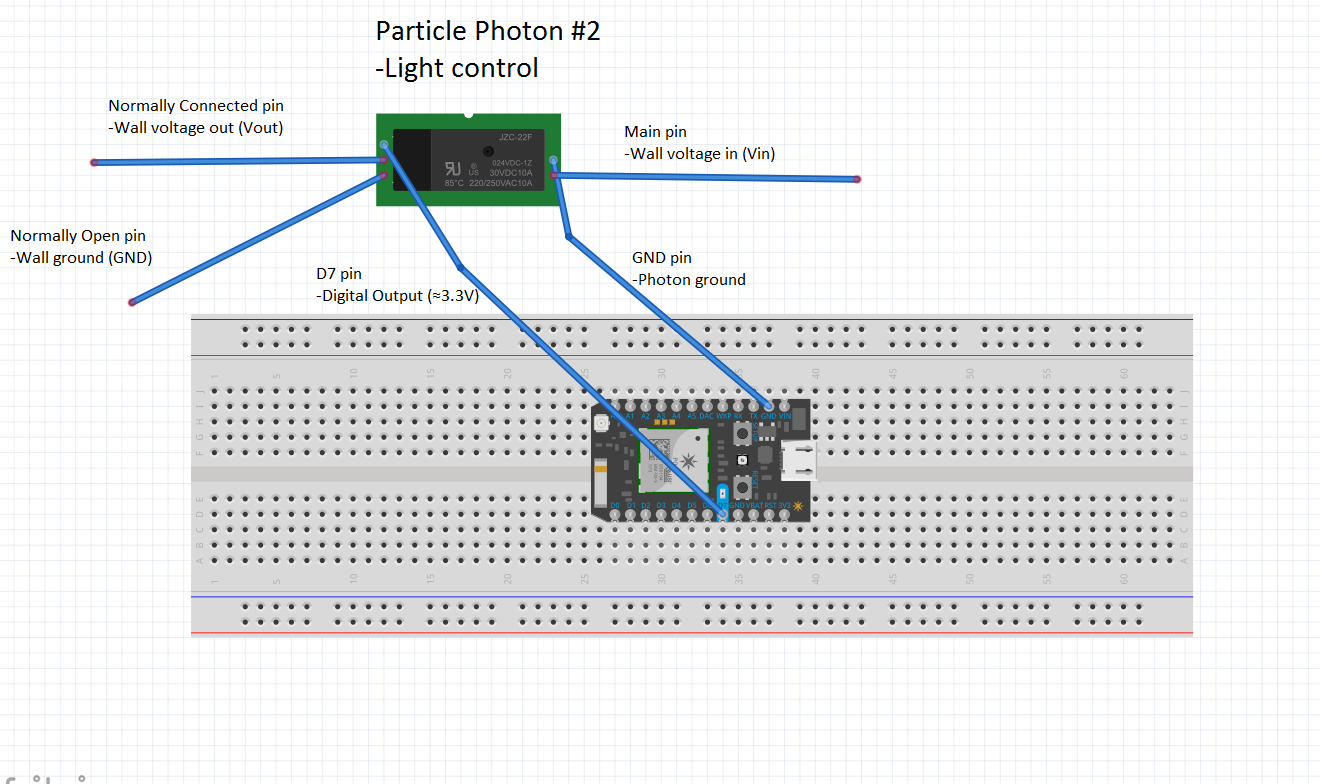
Photon 2 is a relatively easier set up. You can either install it on the wall below the wall switch that it is wired into, or simply leave it on a table. Either way make sure that a wall socket is within distance to provide power to the photon via USB cable.
Steps for replication
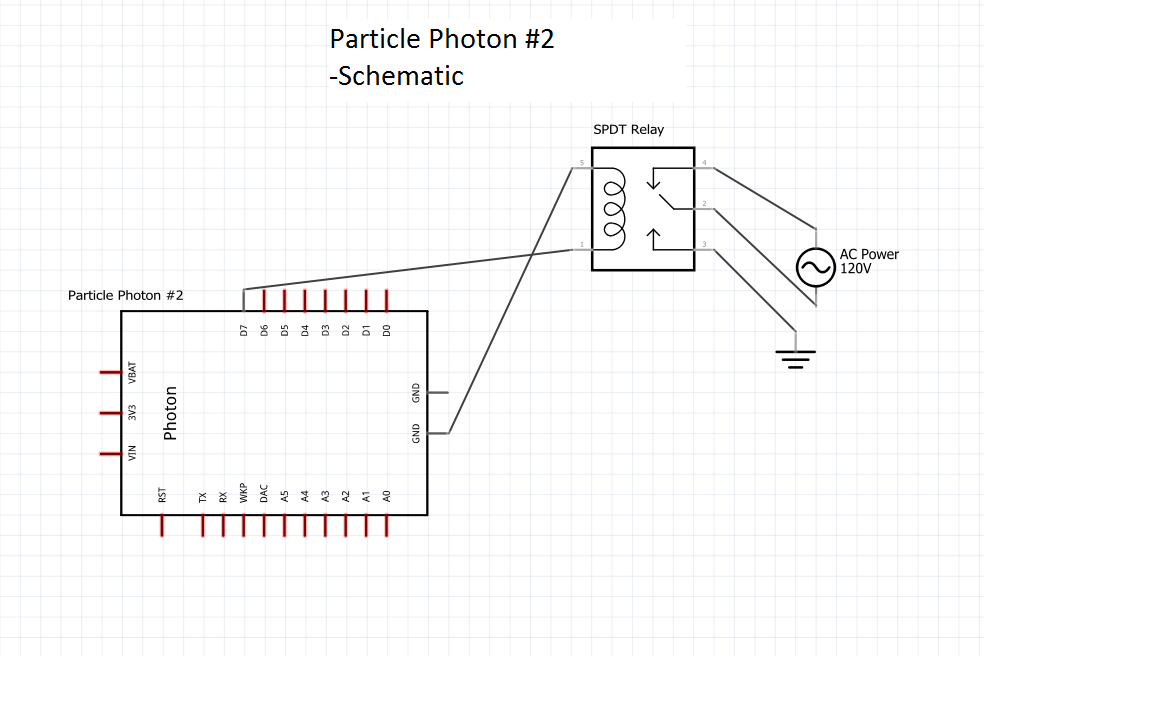
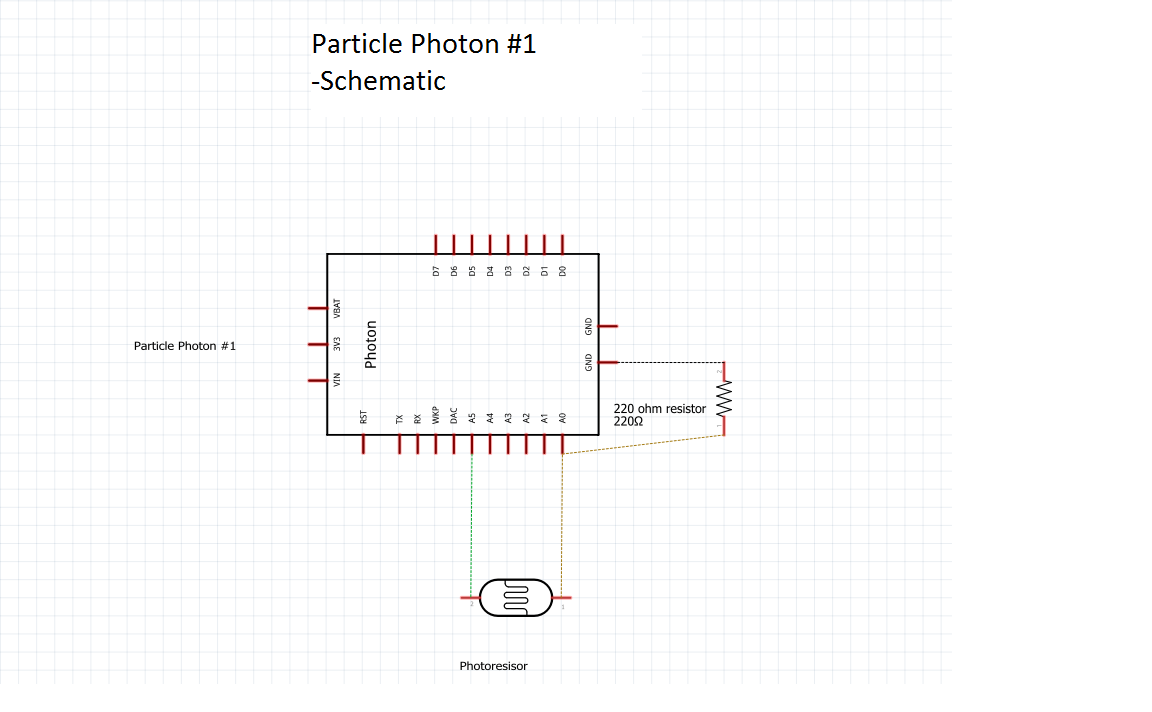
Step 1: Build both circuits as seen in the schematics section of this project. Do not worry about wiring photon 2 into the wall just yet.
Step 2: Open IFTTT and create a call function to see if your lights are on such as the one in the schematics section. Also create an IFTTT notification that is subscribed to the event that your light are off (Located in the schematics section.)
Step 3: Claim photon 1 and plug it into your computer. Then open up particle IDE and flash the first set of code to your photon.
Step 4: If you wish to monitor the code using ThingSpeak such as we did, you will have to edit the code below where it says "R039SVKNF07FZEBQ" to your own photon 1's access token (This can be found by clicking the gear icon on the lower left corner of the IDE.)
Particle.publish("thingSpeakWrite_A0", "{ \"1\": \"" + String(value) + "\", \"k\": \"R039SVKNF07FZEBQ\" }", 60, PRIVATE);
Then open up ThingSpeak, make a new channel, and find your API Write Key under "API Keys." Then open IoT Debugger, click particle, and insert the API Write Key in for the access token.
Step 5: Claim photon 2 and plug it into your computer. Then flash the second set of code.
Step 6: Tape photon 1 and the battery back near the light you wish to monitor. Make sure that all components are firmly attached to the breadboard. Then wire photon 2's circuit into the switch's circuit using the diagrams under the schematics section. This is where you may want to upgrade your jumper wires to something thicker in order to avoid overheating the wires.
Step 7: Send a a message to the IFTTT number given to you and enjoy!
Particle Photon #2
Note: The relay is rated at a 5V minimum to activate the switch from NC to NO, though we used port D7 that is rated at 3.3V. This still worked for us, but if you are having issues getting the relay to switch try running an external battery pack across the relay coil.

Light Check IFTTT


Comments