Go find a buddy who also has a Particle device.
Each of you will pick a unique event name
(make it weird so that no one else will have it)
(no more that 63 ASCII characters, and no spaces)
In the following code, replace "your_unique_event_name" with your chosen name.
Replace "buddy_unique_event_name" with your buddy's chosen name.
Have your buddy do the same on his or her IDE.
Then, each of you should flash the code to your device.
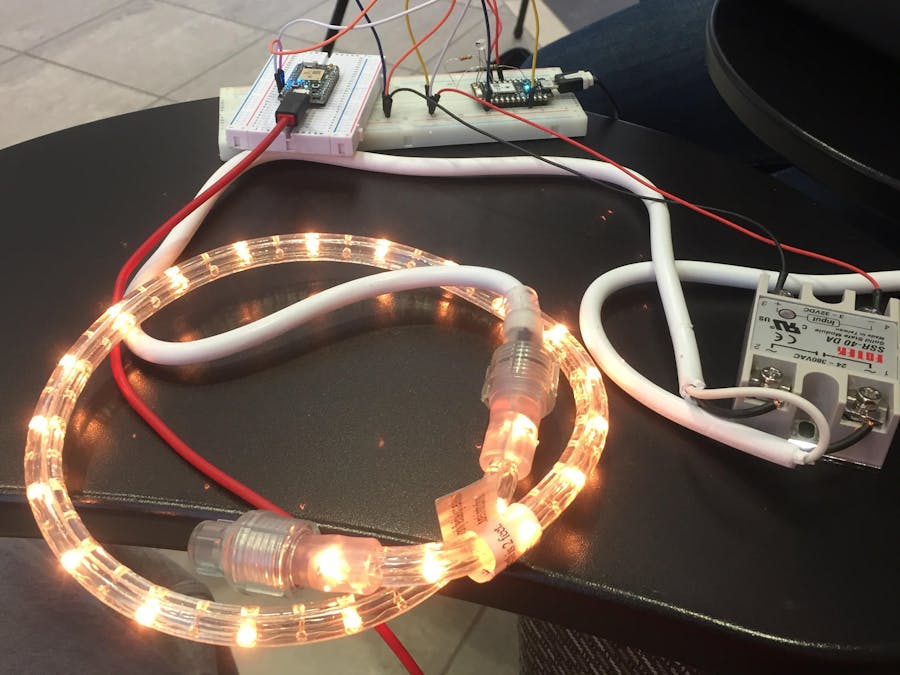
Breaking the beam on one device will turn on the D7 LED on the second device.
But how does this magic work? Through the miracle of publish and subscribe.
We are going to Particle.publish a public event to the cloud.
That means that everyone can see you event and anyone can subscribe to it.
You and your buddy will both publish an event, and listen for each others events.
------------------------------------------*/
// Timer end.
Timer timer3(15000, updateThingspeak);
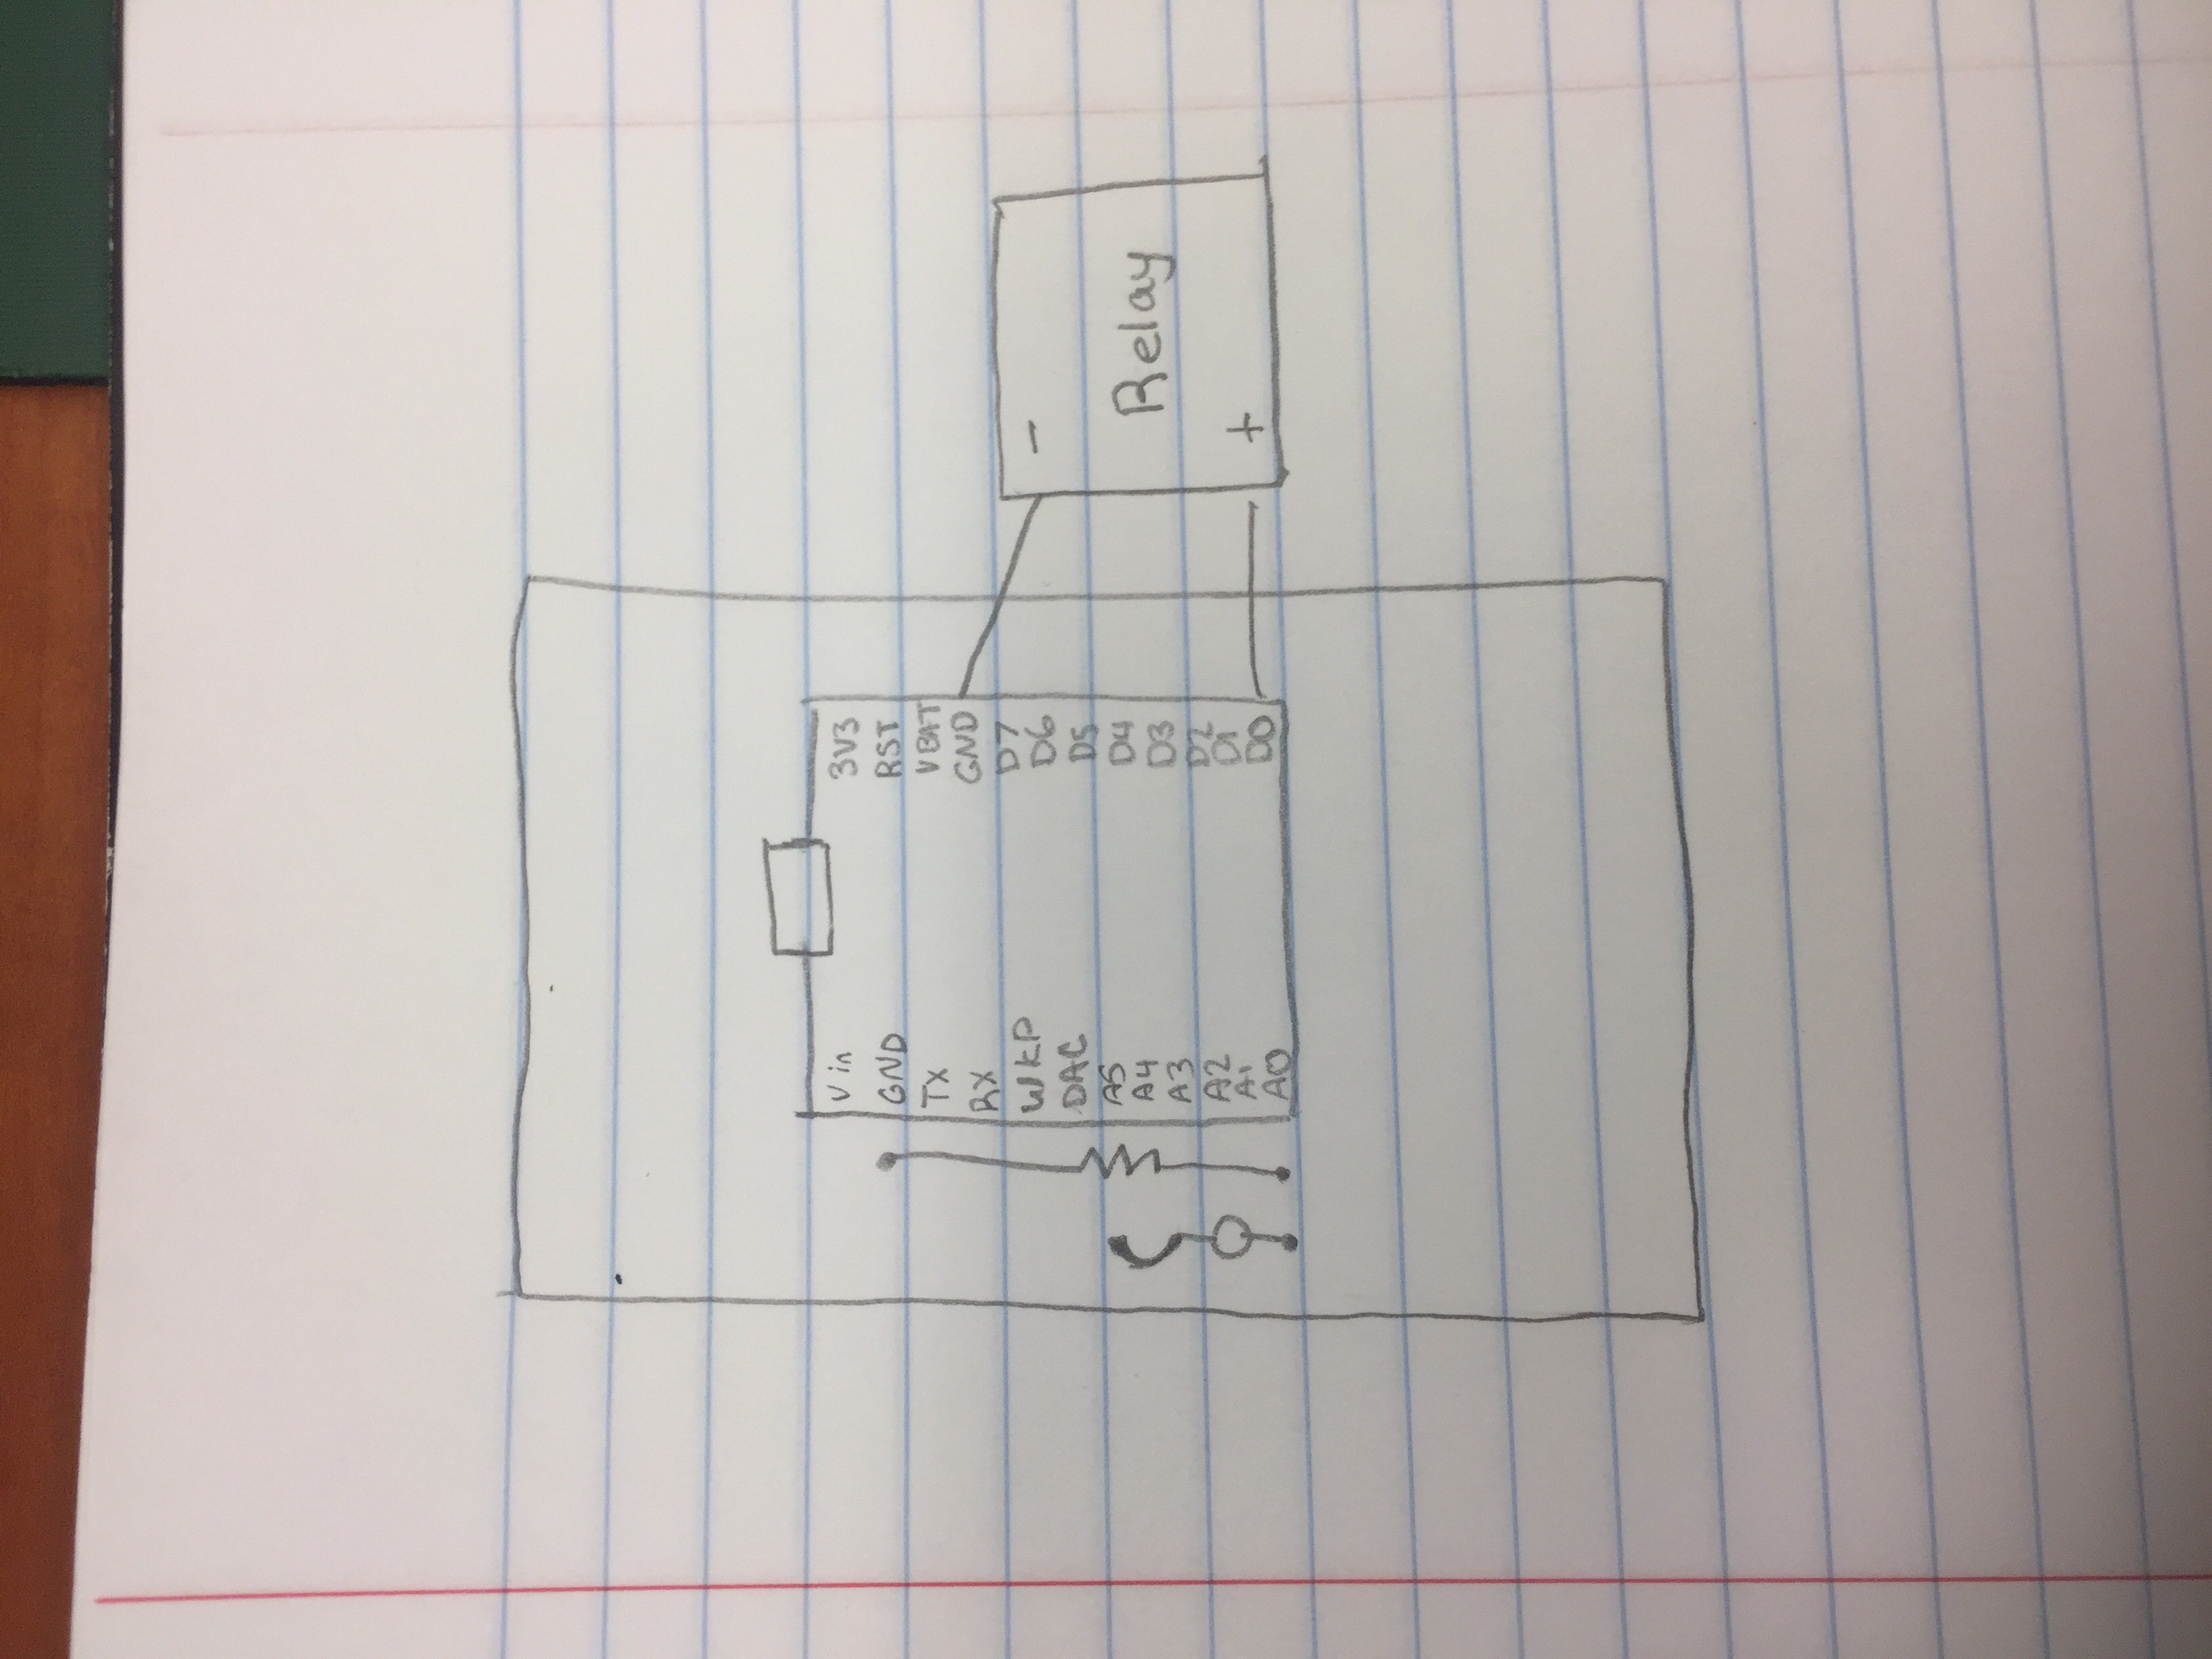
int led = D6;
int boardLed = D0;
int photoresistor = A0;
int power = A5;
int intactValue;
int brokenValue;
int beamThreshold;
int lamp_on;
bool beamBroken = false;
const String key = "X33SGKJ0JD4PL6K0"; //thingspeak write key
// We start with the setup function.
void setup() {
Serial.begin(115200);
//timer.start(); //initialize timer
Particle.variable("ONLIGHT2", &lamp_on, INT);
// Subscribe to the integration response event
Particle.subscribe("ONLIGHT1", myHandler);
// This part is mostly the same:
pinMode(led,OUTPUT); // Our LED pin is output (lighting up the LED)
pinMode(boardLed,OUTPUT); // Our on-board LED is output as well
pinMode(photoresistor,INPUT); // Our photoresistor pin is input (reading the photoresistor)
pinMode(power,OUTPUT); // The pin powering the photoresistor is output (sending out consistent power)
// Here we are going to subscribe to your buddy's event using Particle.subscribe
Particle.subscribe("ONLIGHT1", myHandler);
// Subscribe will listen for the event buddy_unique_event_name and, when it finds it, will run the function myHandler()
// (Remember to replace buddy_unique_event_name with your buddy's actual unique event name that they have in their firmware.)
// myHandler() is declared later in this app.
// Now for the myHandler function, which is called when the cloud tells us that our buddy's event is published.
// Next, write the power of the photoresistor to be the maximum possible, which is 4095 in analog.
analogWrite(power,4095);
// Since everyone sets up their leds differently, we are also going to start by calibrating our photoresistor.
// This one is going to require some input from the user!
// Calibrate:
// First, the D7 LED will go on to tell you to put your hand in front of the beam.
digitalWrite(boardLed,HIGH);
delay(2000);
// Then, the D7 LED will go off and the LED will turn on.
digitalWrite(boardLed,LOW);
digitalWrite(led,HIGH);
delay(500);
// Now we'll take some readings...
int off_1 = analogRead(photoresistor); // read photoresistor
delay(200); // wait 200 milliseconds
int off_2 = analogRead(photoresistor); // read photoresistor
delay(1000); // wait 1 second
// Now flash to let us know that you've taken the readings...
digitalWrite(boardLed,HIGH);
delay(100);
digitalWrite(boardLed,LOW);
delay(100);
digitalWrite(boardLed,HIGH);
delay(100);
digitalWrite(boardLed,LOW);
delay(100);
// Now the D7 LED will go on to tell you to remove your hand...
digitalWrite(boardLed,HIGH);
delay(2000);
// The D7 LED will turn off...
digitalWrite(boardLed,LOW);
// ...And we will take two more readings.
int on_1 = analogRead(photoresistor); // read photoresistor
delay(200); // wait 200 milliseconds
int on_2 = analogRead(photoresistor); // read photoresistor
delay(300); // wait 300 milliseconds
// Now flash the D7 LED on and off three times to let us know that we're ready to go!
digitalWrite(boardLed,HIGH);
delay(100);
digitalWrite(boardLed,LOW);
delay(100);
digitalWrite(boardLed,HIGH);
delay(100);
digitalWrite(boardLed,LOW);
delay(100);
digitalWrite(boardLed,HIGH);
delay(100);
digitalWrite(boardLed,LOW);
intactValue = (on_1+on_2)/2;
brokenValue = (off_1+off_2)/2;
beamThreshold = (intactValue+brokenValue)/2;
}
void loop() {
//The piece of code below is what is being read off of the photoresistor in the circuit.
int analog_value = analogRead(A0);
// This loop sends a publish when the beam is broken.
if (analogRead(photoresistor)>beamThreshold) {
if (beamBroken==true) {
Particle.publish("ONLIGHT2","the light is off");
// publish this public event
// rename your_unique_event_name with your actual unique event name. No spaces, 63 ASCII characters.
// give your event name to your buddy and have them put it in their app.
// Set the flag to reflect the current status of the beam.
beamBroken=false;
}
}
else {
if (beamBroken==false) {
// Same deal as before...
Particle.publish("ONLIGHT2","the light is on");
delay(10000);
beamBroken=true;
}
}
stuff();
}
// Now for the myHandler function, which is called when the cloud tells us that our buddy's event is published.
void myHandler(const char *event, const char *data)
{
/* Particle.subscribe handlers are void functions, which means they don't return anything.
They take two variables-- the name of your event, and any data that goes along with your event.
In this case, the event will be "buddy_unique_event_name" and the data will be "intact" or "broken"
Since the input here is a char, we can't do
data=="intact"
or
data=="broken"
chars just don't play that way. Instead we're going to strcmp(), which compares two chars.
If they are the same, strcmp will return 0.
*/
if (strcmp(data,"the light is off")==0) {
// if your buddy's beam is intact, then turn your board LED off
digitalWrite(boardLed,LOW);
lamp_on = 1;
}
else if (strcmp(data,"the light is on")==0) {
// if your buddy's beam is broken, turn your board LED on
digitalWrite(boardLed,HIGH);
lamp_on = 0;
}
else {
// if the data is something else, don't do anything.
// Really the data shouldn't be anything but those two listed above.
}
}
void stuff() {
// Get some data
String data = String(10);
// Trigger the integration
Particle.publish("ONLIGHT2", data);
// Wait 60 seconds
delay(10000);
}
void myHandlera(const char *event, const char *data) {
// Handle the integration response
}
bool updateThingspeak()
{
//delay (2000);
int count;
count++;
Serial.print("Updating Thingspeak:");
Serial.print(count);
int rssival = WiFi.RSSI();
//sprintf(publishString,"%d",rssival);
//bool success = Particle.publish("RSSI",publishString);
//sprintf(publishString, "%1.4f", checkbattery());
bool success = Particle.publish("thingSpeakWrite_All", +
"{ \"1\": \"" + String(lamp_on) + "\"," +
"\"k\": \"" + key + "\" }", 60);
return success; //if sent, then turn of the send flag, otherwise let it try again.
}
//X33SGKJ0JD4PL6K0


_3u05Tpwasz.png?auto=compress%2Cformat&w=40&h=40&fit=fillmax&bg=fff&dpr=2)
Comments