


Hardware Set up: Hacking the 3DS.
Hi!
So you're probably wondering how to set this up? Don't worry. We'll hold your hand.
Step 1: Get the materials you'll need.
1x Friend with soldering skills
Small roll of standard hobbyist solder - Thinner = better.
1x Soldering iron - get a fine tip!
Small roll of copper tape (nobody's perfect!)
30 Gauge Wire (stranded, not solid).
18 Gauge Wire (solid... for breadboarding... if you have other wire you like to breadboard with that works too.)
1x Breadboard
1x Arduino (Uno or Mega or similar recommended. We did ours with a Mega 2560)
1x Phillips Microscrewdriver.
1x Nintendo 3DS. -- you can use which ever DS you want, but we tore down the standard 3DS.
1x Dremel (or similar cutting tool)
Step 2: Time to void the warranty!
Disclaimer: some Images taken from http://www.ifixit.com/Teardown/Nintendo+3DS+Teardown/5029
1.Get your Phillips Microscrewdriver in action and start taking out all of the screws on the back side of the DS.
http://d3nevzfk7ii3be.cloudfront.net/igi/l31DElbHEobKBQpD.hugethen you'll end up with...
http://d3nevzfk7ii3be.cloudfront.net/igi/E2xSKjqUVqUOLaDY.huge
2. Remove the battery.
3. Remove all of the black screws in the back of the 3DS that you can see. NOTE: These screws strip VERY EASILY. Apply good pressure and turn slowly to make sure you don't strip a screw.
(if you strip a screw, you'll need to use a drill very carefully to destroy the screw. I had to do this, and used a drill press to do so)
4. Follow the instructions on this image! http://i.imgur.com/AMojc2C.jpg
5. Then do this! Don't break the L and R button ribbon connectors when you open it up! http://i.imgur.com/qQUJDxy.jpg
6. Alright, woohoo! What you really want is where all of the button contacts are... Please see this image on where you'll want to solder your 30 gauge stranded wire: http://i.imgur.com/pMZYkvz.jpg
7. You have two choices. Both have their positives and negatives
7a.If you want to have external power (I have removed my 3DS battery and run my setup off of an external supply), you'll need to solder wires here too: http://i.imgur.com/IzSG3Qh.jpg . Positives: No worry about battery problems, easy solder. Negatives: You'll now need to find a way to supply 3.7V and up to 800mA to the 3DS.
7b. If you want to use your battery, you'll need to solder an additional wire which is the 3DS Ground. Positives: Looks nicer at the end of the day, and your system is more portable. Negatives: I cant really recommend soldering onto a lithium ion battery contact (safety reasons). I did it and it works fine, but don't screw up. You can find another ground point on the 3DS but I was too lazy to find such a point.
8. Get your Dremel / similar cutting tool. You'll need to cut small holes in the plastic of the 3DS case to route your new wires out.
9. Screw everything back together!
Step 3: Routing the wires to the Arduino>1. (Optional) The 30 gauge stranded wire sucks to breadboard with. I soldered a solid core wire on all of my contact wires so I could plug it into the breadboard much easier.
2. Test that it works! Power up the 3DS and touch one of the button contact wires to the ground (of your battery). You should see the direction move!
3. Plug the wires into the Arduino. If you want to use our code to run everything, then you will need match the directions that we chose with the same Arduino pin numbers. Really, it doesnt matter. Just make sure you use your microcontroller's Digital pins and that it's consistent with the Arduino code. We had:
int LeftPin = 24;
int RightPin = 26;
int UpPin = 30;
int DownPin =28 ;
int A_Pin= 40;
int B_Pin= 38;
int X_Pin = 42;
int Y_Pin = 44;
int HomePin= 32;
int SelectPin=36 ;
int StartPin= 34;
4. Connect the Arduino's GND pin to the Ground from the 3DS
5. Make sure that the power source you are using (whether it's a battery or an external source) also shares the same ground as the 3DS and the Arduino.
6. Ta-da. It should be done and look like this:
http://i.imgur.com/sM8Vt48.jpgv
Arduino Code to Control the DS from serial commands
Photos taken during build
Hacking the 3DS: Photos
Software Setup Instructions
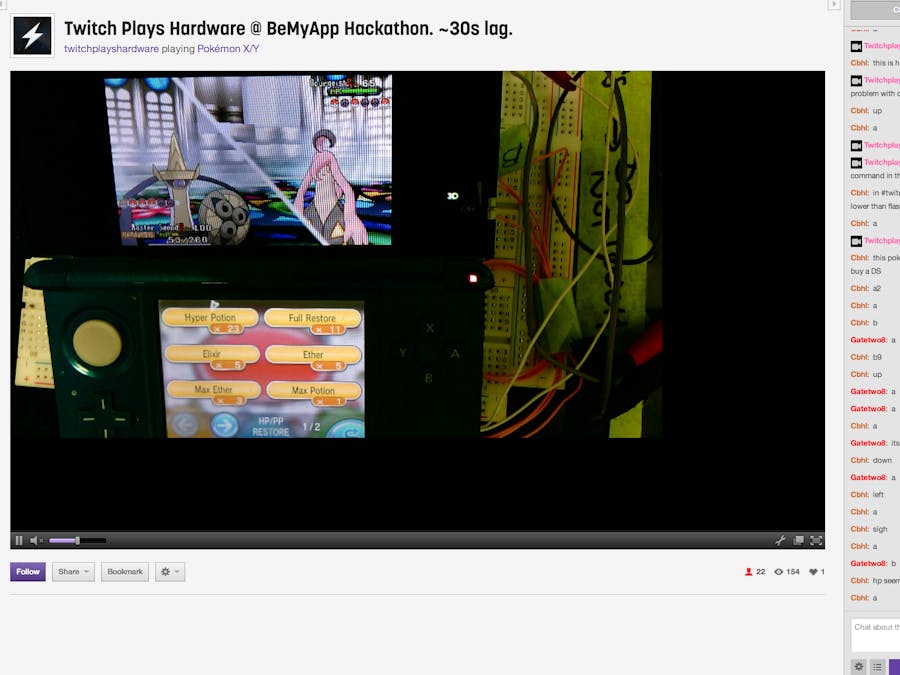
Twitch Plays Hardware
Follow the guide on the github repo: https://github.com/mrandrewandrade/TwitchPlaysHardware
v0.0 Built at Hack Into The BemyApp FactoryWon best use of Arduino platform :)
For the hackathon we created a method to control a Nintendo3Ds via Internet Relay Chat. The code was written Hackathon Style and was a fork of clone of the program Twitch channel "Twitch Plays Pokemon" uses and abstracts it in such a way we can control hardware.
This is both an opensourced hardware and software hackathon and we are providing everything you need to get started. A big part of learning is trying to figure things out and understand how they work. If you are having trouble, try the twitch plays pokemon project using an emulator. Once you can play Pokemon through the emulator, then you can move on to using a DS.
Please see the hackster.io project page for full documentation including how to hack that 3DS and set up hardware! ###
Software Documentation
The software implementation is a fork of TwitchPlaysPokemon clone and provides implementation for both use for windows applications like an emulator, as well as to write to arduino via serial. The current implementation uses arduino, but similar methods can be used for other hardware devices.
The currently hardware and network stack is the following:
Nintendo 3DS <--Digital Write-- Arduino <--SerialWrite-- Python on PC <--IRC-- twitch.tv viewers
The Nintendo 3DS is streamed via webcam to the computer running Python.
Key notes, please read:
- The python code is NOT written by me. I only added the serial code implementation.
- The python script and the Arduino can not connect to the arduino at the same time. Please ensure you close the python script before trying to use the ide.
- COM port must be manually configured in the python code. You can use the arduino IDE to find the correct COM port, and modify the python script to connect to the correct port.
Built for Windows, written in Python 3 32 BITv
Prerequisites:
Please note, this uses the PyWin32 and PySerial which requires the 32 bit version of Python 3. This will not work on any operating system other than windows.
- Python 3.3.4 32 bit
- PyWin32 32 bit
- Pyserial 2.7 Windows 32 Bit
- If you have any dll related issues make sure you're using the right version!
- Install the Arduino IDE
- Create a twitch.tv account
How to use
- Install all the required prerequisites
- Follow the instruction and set up using Emulator here
- Check out this video if you are having issues. The twitch chat authentication can be found here
- Configure the hardware as outlined in the Hackster.io page
- Download the arduino located in /ArduinoCode/ and load onto arduino using IDE. Please ensure you set the correct board, serial port and that the pins are the correct number
- Confirm that you are write to the Arduino via the serial terminal on the Arduino IDE. Arduino should return the command you send.
- Ensure you close the arduino IDE once you upload the code. Python can not talk to the arduino if the port is busy (being used by the arduino IDE)
- Inside /TwitchPythonBot/ run Launch.py using your favourite python interpreter. Follow the same steps you followed when using the Emulator here except set Notepad as the program instead of VisualGameBoyAdvance
- For the sake of flexibility, the file in /game/ will open and is set at notepad as default.
- If you set things up right, the Python script should sniff the steam and send the commands to Arduino
To get people to play via stream just type the commands in the chat:
A:          a
B:          b
X:          x
Y:          y
Up:         up
Right:      right
Down:       down
Left:       left
My Channel
- My channel will be available here
- At the hackathon there was about a 30 second lag at the hackathon.
- Derek, my partner at the hackathon owns the DS and possibly will post in the future, stay tuned.


Comments