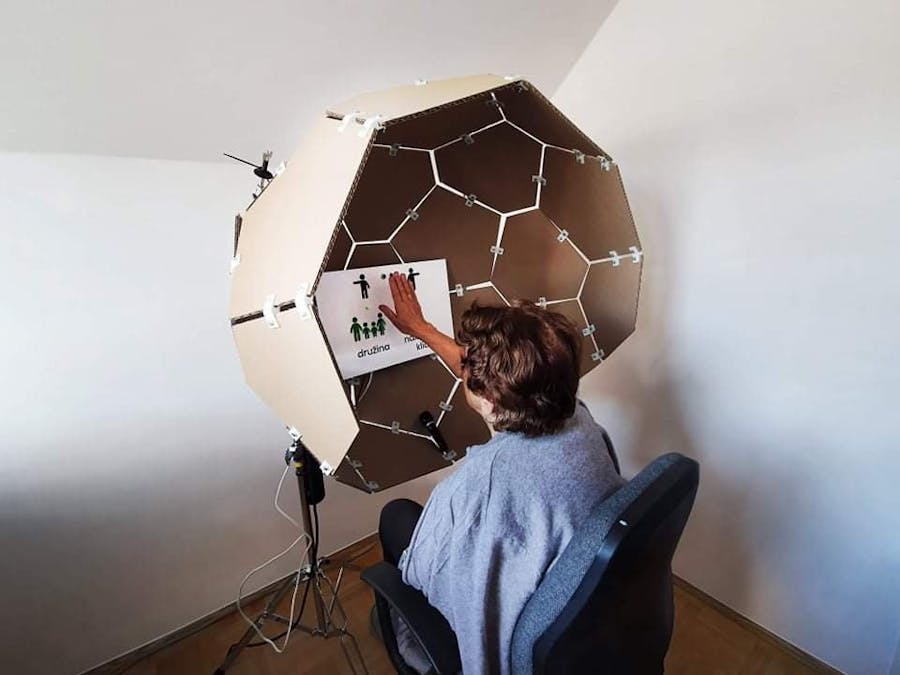
IntroductionDuring COVID-19 pandemic our team saw an oportunityy to help elderly living in retirement homes. They often come across loneliness and depresion as they do not have someone to talk to. We wanted to address that problem by giving them a change to connect to each other living in different homes. We designed a device that connects them so they can chat. We hope that we can improve their mental health. We also wanted to assure that the voice call is as private as it can be, so we also designed a construction around in the shape of a round booth, cupole.
DescriptionThe device is a combination of the box where all of the electronics are stored and the construction around it. It can be disassembled so you can use it for different purpose. We wanted to make sure that the device is modular, made of smaller modules, units. We will also attach the assembley instructions, as the cupole should be put together as instructed.
How to use the deviceThe device should be used fairly simple as we did not want to complicate things for older people. When the caller sits before the booth he should identify himself (for example: NFC tags, PIN code,...). For this step, additional equipment is needed (our prototype do not have this function, as we only wanted to test the usage). Then the user will have to make a choice. He will have two options: to call a family or to call a random person. For this he will have to raise his hand and swipe left or right (ultrasonic sensor will detect the hand movement). Then he waits to connect to them. When they decide to end the voice call, they just simply stand up and the sensor will detect that there is nobody anymore and will end the call.
Construction assembley instructionAs we stated above, the steps of the assemebley are important. Also the position of each shape in the construction is predetermined. We attach the blueprint below. We also attach.dxf files of the pentagon and hexagon shapes used in the construction. They can be cut on laser or any other technique. For the prototype we used 6 mm thick cardboard.
First layer (#2 - #7) of the shell is fixed to the load carrying plate (#1) as is shown on the picture below:
Second layer (#8 - #16) starts on top of the plate #2 as shown on the picture below. One thing to be careful is that some plates (#11 - #14) are cut differently. Those edges should be positioned as shown on the picture, so that in the end it will have only one, nice, straigth egde. Edges that are cut are shown in red!
Second layer of the shell
Third layer (#17 - #22) starts on top of the plates #14 and #15 as shown on the picture below. Once again you should be careful about the plates that are cut differently. In this case, all of the plates are cut differently (#17 - #22). Those edges should be positioned as shown on the picture, so that in the end it will once again have only one, nice, straigth egde. Edges that are cut are shown in red!
Connection between plates is optional and can be solved using different methods. We used 3D printed connectors and fixed them to the plates using crews and nuts. Picture of the used connector is shown and also the.stl file of the model is attached. We used M5x20 screws with hex head. We connected only the longer edges on the hexagon shaped plates because the angle between shorter edges is different. We used only one connector per edge but to make it more durable it can be strenghend with more connectors.
Connectors that connect longer edges of the plates
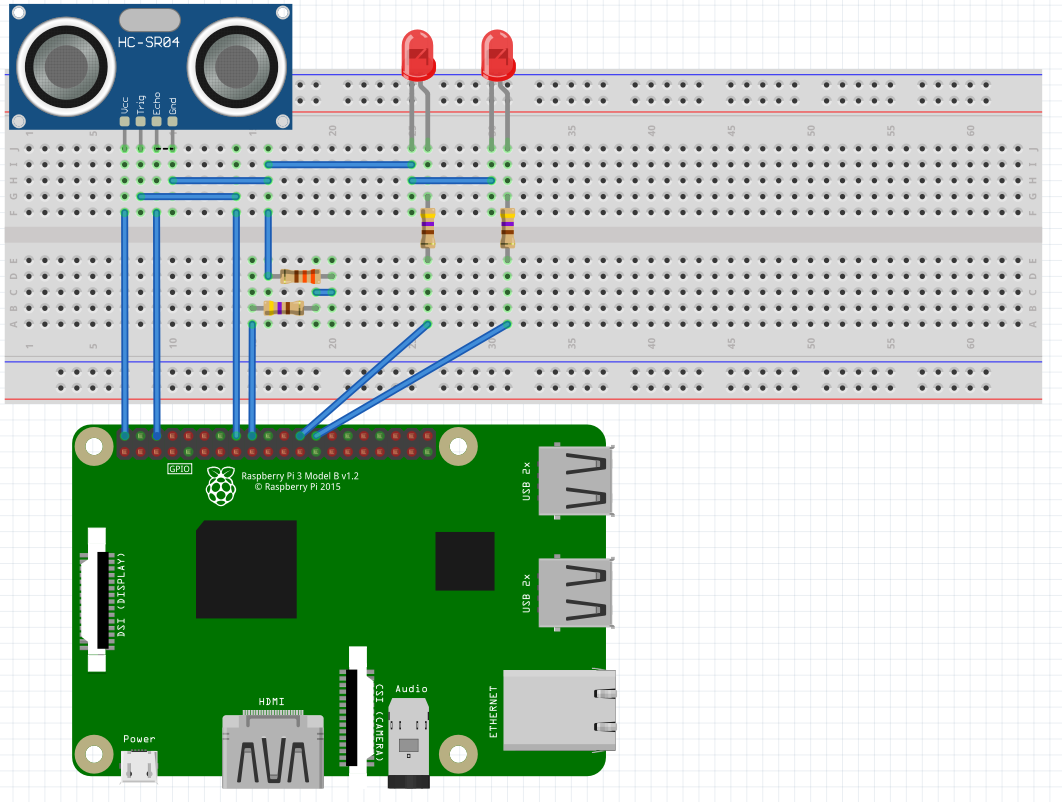
For this device we used ultrasonic sensor hc-sr04 with voltage divider because RaspberryPi uses 3.3v logic and sensor works on 5v logic and LED to indicate call state. In future we will replace ultrasonic sensor with gesture sensor for example apds-9960. For detailed wiring check the wiring diagram below.
SoftwareFirst step is to flash sd-card with Rasbian os and connect it to network, for our example to work both end of the call should be in same network.
Next step is to upload and modified code to work for your network, change raspberrypi and remote ip.
Final setup and runConnect microphone and speakers to RaspberryPi, run code with:
python3 talk_to_me.py
For other part we used linux pc where we run:
bash remote_part.sh
Now just make a gesture for call and you can talk to me :)


Comments