

Hardware components | ||||||
 |
| × | 1 | |||
| × | 1 | ||||
| × | 1 | ||||
| × | 1 | ||||
| × | 1 | ||||
| × | 1 | ||||
| × | 1 | ||||
 |
| × | 1 | |||
| × | 1 | ||||
| × | 1 | ||||
| × | 1 | ||||
Software apps and online services | ||||||
| ||||||
Hand tools and fabrication machines | ||||||
 |
| |||||
Key goals:
- Have a robotic skull that is able to move its ‘eye’
- Have it recognize / record faces and assign them to people
- Be able to recognize speech and talk back
Most of you reading this have probably seen Terminator 1 + 2. If you haven’t, stop reading this right now and go watch them.
Welcome back.
I’ve loved these films for as long as I can remember, there was even the summer of 2001 where I think I watched Terminator 2 almost every day throughout the holidays.
I always thought how cool it would be to make something like a Terminator myself, but never really had the skill or the tools available to do it – now, fortunately, in today’s world there is much more available to the consumer and I’m slightly smarter than I was when I was 11. After looking over some of the available tech and working on other projects to get my knowledge up I finally got to work on the Raspbinator in 2015, a few more projects and some procrastination later and its finally here; in its first incarnation.
Please see my prior post for details on the earlier phase of the project.
My CPU is a neural net processor.Here are the items I’ve used for the project:
I insist.I started work on this a while back so I’m using Raspbian Jessie, but the same stuff below will probably work with Stretch – so get on PiBakery and use this to start if you want to try and replicate this.
The main delay for this project was getting the talking / learning ability of it working, I’ve tried working on a chatbot before but it was difficult and didn’t work… too well. The past couple of months or so though I’ve been working hard on getting a decent-ish chatbot working that can receive inputs from someone and say things back.
I finally got the logic of the system down and it goes something like this loop (simplified):
- Bot says initial “Hello”.
- Human responds.
- Bot stores the response to “Hello” and searches its database for anything its said before that closely matches what the human input was, then brings up a result from a prior interaction.
- Loop back to 2.
By storing human responses to the bots Mongo database and assigning them to things the bot has previously said, then comparing inputs from the person to those items to find appropriate responses, you can get some reasonably decent responses from the bot.
As an example; if the bot says “whats the weather like” and I type in “its raining outside” it will store that response and tie it to that input. Now if someone else comes along and types “hows the weather”, it will search its database for close matches and find the previous response “whats the weather like”, at which point it will search for responses to that and find my response “its raining outside”. So while its not really ‘thinking’ about its responses it does end up coming back with some reasonable replies.
Now what happens if there are no prior responses for the input? Before the bot responds it stores the input its received into the database, its also splitting up every input and storing all the individual words – so when it can’t find a previous reply to your input it will search the database with zero accuracy, essentially picking a reply at random – sometimes repeating what you just said.
If it has more than 20 words stored in its database however, it will generate a random sentence from those words and reply with that. Now you may be thinking that this causes the bot to talk a lot of nonsense – you’d be right, but what happens is at first it will just repeat what you are saying as you talk to it. But the more you input in and reply the more it learns and the random sentences it generates can sometimes actually make some degree of sense; and when you reply to this it then has a reference point for when it receives an input similar to what it just said.
Here’s another example:
If I say to the bot: “I like cheese” and it has nothing in its database for this input and enough words to generate a random sentence, as essentially a guess it could come back with: “Hello television like usually”. Which of course doesn’t make sense, but if I then respond with “Yes I like television too” it stores that reply. Now, say, someone else comes along and types in “I usually watch television” it will run that through the database and find its similar to what it said before (“Hello television like usually”) and find my response (“Yes I like television too”), giving the illusion of a real response.
It’s essentially learning from the beginning, it knows nothing so it will try its best to use prior experience and as a last resort, guess – until it learns more so it doesn’t have to guess any more.
So with this in place and giving somewhat decent and consistent results I went ahead with trying to hook this up into an STT (Speech to Text) and a TTS (Text to Speech) system so that I could actually talk, rather than type and hear, rather than read the bots responses.
First off I needed to get the head to be able to talk and listen, previously I had toyed with using Jasper with PocketSphinx as the speech to text engine. This turned out to be less accurate than I’d hoped for an offline solution – so I switched it up to wit.ai and this turned out to be far better in testing.
I then realised that using Jasper was probably a bit overkill and I could hook into the wit.ai API without using Jasper at all. At this point the bot being able to listen and talk was working.
Also as a note some pre-requisites for running the chatbot:
Pymongo (will need to use the version 3.4.0)
Next up is sorting out the ‘eye’ of the Raspbinator, for this I’m using the 16 Channel 12-bit PWM HAT from Adafruit as listed in the components above. See Adafruits handy guide for setting up servos and the HAT itself.
Once I had the hang of getting the servos to move about I wanted it to do a ‘search pattern’ whereby the pan and tilt module would move the camera in a down, left, up right kind of pattern so it can basically search all around – like an eyeball looking around everywhere it can.
Thanks to the simple test given on Adafruits library for using the HAT I was able to learn and import/change this code to suit my needs.
After some testing its time to sort out facial recognition with OpenCV.
The first tutorial I used was this to install opencv and this to get some basic facial recognition – with these two I was able to get some basic recognition of faces, as seen in the tutorial opencv can be used to identify the existence of a human face.
Further from this I wanted to expand the functionality to recognise people from a set of faces, this is where I bring in this tutorial to be able to use a trainer to find the faces of a set and assign them to id’s, so that I could have my bot see someone, identify their face and then compare this against a pre-existing set so that it can then know who they are.
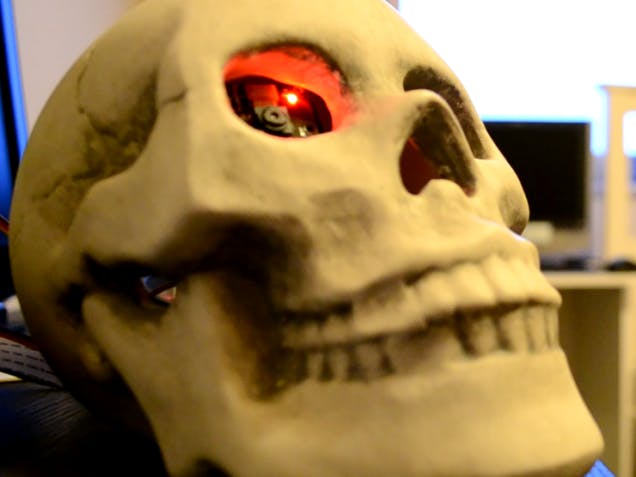
At this point it was all just a case of putting the above 3 functions together and then chucking it all into a neat skull-like package, as seen in the photo above. I used a skull-shaped tealight holder, its not listed above as I got it from some random shop and I cannot find it from a quick Googling about.
Here’s a video showing the skull and the project in action
It works – for the most part, the video shows a number of times it actually responded well and recognised what it was meant too; but there were some issues with it, as seen in the outtakes near the end of the video.
It will pick up all 3 of the faces it has stored, I’ve tested with my own face and photos of Sarah and John from T2 and 7/10 times it will identify the face correctly, as seen in the video. Faces it doesn’t know, however…
I found that the bot will often return a high confidence result even if shown a totally new face, resulting in it identifying any new face as one it already knows – rather than returning as an unknown face. For instance one time, using a photo of Chris Pine on it; it thought it was me.
The voice accuracy of wit.ai was also very impressive, most of the time getting the words I had said to it correct – resulting in some very eerie moments when the bot would return something like a genuine response to my speech inputs – as you can see in the video above at 1:50 minutes in.
Hasta la vista, baby.So that is Phase I of the project; I’m happy with how it works, despite the chatbot implementation being a bit random at times and I’m very happy with wit.ai – its very accurate and fast as well as being a piece of cake to use; the obvious caveat being the skull needs to be online at all times.
Things to improve/add for Phase II:
- Clean up the code a bit (any suggestions welcome)
- Get a better fake skull that can fit more inside
- Make the skull respond with less random responses when it has returned nothing from the database; by adding in a smarter function to construct sentences somehow – I’ll be doing R&D on this asap
- Add functionality for the skull to identify new faces and then ask them for their names and append a photo of them to the training folder, so they can be identified in the future
I invite you to try the code yourself and improve upon it, build your own and see what you can get it to do. I’m certainly excited to expand upon this project and really get it doing some cool things.
Let me know what you create and what you think of my project, its taken a long while to finally get it working – even if it is rather basic and error prone at this point.
And so the unknown future rolls toward us. I face it, for the first time, with a sense of hope.
Because if a machine, a Raspberry Pi, can learn the value of human life…
Maybe we can too.


Comments