// -----------------------------------------
// Publish and Console with IR Sensors
// -----------------------------------------
// This app will publish an event when your mailbox is opened.
// It will publish a different event when the mailbox is closed.
// Start by declaring which pins everything is plugged into.
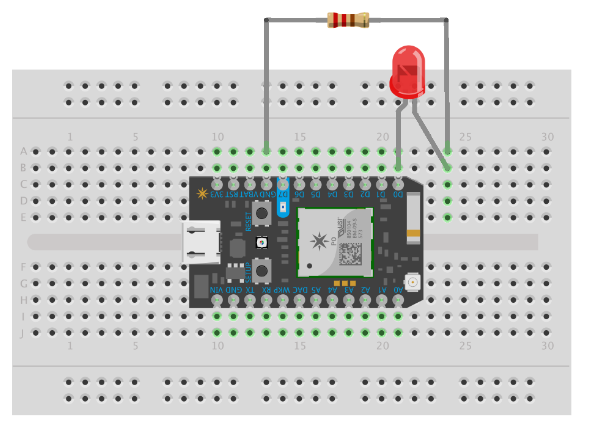
int boardLed = D7; // This is the LED that is already on your device.
// On the Core, it's the LED in the upper right hand corner.
// On the Photon, it's next to the D7 pin.
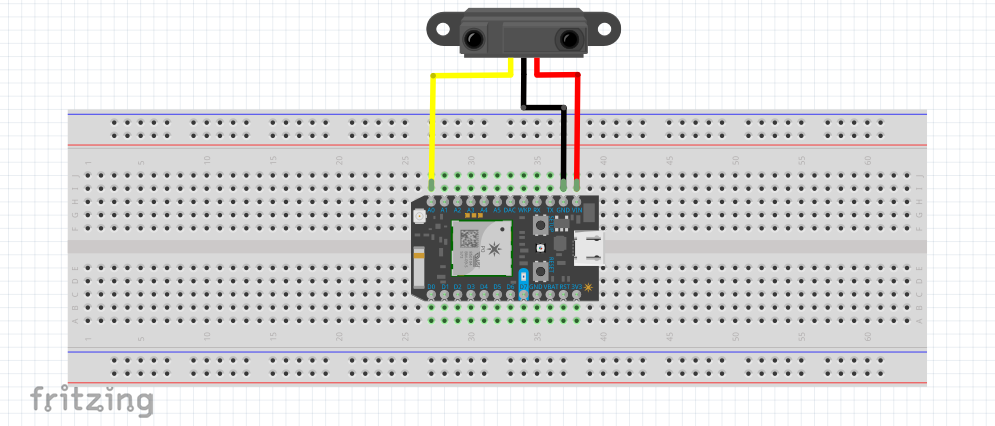
int IRSensor = A0; // This is where your IR Sensor is plugged in. The other side goes to Vin due to voltage requirements (at least 4.5 V)
// The following values get set up when your device boots up and calibrates:
int intactValue; // This is the average value that the IR Sensor reads when the mailbox is closed.
int brokenValue; // This is the average value that the IR Sensor reads when the mailbox is opened.
int beamThreshold; // This is a value halfway between the mailbox opened and the mailbox closed.
bool beamBroken = false; // This flag will be used to mark if we have a new status or not. It will be used in the loop.
char resultstr[64];
// Start with the setup function.
void setup() {
pinMode(boardLed,OUTPUT); // The on-board LED is output.
pinMode(IRSensor,INPUT); // The IR Sensor pin is input (reading the IR Sensor).
Particle.variable("result", resultstr, STRING);
// Since everyone sets up their mailbox detection system differently, we are also going to start by calibrating our IR Sensor.
// This one is going to require some input from the user!
// First, the D7 LED will go on to tell you to open your mailbox to a position where you would consider the mailbox being opened.
digitalWrite(boardLed,HIGH);
delay(2000);
// Then, the D7 LED will go off.
digitalWrite(boardLed,LOW);
delay(500);
// Now take some readings...
int open_1 = analogRead(IRSensor); // read IR Sensor
delay(2000); // wait 2 seconds
int open_2 = analogRead(IRSensor); // read IR Sensor
delay(3000); // wait 3 seconds
int open_3 = analogRead(IRSensor); // read IR Sensor
delay(4000); // wait 4 seconds
int open_4 = analogRead(IRSensor); // read IR Sensor
delay(5000); // wait 5 seconds
int open_5 = analogRead(IRSensor); // read IR Sensor
delay(6000); // wait 6 seconds
int open_6 = analogRead(IRSensor); // read IR Sensor
delay(6000); // wait 6 seconds
int open_7 = analogRead(IRSensor); // read IR Sensor
delay(6000); // wait 6 seconds
int open_8 = analogRead(IRSensor); // read IR Sensor
delay(6000); // wait 6 seconds
// Now flash to let us know that you've taken the readings...
digitalWrite(boardLed,HIGH);
delay(100);
digitalWrite(boardLed,LOW);
delay(100);
digitalWrite(boardLed,HIGH);
delay(100);
digitalWrite(boardLed,LOW);
delay(100);
// Now the D7 LED will go on to tell you to close your mailbox...
digitalWrite(boardLed,HIGH);
delay(2000);
// The D7 LED will turn off...
digitalWrite(boardLed,LOW);
// ...And now take more readings.
int closed_1 = analogRead(IRSensor); // read IR Sensor
delay(2000); // wait 2 seconds
int closed_2 = analogRead(IRSensor); // read IR Sensor
delay(3000); // wait 3 seconds
int closed_3 = analogRead(IRSensor); // read IR Sensor
delay(4000); // wait 4 seconds
int closed_4 = analogRead(IRSensor); // read IR Sensor
delay(5000); // wait 5 seconds
int closed_5 = analogRead(IRSensor); // read IR Sensor
delay(6000); // wait 6 seconds
int closed_6 = analogRead(IRSensor); // read IR Sensor
delay(6000); // wait 6 seconds
int closed_7 = analogRead(IRSensor); // read IR Sensor
delay(6000); // wait 6 seconds
int closed_8 = analogRead(IRSensor); // read IR Sensor
delay(6000); // wait 6 seconds
// Now flash the D7 LED on and off three times to let us know that we're ready to go!
digitalWrite(boardLed,HIGH);
delay(100);
digitalWrite(boardLed,LOW);
delay(100);
digitalWrite(boardLed,HIGH);
delay(100);
digitalWrite(boardLed,LOW);
delay(100);
digitalWrite(boardLed,HIGH);
delay(100);
digitalWrite(boardLed,LOW);
// Now we average the "closed" and "open" values to get an idea of what the analog value reading will be with the mailbox closed and open.
intactValue = (open_1+open_2+open_3+open_4+open_5+open_6+open_7+open_8)/8;
brokenValue = (closed_1+closed_2+closed_3+closed_4+closed_5+closed_6+closed_7+closed_8)/8;
// Let's also calculate the value between the mailbox closed and mailbox open.
beamThreshold = (intactValue+brokenValue)/2;
}
// Now for the loop.
void loop() {
/* In this loop function, we're going to check to see if the mailbox has been opened.
When the status of the mailbox changes, we'll send a Particle.publish() to the cloud
so that if we want to, we can check from other devices when the mailbox is opened or closed.
We'll also turn the D7 LED on when the mailbox is opened.
*/
if (analogRead(IRSensor)>beamThreshold) {
/* If you are above the threshold, we'll assume the mailbox is closed.
If the mailbox was closed before, though, we don't need to change anything.
We'll use the beamBroken flag to help us find this out.
This flag monitors the current status of the mailbox.
After the mailbox is opened, it is set TRUE
and when the mailbox is reclosed, it is set to FALSE.
*/
if (beamBroken==true) {
// If the mailbox was opened before, then this is a new status.
// We will send a publish to the cloud.
// Send a publish to your devices...
Particle.publish("Mailbox_Status","Closed",60,MY_DEVICES);
// And flash the on-board LED on and off.
digitalWrite(boardLed,HIGH);
delay(500);
digitalWrite(boardLed,LOW);
// Finally, set the flag to reflect the current status of the mailbox.
beamBroken=false;
}
else {
// Otherwise, this isn't a new status, and we don't have to do anything.
}
}
else {
// If you are below the threshold, the mailbox is probably open.
if (beamBroken==false) {
// Send a publish...
Particle.publish("Mailbox_Status","Open",60,MY_DEVICES);
// And flash the on-board LED on and off.
digitalWrite(boardLed,HIGH);
delay(500);
digitalWrite(boardLed,LOW);
// Finally, set the flag to reflect the current status of the mailbox.
beamBroken=true;
}
else {
// Otherwise, this isn't a new status, and we don't have to do anything.
}
}
delay(1000);
int data1 = analogRead(IRSensor);
int data2 = beamBroken;
sprintf(resultstr, "{\"data1\":%d, \"data2\":%d}", data1, data2);
delay(1000);
}


Comments