


Hardware components | ||||||
 |
| × | 1 | |||
| × | 1 | ||||
 |
| × | 1 | |||
 |
| × | 1 | |||
I got this idea because as a child my friends and I would have competitions on who could spin the top for the longest amount of my time. In a computer science class we were required to use a device called a micro:bit, and program it to work in collaboration with another item. That is how this idea arose. Here is the process in which I created the top and attached the micro:bit to count the revolutions:
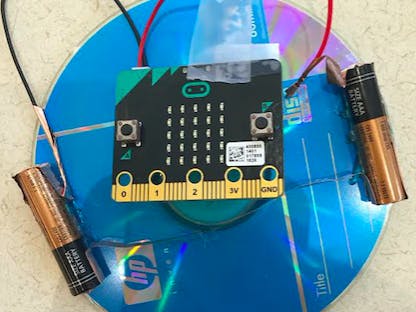
First, I hot glued the standard size marble into the center of the CD. Held it in position and waited for it dry for about eight minutes. This will allow the CD to spin, replicating the action of a top.
Next, on the side I didn't hot glue the marble in, I hot glued the bottom rim of a bottle cap and placed it over the center hole of the CD. Kept it in place and waited around eight minutes for it to dry. This is the platform the micro:bit is placed on for better stability.
This is a very important, but easily overlooked portion of the project. I measured the distance from the bottle cap to the end of the CD on both sides. Next, I found the center of gravity for both of the AAA batteries and marked it. At the same distance on both sides of the CD, I hot glued the center mark of the battery to the line on the CD. This allowed for the CD to be balanced on both sides giving it the optimal amount of revolutions per attempt to spin.
Lastly, I attached the black wire, which is used to charge the batteries and power the micro:bit, is connected from the micro:bit to the negative pole of battery using copper tape. The copper tape is wrapped around the metal wiring of the black cord, which is used as a conductor for electricity. I did the same connection for the red wiring, except I attached the metal wiring to the positive pole of the battery. If there is a solid connection then the micro:bit will power on and upon the a button being pressed it will count the amount of revolutions after the top is spun.
Note: I realize in the picture above the micro:bit is taped to the edge of the CD. However, in my final version I wrapped the tape into a ring shape to make it double stick tape and attached it from the micro:bit to the cap.
Everything mentioned above was to do with the construction of the micro:bit, but an equally important part of the process is coding your micro:bit.
Although the above code may seem simple enough, it took me a while to actually to draft and fit all the code together. The "A button" on the micro:bit has two functions, it starts the recording of rotations and resets it if you did a prior spin. It does this because each time the "A button" is pressed it resets the variable, "spin", to zero. Next, I used a conditional "if" statement, so only if the micro:bit rotates 360 degrees, then spin, which starts at 0 will have 1 added to it. I put the "spin + 1" in a show number block, so the number of spins will be displayed on the micro:bit. Lastly, I attached the forever loop onto this because I want the micro:bit to keep counting revolutions until the top stops rotating.


Comments