


Hardware components | ||||||
 |
| × | 1 | |||
| × | 1 | ||||
| × | 1 | ||||
| × | 8 | ||||
| × | 4 | ||||
| × | 4 | ||||
Software apps and online services | ||||||
 |
| |||||
Hand tools and fabrication machines | ||||||
| ||||||
- Attach metal couplers and wheels on the motors.
- Assembly the motors with metal brackets.
- Assembly the chassis with delivered screws.
- Attach CORE2 board on the chassis.
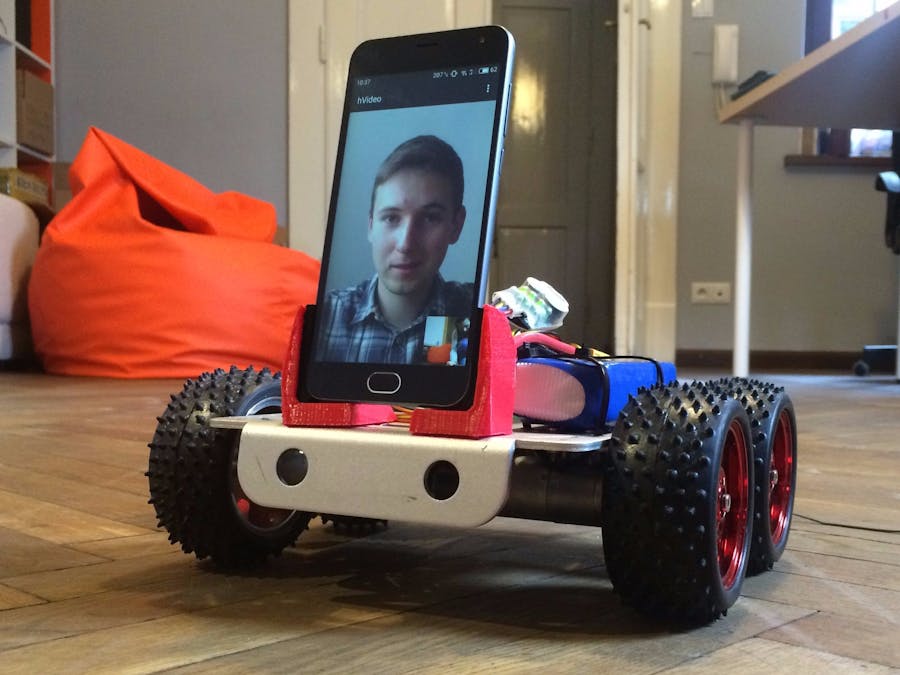
- Attach phone holder on the chassis.
- Add power supply.
In our configuration the only thing you have to do in electronics is to connect 4 motors delivered with the chassis, attach ESP8266 adapter delivered with CORE2 and add power supply, for example Li-Po battery.
hMotA - front-right motor
hMotB - front-left motor
hMotC - back-right motor
hMotD - back-left motor
The source code is available here on github and also included here (main only):
#include "hFramework.h"
#include "hCloudClient.h"
#define GEAR1   200
#define GEAR2   600
#define GEAR3   1000
int speed;
bool keyW = false;
bool keyS = false;
bool keyA = false;
bool keyD = false;
hGPIO& lightLeft = hSens1.pin1;
hGPIO& lightRight = hSens2.pin1;
void debugConsole_task()
{
	char ch;
	platform.printf("Wpisz znak:\r\n");
	for (;;) {
		if (platform.read(&ch, 1) == 1) {
			platform.printf("echo: %c\r\n", ch);
		}
	}
}
void status_task()
{
	while (1) {
		platform.ui.label("lb_bat").setText("%2f V", sys.getSupplyVoltage());
		platform.ui.progressBar("pb_bat").setValue(sys.getSupplyVoltageMV() / 15); //supply voltage milivolts
		platform.ui.label("l1").setText("hMot1 enc = %d", hMot1.getEncoderCnt());
		sys.delay(1000);
	}
}
void cfgHandler()
{
	auto l1 = platform.ui.label("l1");
	auto g1 = platform.ui.button("g1");
	auto g2 = platform.ui.button("g2");
	auto g3 = platform.ui.button("g3");
	platform.ui.loadHtml({Resource::WEBIDE, "/web_ui/ui.html"});
	platform.ui.video.enable();
}
void onKeyEvent(KeyEventType type, KeyCode code)
{
	platform.ui.console("cl1").printf("\r\nKE: t:%d, c:%d [%dms]", type, code, sys.getRefTime());
	switch (code) {
	case KeyCode::Up:    keyW = type == KeyEventType::Pressed; break;
	case KeyCode::Left:  keyA = type == KeyEventType::Pressed; break;
	case KeyCode::Right: keyD = type == KeyEventType::Pressed; break;
	case KeyCode::Down:  keyS = type == KeyEventType::Pressed; break;
	case KeyCode::Key_T:
		if (type == KeyEventType::Pressed) {
			platform.ui.console("cl1").printf(" pressed");
			hServoModule.servo2.setWidth(1300); // 1.3 ms width
		} else {
			platform.ui.console("cl1").printf(" released");
			hServoModule.servo2.setWidth(2300); // 2.3 ms width
		}
		break;
	default : break;
	}
}
void onButtonEvent(hId id, ButtonEventType type)
{
	platform.ui.console("cl1").printf("\r\nBE: t:%d, i:%s [%dms]", type, id.str(), sys.getRefTime());
	if (id == "g1") {
		if (type == ButtonEventType::Pressed) {
			speed = GEAR1;
			platform.ui.label("l1").setText("Gear: 1");
		}
		return;
	}
	if (id == "g2") {
		if (type == ButtonEventType::Pressed) {
			speed = GEAR2;
			platform.ui.label("l1").setText("Gear: 2");
		}
		return;
	}
	if (id == "g3") {
		if (type == ButtonEventType::Pressed) {
			speed = GEAR3;
			platform.ui.label("l1").setText("Gear: 3");
		}
		return;
	}
	keyW = 0;
	keyS = 0;
	keyA = 0;
	keyD = 0;
	if (id == "move_up") {
		if (type == ButtonEventType::Pressed) {
			keyW = 1;
		}
	}
	if (id == "move_down") {
		if (type == ButtonEventType::Pressed) {
			keyS = 1;
		}
	}
	if (id == "move_left") {
		if (type == ButtonEventType::Pressed) {
			keyA = 1;
		}
	}
	if (id == "move_right") {
		if (type == ButtonEventType::Pressed) {
			keyD = 1;
		}
	}
}
void hMain()
{
	speed = GEAR2;
	platform.begin(&RPi);
	platform.ui.configHandler = cfgHandler;
	platform.ui.onKeyEvent = onKeyEvent;
	platform.ui.onButtonEvent = onButtonEvent;
	platform.ui.setProjectId("@@@PROJECT_ID@@@");
	sys.taskCreate(debugConsole_task, 2, 1000, 0);
	//sys.taskCreate(status_task, 2, 1000, 0);
	hMot1.setSlewRate(0.045);
	hMot2.setSlewRate(0.045);
	hMot3.setSlewRate(0.045);
	hMot4.setSlewRate(0.045);
	hSens1.pin1.setOut();
	hSens2.pin1.setOut();
	hServoModule.enablePower();
	for (;;) {
		int mot1 = 0;
		int mot2 = 0;
		if (keyW) {
			mot1 += speed;
			mot2 -= speed;
		}
		if (keyS) {
			mot1 -= speed;
			mot2 += speed;
		}
		if (keyA) {
			mot1 += speed;
			mot2 += speed;
		}
		if (keyD) {
			mot1 -= speed;
			mot2 -= speed;
		}
		hMot1.setPower(mot1);
		hMot2.setPower(mot2);
		hMot3.setPower(mot1);
		hMot4.setPower(mot2);
		sys.delay(100); // 50ms
		LED2.toggle();
	}
}
Simply download it and upload on the Husarion Cloud web IDE. To connect your CORE2 to the Cloud follow this tutorial on Husarion webpage. Then install hVideo app available here on Play Store. Pair your phone's camera with the Cloud by simply scanning QR code:
Attach phone to the robot, turn it on and click on it in the Cloud. You will see this web user interface:
On the left you can see a joystick, to easily control your robot via web browser in any phone. Or you can simply steer it using arrow keys on the keyboard. Next to it there is a gear shift to control robot's speed.
Hope you will enjoy it, here's how it works:


Comments