


Hardware components | ||||||
 |
| × | 1 | |||
| × | 2 | ||||
 |
| × | 1 | |||
Software apps and online services | ||||||
| ||||||
Most electric bikes also provide access to a USB port to charge a phone. This creates an excellent source of power for additional LEDs and microcontrollers!
The Harry vs Larry Bullit is an amazing electric cargo bike: a beautiful, fast, 2-wheel road machine. Using the power from the 2 USB ports from the Bullit, we will be installing an active lighting system that uses the accelerometer data from the micro:bit to control a NeoPixel strip.
SAFETY DISCLAIMER: This project is not meant to replace your main source of light. Please follow your bike manufacturer instructions before making any modifications to it.
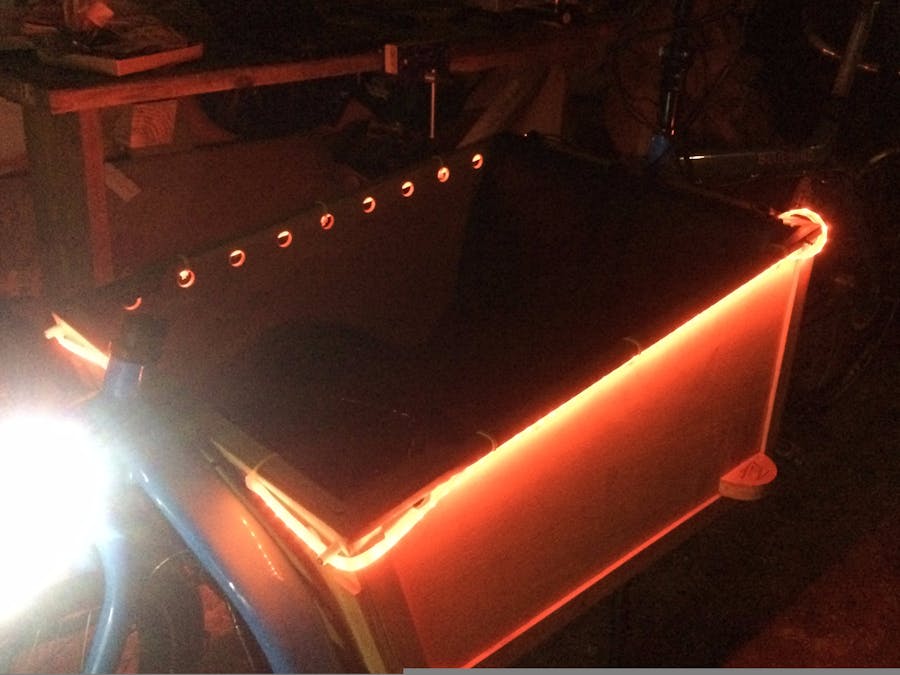
The NeoPixel strips are secured to the cargo box using cable ties.
The Bullit has 2 USB ports which makes it easy to power the NeoPixel separately from the micro:bit. Cut open a USB cable and solder the power cables to the NeoPixel strip. The micro:bit is connected via USB and an alligator-clip connects P0 to the remaining cable on the strip.
Since this program involve a few line of codes, it is simply faster to use the online web editor at https://pxt.microbit.org .
NeoPixel are not supported out-of-the-box in the editor. Fortunately, codethemicrobit can be extended with custom packages. The NeoPixel package is hosted on GitHub and added to the project through the web editor. codethemicrobit automatically loads the NeoPixel functions and classes in the blocks and JavaScript.
From the editor, click on More -> Add Package... then select neopixel.
Copy this snippet in the JavaScript editor. It creates a strip variable for a 120 LED strip, specifies rainbow color and have them rotate them through.
let strip = neopixel.create(DigitalPin.P0, 120, NeoPixelMode.RGB)
strip.showRainbow(1, 360)
basic.forever(() => {
    strip.rotate()
    strip.show()
})
We will split the NeoPixel strip into 6 ranges to enable different animations on various part of the strip. As show below, we have 2 tail light ranges, 2 head light ranges and 2 intermediate side range.
Using the range
function, we define 6 ranges to match the schema.
The tail ranges will set to 1 red LED on. Those ranges will be rotated to create a small flickering animation. The head range will set 1 LED on and rotate as well. The side ranges will have a green beam (5 LED wide) travelling from the front to the back.
let strip = neopixel.create(DigitalPin.P0, 120, NeoPixelMode.RGB)
// ranges
let tails =[strip.range(0, 5), strip.range(115, 5)]
let heads =[strip.range(55, 5), strip.range(60, 8)]
let sides =[strip.range(5, 50), strip.range(68, 47)]
// back headlights: 1 red LED rotating
// head light: 1 white LED rotating
// side lights: 5 LED travelling
for (let i = 0; i < 2; i++) {
   tails[i].setPixelColor(0, NeoPixelColors.Red)
   heads[i].setPixelColor(0, NeoPixelColors.White);
   for (let j = 0; j < 5; j++) {
     sides[i].setPixelColor(j, NeoPixelColors.Green);
   }
}
// rotate tails and sides
basic.forever(() => {
   tails[0].rotate(1)
   tails[1].rotate(-1)
   heads[0].rotate(-1)
   heads[1].rotate(1)
   sides[0].rotate(-1)
   sides[1].rotate(1)
   strip.show()
})
We will detect that value by monitoring the magnitude of the acceleration on the bike. Whenever it passes a threshold, we'll turn every odd LED to red. To make things easier, we refactor the LED color setup in separate functions.
if (input.acceleration(Dimension.Strength) > 1300) {
     while (input.acceleration(Dimension.Strength) > 1100) {
       // we are breaking or jumping
     }
}
The complete code looks more like this:
function setupLights() {
 strip.clear()
 // back headlights: 1 red LED rotating
 // head light: 1 white LED rotating
 // side lights: 5 LED travelling
 for (let i = 0; i < 2; i++) {
     tails[i].setPixelColor(0, NeoPixelColors.Red)
     heads[i].setPixelColor(0, NeoPixelColors.White);
     for (let j = 0; j < 5; j++) {
         sides[i].setPixelColor(j, NeoPixelColors.Green);
     }
 }
}
setupLights()
basic.forever(() => {
 ...
 if (input.acceleration(Dimension.Strength) > 1300) {
     while (input.acceleration(Dimension.Strength) > 1100) {
         strip.showColor(NeoPixelColors.Red)
         basic.pause(150)
         strip.clear()
         strip.show()
         basic.pause(100)
     }
     setupLights()
 }
})
The detection algorithm is not quite perfect, tt triggers on every bump which makes for more fun animations. To really improve it, we would first need to be able to collect the sensor data to analyse/crunch/process it offline and design something better. But that's for another episode...


Comments