

Hardware components | ||||||
 |
| × | 1 | |||
 |
| × | 1 | |||
| × | 1 | ||||
| × | 1 | ||||
 |
| × | 1 | |||
| × | 1 | ||||
Software apps and online services | ||||||
 |
| |||||
 |
| |||||
| ||||||
| ||||||
Hand tools and fabrication machines | ||||||
 |
| |||||
 |
| |||||
 |
| |||||
 |
| |||||
 |
| |||||
The journey of this project began during a 'Design Thinking' project with a motive to design a system for measurement of localized Air Quality data for detecting pollution hotspots and alerting commuters of the same. The idea was to deploy large number of low cost devices across a geographic location to get this data, analyze it and use it for traffic management and city planning. Although quite visionary and ambitious, this project received a lot of appreciation at various levels and fared well in various competitions, it couldn't really move into the implementation phase. Lack of funds, expertise and less access to technology, hampered the progress of the project. However, I decided to publish this project (although fairly late - had developed this in 2018), as an attempt to inspire interested hacksters, to not just encourage learning but also hope for people to take it forward.
Hardware OverviewThe hardware in the project is broadly divided into:
- Sensors and their interfacing with Arduino Nano
- Arduino Nano and NodeMCU interface
In this project, the Figaro TGS2600 checks for Methane and Carbon Monoxide, Figaro TGS2602 checks for Ammonia, Hydrogen Sulfide and Toluene while the less accurate and cheap MQ135 checks for Carbon Dioxide and NOx. Although a single sensor is used to detect multiple gases, it's better to use a dedicated sensor for each gas, if you want better accuracy and reliability.
Arduino Nano and NodeMCU should cost less than about $15 in total and will do a great job for our basic requirement.
Sensors: Interfacing and Testing with NanoMost low cost Gas Sensors available in the market are Electrochemical-type contact sensors. A sensing element is used to detect a certain gas. The sensor conductivity increases/decreases depending on gas concentration in the air. A simple electrical circuit can convert the change in conductivity to an output signal which corresponds to the gas concentration To model this, it's extremely important to understand the datasheets and the Rs/Ro Vs PPM or the Sensitivity Characteristics.
Please head over to this blog written by Davide Gironi to get a clear understanding of how to model your software and hardware to get an accurate sensor data.
For TGS2600/TGS2602 Sensor interface with Arduino
The sensor requires two voltage inputs to detect the concentration of gas: Heater Voltage (VH) and Circuit Voltage (VC). This sensor has 4 terminals. Two are dedicated to heater which maintains optimum sensing temperature in the sensor and the other two are for measurement of Output Voltage across a load resistor (RL) which is connected in series with the sensor. DC voltage is required for the circuit voltage since the sensor has a polarity. A common power supply circuit can be used for both VC and VH to fulfill the sensor's electrical requirements.
The value of the load resistor (RL) should be chosen to optimize the alarm threshold value, keeping power consumption (PS) of the semiconductor below a limit of 15mW. Power consumption (PS) will be highest when the value of Rs is equal to RL on exposure to gas (source: TGS2600 Datasheet).
Pin connection:
1: Heater
2: Sensor electrode (-)
3: Sensor electrode (+)
4: Heater
From the sensitivity curve, we obtain the scaling factor (a), and exponent (b) for our equation the ppm = a*(Rs/Ro)^b using power regression. If you don't understand this, please refer to Davide's Blog.
Also,Rs = Sensor resistance in displayed gases at various concentrations Ro = Sensor resistance in fresh air
To calculate Ro:
We know what the values of a, b are for 'air' (which is typically constant throughout) and also the Rs value, which can be calculated from:
Rs = ( Vc/Vout - 1) x RL
Hence from the equation: ppm = a*(Rs/Ro)^b we get:
Ro = Rs * sqrt(a/ppm, b)
Code to obtain Ro is present in the code section of the page. Refer to that end to see the code.
Once you obtain the Ro value, you can now proceed to calculate the final PPM value. To do so, follow these steps:
- Convert raw analog value to Vout or Vrl Voltage value
- Calculate the Rs value
- Find Rs/Ro ratio
- Obtain the PPM value by plugging the obtained values into the formula
VRL_F2600 = analogRead(F2600)*(5.0/1023.0);
Rs_F2600 = ((5.0/VRL_F2600)-1)*(RL_F2600);
ratio_F2600 = Rs_F2600/Ro_F2600;
float ppm_CO = CO_A * pow(ratio_F2600, CO_B);
This should help you obtain gas sensor value in PPM. However, as a part of calibration, you may be required to use a true value as reference and compare against the measure value.
Use: Ref. Value = Calibration Factor x Measured Value
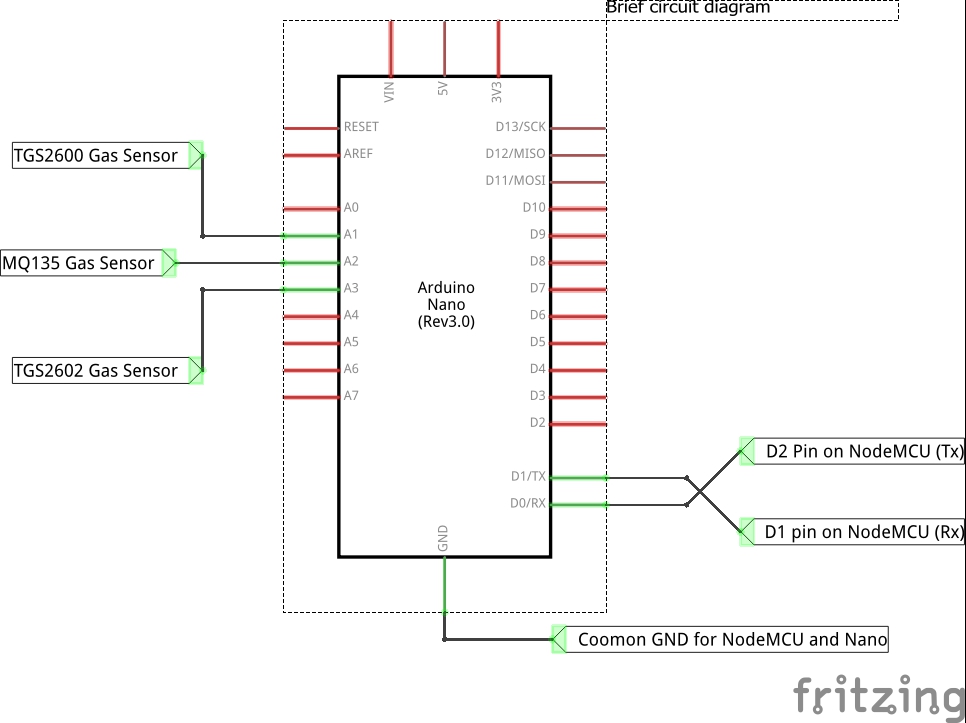
Arduino Nano and NodeMCU interfaceWhile hardware for sensors and their connectivity with Arduino Nano is not quite surprising and is fairly common, the Interface between Arduino Nano and NodeMCU might be intriguing to a few. The objective here was to ensure that the device be cheap and should have connectivity to the internet. The necessity of Arduino Nano arises when data from sensors is to be sampled. The gas sensors output Analog data and hence the MCU must have at least 3 analog pins (since we used 3 gas sensors here; could be scaled up to a larger number) to read this analog data.
As NodeMCU has only 1 Analog input pin (A0), it makes it alone isn't fit for the job. To solve this, the most obvious approach would be to interface an ADC (Analog-to-digital) converter and get this job done, but I chose a rather uncommon approach by interfacing a NodeMCU and a Nano (which was interfaced to the sensors). I did this because both these devices commonly available and easy to use as compared to an ADC, thus making it convenient.
To interface Nano and NodeMCU is quite simple. We make use of the "SoftwareSerial.h" library, which allows us to use any set of digital pins on the MCU as our UART bus. We directly used Nano's default Rx/Tx pins and cross-connected them with pin 6 and 5 respectively on NodeMCU to establish UART communication.
Rx (Nano) <=> Tx (Digital pin 6 on NodeMCU)
Tx (Nano) <=> Rx (Digital pin 5 on NodeMCU)
GND (Nano) <=> GND (NodeMCU)
While testing the UART communication, I realized that the entire data wasn't getting transferred and I couldn't debug it either. Hence, I decided to use the standard JSON format to transfer data. With the help of "ArduinoJson.h" library, I could pack this data, send it, store it on buffer till entire data is received, unpack it and then upload it to ThingSpeak. To understand how to implement Arduino JSON to your project, head over to the creator's website or read the documentation of the library on GitHub.
Note: The values are random and do not portray sensor data in this image.
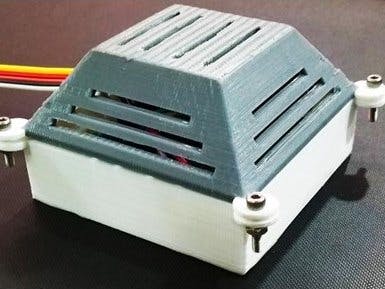
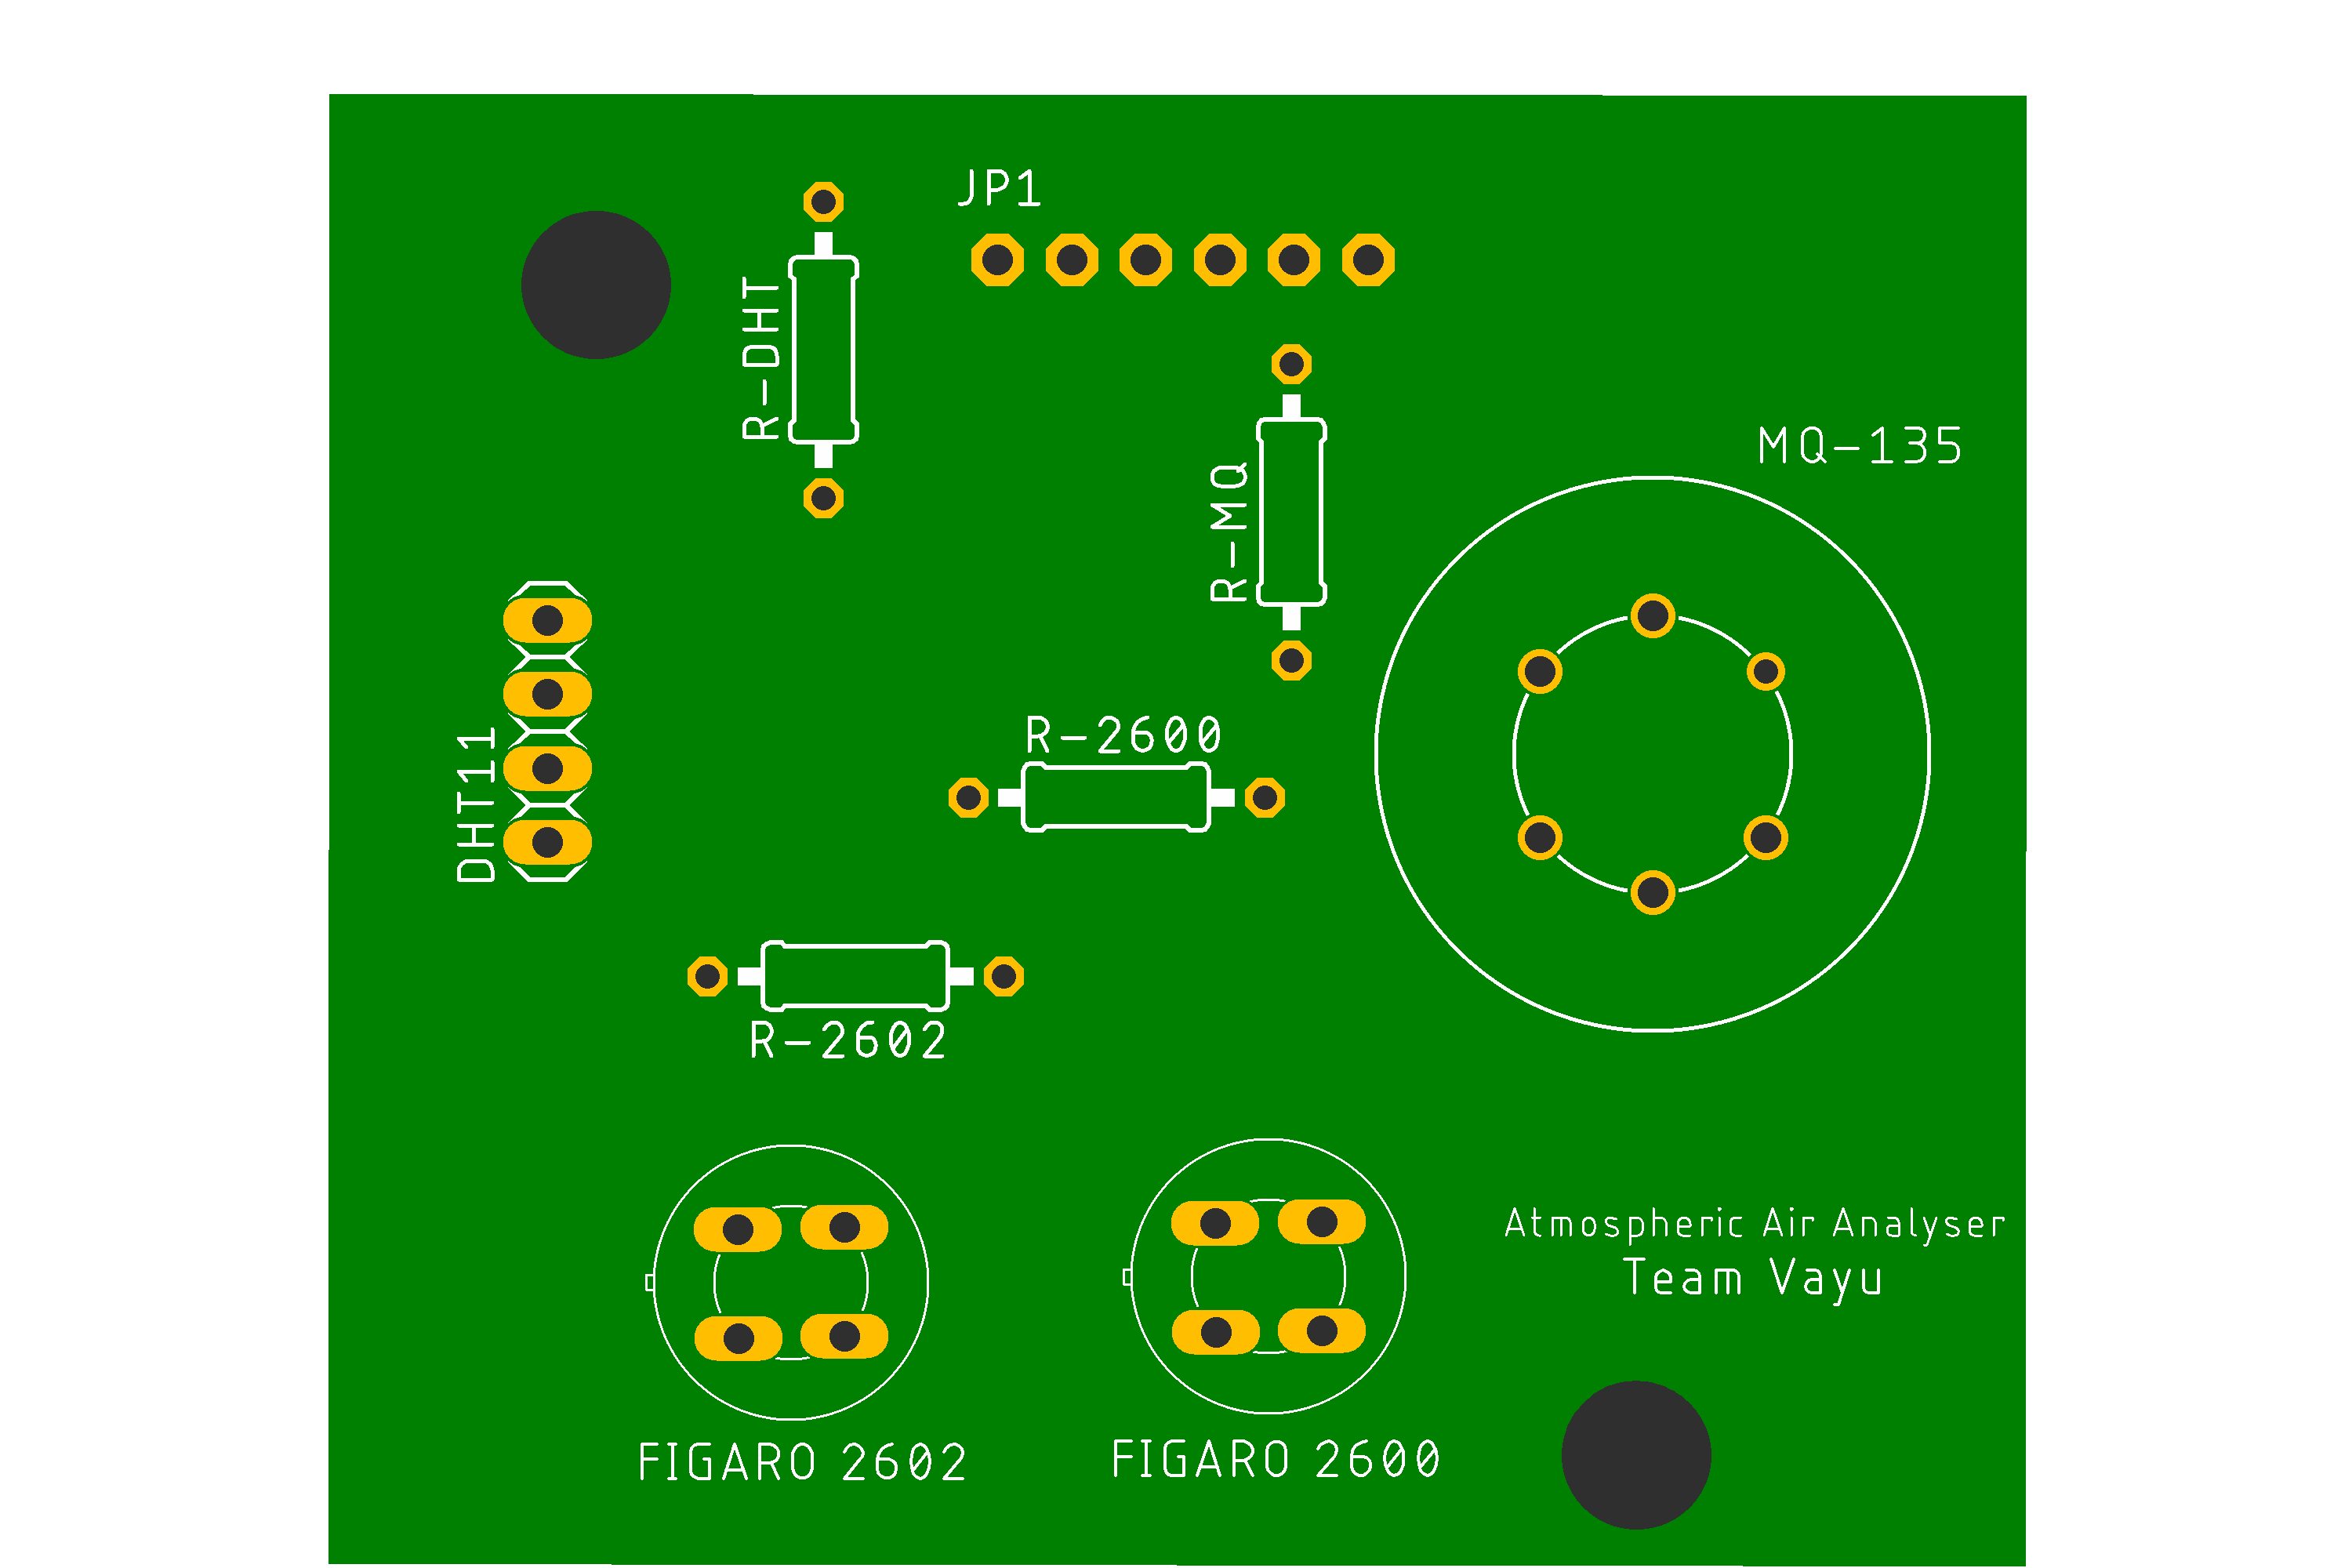
PCB Design and Hardware CasingUsing the user-friendly EAGLE CAD, A simple PCB was designed to house the three gas sensors and also DHT11 Temperature Sensor. You can find the schematic and board files in the downloads section. Along with this, a simple hardware casing was designed using AutoCAD to house the sensor-PCB. It was then 3D Printed and has been in use ever since. Incase you need to get access to additional documents, please visit my GitHub rep on the same.


_t9PF3orMPd.png?auto=compress%2Cformat&w=40&h=40&fit=fillmax&bg=fff&dpr=2)


Comments