


Hardware components | ||||||
 |
| × | 1 | |||
 |
| × | 1 | |||
Software apps and online services | ||||||
 |
| |||||
Occasionally for any application or project the temperature of something becomes necessary to know, from a room where you are, as an application of home automation, up to the temperature controlling of a liquid. There are a lot of sensors that allow us know its temperature, the most known are LM35, thermistor, thermocouple and RTD. Making good use of one of the many PSoC's characteristics and that will be how to use a thermistor today!.
The ThermistorThermistors, in short, are thermally sensitive resistors, which bases its operation on the change in resistance due to temperature changes. There are two types of thermistors:
- NTC (Negative Temperature Coefficient): As temperature increases its resistance decreases
- PTC (Positive Temperature Coefficient) Otherwise Called Positor: As temperature increases its resistance it increases.
In the market the most well-known and sold there are the type NTC that is the one that we are going to use today.
The temperature characteristic curve vs. resistance of the thermistors is not linear, for which you have to take into account a series of equations that will have to be used, but it is here where PSoC shines by having a special component for the thermistors which helps us much avoiding the calculations and through API gives us the values of resistance and temperature of our thermistor.
It is necessary to bear in mind that at the moment of obtaining the thermistor it is necessary to look for one of average quality to high and verify also that we can find its corresponding data sheet because we are going to need two fundamental parameters, that are: The constant Beta (B) that corresponds to a relation between two temperatures, for example, 30/50=3890 and the resistance to 25 degrees; with this two details it is possible identify the curve of our thermistor and this way be able to make our project go to work.
Materials Used- Breadboard
- CY8CKIT-059 PSoC5LP Prototyping Kit
- KY-013 (Temperature sensor thermistor based)
- LCD 20x4
- Breadboard Jumpers.
What first we must know is that the correct way of reading a thermistor is with a voltage divisor with another well-known resistance and with a tolerance of 1 % or less.
The module KY-013 already has implemented this voltage divider with a resistance of 10K so we are not going to need putting this resistor on the protoboard, but it is important to keep in mind that if you buy only the thermistor, know that this thermistor must be connected in series with a resistor (I recommend a resistor of 10K,1%) as shown in the following diagram:
As we see the voltage divider will be fed with 1 volt that we that we obtain from the PSoC and the other end of the resistor is connected to ground, this way we will have 3 terminals that we will call VHig, Vtermistor, Vlow. These three terminals have to be connected to the PSoC such as shown in the image.
Remember that pin VLow must be grounded!
On the other hand we have to connect the LCD, it is quite simple and it has been done often, nevertheless, here I leave a how-to-connect to PSoC:
These are all the connections that is necessary to accomplish, have special care in the thermistor part.
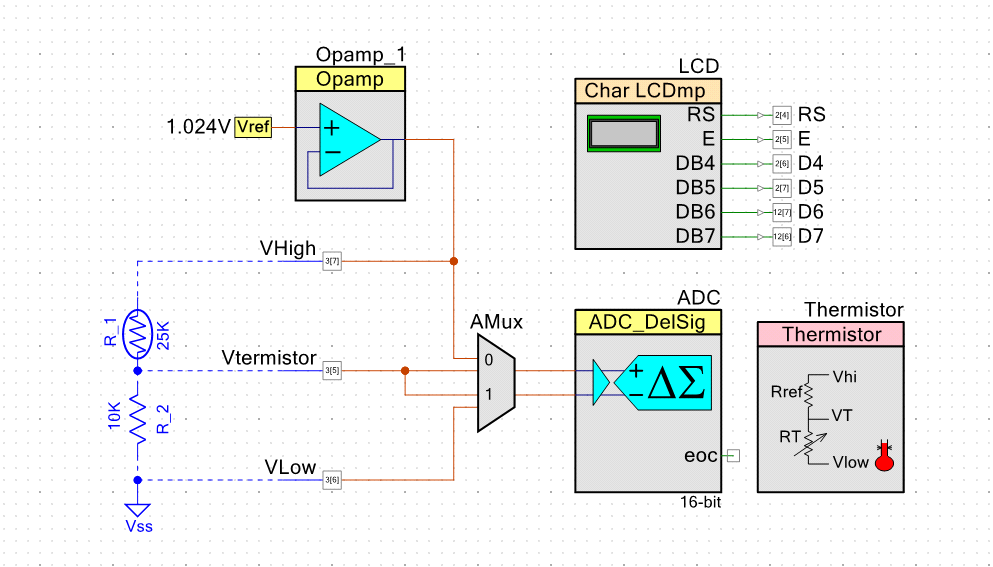
The SoftwareThe main thing here is take acknowledgement, looking the PSoC schematic, is that we are going to read the thermistor voltage as well as the voltage of the resistor used for reference, being two different voltage we are going to use an analog multiplexer configured as a two-channel differential mode:
We will use a reference voltage of 1 volt along with a OpAmp configured in follower mode to feed the voltage divider.
We must then use an ADC (Analog to digital converter) to read the two voltages, channel-changing will be done through code, now only we have to configure the ADC in the following manner:
Of this setup window the most important thing to emphasize is that the input mode of the ADC is differential. The rest is left by default.
Be careful with the conversion mode that must be 2 – Continuous, we are going to be obtaining the values from the code. We will be using 16-bit of resolution that's more than enough for this case.
The input range will be of +/-1. 024V, on having seted the reference voltage to 1V, this way we make sure that the voltage does not exceed of that PSoC configuration. .
The other settings of the ADC can be left to there default values.
The following component, and the most important, which is where we are going to center our attention is the thermistor component:
As it was said before, PSoC incorporates a temperature calculator based on thermistors resistance. You must first configure the parameters in the components schematic:
The parameter "Reference resistor" refers to the resistor we are using as reference, it must be expressed in Ohm. For this case the resistor value in Omhs wil be 10000 (10K).
"Implementation" mode will be set to "Equation". Giving these simple parameters to "Configure ThermistorCalc" window does all the calculations corresponding to the equation that defines the behavior of the thermistors, by this way giving us the resistance and temperature values.
We have also to indicate three more parameters.
It is here where it takes place the importance of the thermistors quality and how much of information is obtained for that thermistor. If the data sheet is written with useful information it will have a temperature-resistance plot. From this plot or table we can obtain the three values that are important to us. Resistance at 100 degrees C, resistance at 0 degrees C and resistance at room temperature (usually at 25 degrees C).
Once we have these three values we will put them in the corresponding fields of "Temperature" and "Resistance".
If it happens to you as to me that bought a thermistor and found no data sheet nor information on its temperature vs.values resistance, will have to obtain these values by ourselves, and were carried out as follows:
For 100° C: I used water, knowing that its boiling point is at 100° C, I heated it until it began to boil and then plunged the thermistor being careful not to submerge the terminals, and at that point take I measured the resistance which gave me as reading a resistance value of 1083 ohm.
For 0°C: I also used water, this time I put water in the freezer seeking the point where crystals start to appear in the water which means that it is starting to freeze, this is my 0 degrees point, I put the thermistor into th water taking care not to immerse the terminals and take my measurement with the result for 0°C I read 13250 ohm.
The last temperature to take in account is that of 25°C, that is room temperature,and is obtained by knowing what value you're having at YOUR room, if it is not at 25°C but close to that value, measure the resistance of the thermistor and you'll get a value very close to its nominal values, if it read 4K then its assumed that it is a thermistor of 4K7, if its near the 10K range, then it's assumed that it is of 10K nominal.
Commercially, there are thermistors with different nominal values, but the most common ones are those having 4K7 or 10K at 25°C, you must find the way to achieve a room temperature of 25°C or near to it and measure the thermistor resistance,if the readings approach near to the values mentioned before then that's the value at 25°C. My thermistor is 4.7 Kohm at 25°C.
The most advisable thing is to obtain a thermistor with its data sheet and its temperatures tables or curves, with that we obtain major precision in the measurements and avoid the errors that we could have due to these home-made tests.
There are two coding lines to do the work of getting the temperature from the thermistor and is as follows:
Thermistor_GetResistance(vRef,vTherm);
This line allows to get the value of the thermistor resistance, the parameters it receives are the corresponding voltages to the reference resistor and to that of the thermistor, it is necessary to bear in mind in which channel each one is located to have the certainty to be giving the right values.
Thermistor_GetTemperature(Termresis);
This line allows us to obtain the temperature value once we know the resistance, the parameter that receives is the value of resistance of the thermistor that we obtained previously.
These two lines are the ones that we have to implement later on to be able to read in a correct way the thermistor.
We will finally have to add on the LCD component to be able to visualize the values of resistance and temperature.
Remember that this is a custom component and that it is not included in PSoC creator, this must be manually included and I will leave with the project files.
The implementation of the code is as follows, everything commented to be understood correctly:
#include <project.h>
#include <stdio.h> // Library for sprintf to work
int main()
{
  int32 vTherm,vRef; // Corresponding variables to the reference voltages and thermistor
  int32 Termresis,Termtemp; // Corresponding variables to resistance and temperature of thermistor
  float TermistorResis,TermistorTemp;// variables for correcting format for temperature and resistance
  char str[12];// Variable for print
  // Initialization of components
  CyGlobalIntEnable;
  ADC_Start();
  LCD_Start();
  AMux_Start();
  Opamp_1_Start();
  // Print permanent message
  LCD_Position(0,0);
  LCD_PrintString("Ejemplo de termistor");
  LCD_Position(1,0);
  LCD_PrintString("NTC KY-013");
  for(;;)
  {
      //Channel 0 (Thermistor)
      AMux_FastSelect(0);//Selecting channel 0 of the AMuX
      ADC_StartConvert();//Beginning ADC conversions
      ADC_IsEndConversion(ADC_WAIT_FOR_RESULT);//Waiting for result
      vTherm = ADC_GetResult32();// Saving result in the variable Vtherm
      ADC_StopConvert();// Stop ADC conversions
      //Channel 1 (Resistor Reference)
      AMux_FastSelect(1);//Selecting channel 1 of the AMux
      ADC_StartConvert();//Begin ADC conversions
      ADC_IsEndConversion(ADC_WAIT_FOR_RESULT);//Waiting for result
      vRef = ADC_GetResult32();// saving result in the variable Vref
      ADC_StopConvert();// Stop ADC conversions
      /**********************************************************************
      Once obtained the two values of voltage proceed with obtaining the
		values of resistance and temperature for thermistor
      ***********************************************************************/
      Termresis = Thermistor_GetResistance(vRef,vTherm);  // Getting resistance value from the thermistor
      Termtemp = Thermistor_GetTemperature(Termresis); // Getting temperature value thermistor
      TermistorResis=Termresis/1000.000;// Correction of the format for resitencia
      TermistorTemp = Termtemp/100.00;// Correction of the format for thermistor
      LCD_Position(2,0);
      LCD_PrintString("Resistance: ");
      // Using Sprintf to pass from float to char to be printed on LCD
      sprintf(str,"%.3fK ",TermistorResis);
      LCD_PrintString(str);// The value of resistance is printed
      LCD_Position(3,0);
      LCD_PrintString("Temp: ");
      // Sprintf to pass from float to char to be printed on LCD
      sprintf(str,"%.2f.C  ",TermistorTemp);
      LCD_PrintString(str);// The value of resistance is printed
      CyDelay(300);// // A little delay so that the measurements of the sensor are done every 300mS
  }
}
Finally before compiling the project we have to make a series of modifications in the compiler in order for function sprintf and Thermistor component work correctly:
Doing a right click over the projects name and next click build settings:
And in this window we will have to go where it says "Linker" and in the part where reads "Additional Libraries" write the letter "m" into it, this is done so Math lib is added so necessary for the Thermistor component to work.
After that we go to linker and next to "command line" and there we put the instruction -u_printf_float, necessary to print the values by means of sprintf.
Finally we go to the "pins configuration" then to "System" tab and once in there find "Heap Size" parameter that we should change to 0x200.
Necessary also for sprintf to work. What's left to make is finally assigning pins, compiling and programming.
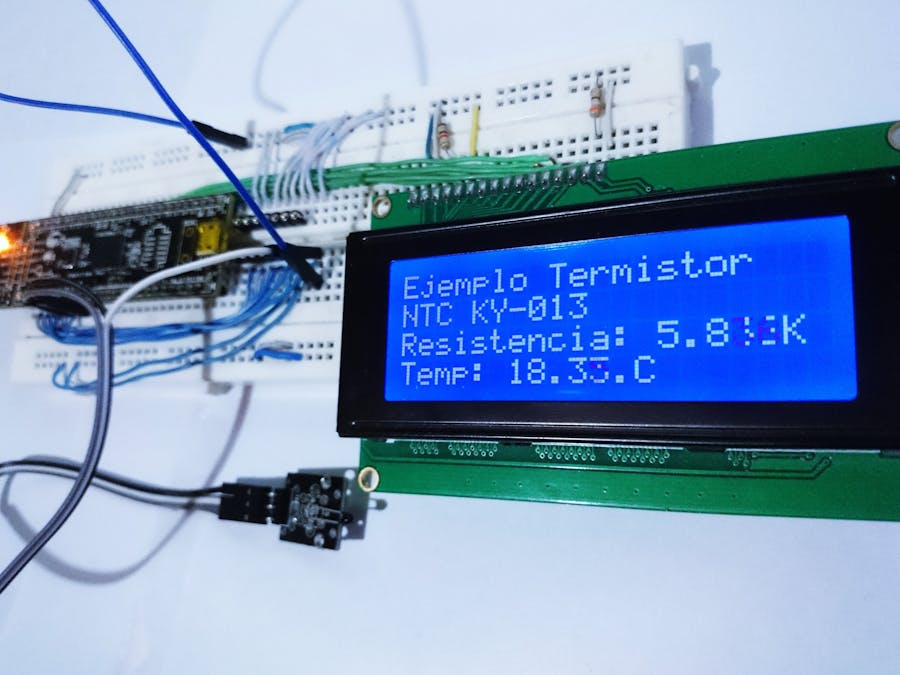
ResultsThe thermistor is stable in the measurements, is also quite sensitive to temperature changes, the values are fairly consistent.
We can compare the measurements given by the thermistor with a thermometer:
We can see an error of at least 4 degrees and this can have several reasons, the first is that since we did not find any information about the thermistor so we had to do the testing ourselves and we could have introduced a measurement error during the test. Also it is possible that the thermometer that we are using as reference is not well calibrated.
Either way, the results are satisfactory because we can get a reliable value of the temperature and we can use it at this moment to have our room temperature in real time!
Finally a video tutorial (Spanish):


Comments