


Hardware components | ||||||
 |
| × | 1 | |||
 |
| × | 1 | |||
Software apps and online services | ||||||
 |
| |||||
I wanted to make a motion detector that would notify me every time my garage door is opened. I was playing with PIR sensor for a while but after having some setup issues (sensitivity x time) I decided to use the HC-SR04 sensor instead...and it works like a charm. The idea is simple: you setup the detector so when the door (or window - depends on how you want to use it) is opened, it gets in the way of the sensor so the measured distance is changed. The advantage using the UltraSonic sensor instead of PIR huge. It can't be triggered with light or mosquitoes which was the main reason I didn't want to use the PIR.
A huge shout out to NextPCB for sponsoring this project. They are a PCB manufacturer, China PCB manufacturer which is also capable of doing PCB assembly.
What you will need:
- WeMos D1 mini board - (other boards are possible - just note that e.g. NodeMCU ESP-12E V1.0 gives out only 3.3V and the HC-SR04 sensor needs 5V)
- HC-SR04+ Ultrasonic sensor - - (using "+" as it can operate on 3.3V)
- Blynk app(if you are new to Blynk and using iOS device, you will need to borrow an Android phone for setting up the notifications)
- Breadboard or soldering iron
- Wires
- Computer with Arduino IDE installed
I heard about people having issues when powering the HC-SR04 sensor from the board. It works fine for me, but the safest way to prevent this is to use HC-SR04P (or "+"), which has an input range of 3 - 5.5v
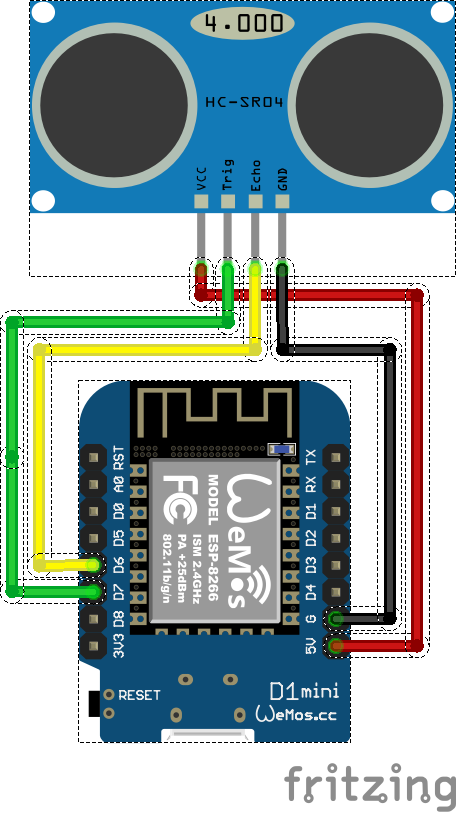
Connections (see the diagram)
WeMos D1 --> HC-SR04(P)
5V --> VCC
G --> GND
D6 --> Echo
D7 --> Trig
Step 2: Blynk SetupFor those who don't know what Blynk is, it is a Platform with iOS and Android apps to controlArduino, Raspberry Pi and the likes over the Internet. It's a digital dashboard where you can build a graphic interface for your project by simply dragging and dropping widgets.
Let's start on Andorid device:
- Download the Blynk app
- Sign up or login (if you already have an account)
- Tap "+" to create New Project
- Give the project a name and select device you are using (in our case it is ESP8266) and tap "Create"
- You will receive an Authentication token in you mail box, we are going to need it later
- On the Blynk Project page tap "+" to add notification widget (if this is your first Blynk project, you should have enough energy to buy it) and set it up as you wish. I use settings as displayed on the screenshot.
- In the project settings (nut icon on the top) "Send app connected command" to ON.
- Close the settings and hit the Play button
Now you can login to Blynk app on your iOS device as well and you should see the project with the notification widget.
Step 3: The Code
Now it is time to upload the code to our board.
- Open the *.ino file in Arduino IDE
- Connect the WeMos board to your computer
- In Tools select the WeMos D1 R2 & mini board
- Adjust the following:
char auth[] = "Your authentication token from your mail box goes here";char ssid[] = "Your WiFi name";char pass[] = "Your WiFi password";
- Also, you can change the range, where you want to be notified (default is set to 1 - 49cm)
if (0 < distance && distance < 50) {
- Hit Upload
Congratulations! If everything was set right, you should now receive your first notification!
Step 4: SummaryThere are three notifications you will be receiving now. The first is telling you, that the Detector was successfully connected to your WiFi, the second notification you will be receiving is when something gets within your setup range. And the third when your Detector is disconnected due to connection or power supply issues.
The modifications you can make to this project are endless. You can setup more notifications for different ranges (Just be aware that Blynk allows notifications after 15s at least). Use different sensors, etc.
About NEXTPCBNextPCB is one of the most experienced PCB manufacturers in China, has specialized in the PCB and assembly industry for over 15 years, providing some of the most innovative printed circuit board with assembly technologies in terms of the highest quality standards, fastest delivery turnaround as fast as 24hours, lowest manufacturer direct prices, and the most dedicated customer service in the industry. You can count on NextPCB to meet your needs, from the simplest boards to the most complex designs for small quantity and large-scale production.
I hope you like this project, if you do, please vote for me and leave a comment/suggestion...I will be happy to get some insight from the others!


_3u05Tpwasz.png?auto=compress%2Cformat&w=40&h=40&fit=fillmax&bg=fff&dpr=2)
Comments