


Hardware components | ||||||
 |
| × | 1 | |||
 |
| × | 1 | |||
 |
| × | 1 | |||
 |
| × | 1 | |||
_ztBMuBhMHo.jpg?auto=compress%2Cformat&w=48&h=48&fit=fill&bg=ffffff) |
| × | 1 | |||
Software apps and online services | ||||||
 |
| |||||
| ||||||
In this blog we are going to build a fire alarm using multiple sensors.
This project will send an alert whenever it detects fire and smoke.
It has also connected with a buzzer and an LED which will act as a audio and visual indication for alert.
So lets quickly start building IoT based Fire Security Alarm System using NodeMCU.
Supplies- ESP8266 NodeMCU x 1
- Flame Sensor x 1
- MQ2 Smoke Sensor x 1
- 5V Buzzer x 1
- Led Any color x 1
- Transistor BC547 x 1
- Resistor 1KΩ x 2
- Jumper cables
- Breadboard
A Flame Sensor is a device that can be used to detect presence of a fire source or any other bright light sources. There are several ways to implement a Flame Sensor but the module used in this project is an Infrared Radiation Sensitive Sensor.
The module uses a LM393 comparator chip to provide a stable digital output signal. This comparator has a driving ability of 15 mA. This flame detector sensor can be used in different project including fire alarms and other fire detecting devices or projects.
Specifications:
- LM393 comparator chip
- Detection Range: 760 nm to 1100 nm
- Operating Voltage: 3.3 V to 5 V
- Maximum Output Current: 15 mA
- Digital Outputs: 0 and 1Detection Angle: about 60 degrees
- Adjustable sensitivity via potentiometer
- LED lights indicators: power (red) and digital switching output (green)
In this project we are using a MQ2 smoke sensor.
This sensor can detect various gases including Methane, Butane and LPG. We are using a MQ2 gas sensor module in this project for better interface.
Specifications:
- Operating Voltage is +5V
- Can be used to Measure or detect LPG, Alcohol, Propane, Hydrogen, CO and even methane
- Analog output voltage: 0V to 5V
- Digital Output Voltage: 0V or 5V (TTL Logic)
- Preheat duration 20 seconds
- Can be used as a Digital or analog sensor
- The Sensitivity of Digital pin can be varied using the potentiometer
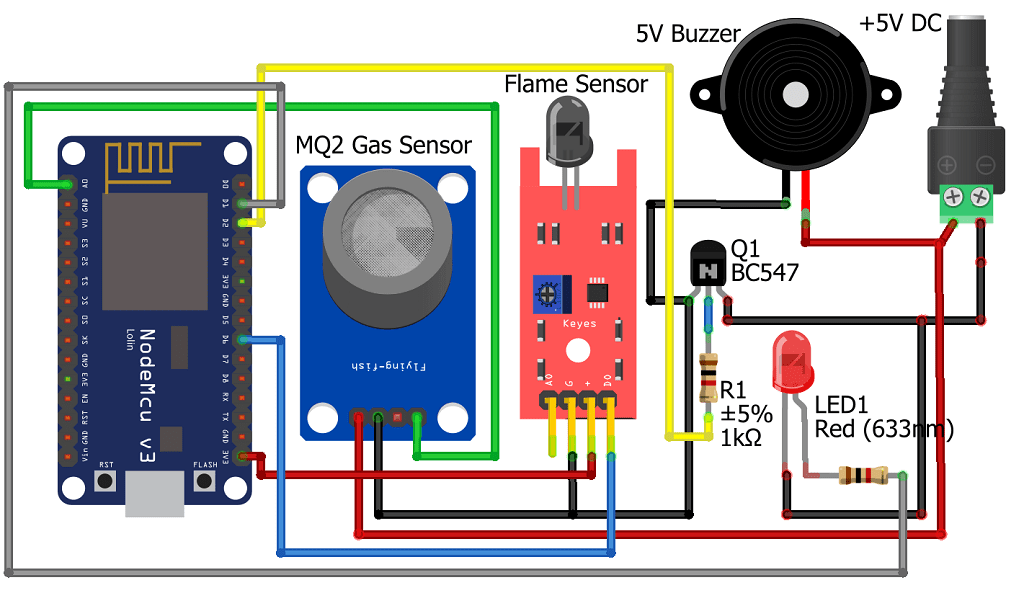
Step 3: Connection
The connection is very simple here all the red and black wired are Vcc and GND connection.
You can also add an additional relay module to switch on exhaust or any other ac appliance.
You can modify the code and add it. We are using A0 pin of MQ2 gas sensor and D0 pin of Flame sensor.
Step 4: NodeMCU ESP8266
ESP8266 NodeMCU is an open source IoT platform.
It includes firmware which runs on the low cost Wi-Fi enabled ESP8266 Wi-Fi SoC from Espressif Systems, and hardware which is based on the ESP-12 module.
It has GPIO, SPI, I2C, ADC, PWM AND UART pins for communication and controlling other peripherals attached to it.
On board NodeMCU has CP2102 IC which provides USB to TTL functionality.
In this IoT Fire Alarm, we are using two GPIO pin to get the digital data from the flame sensor and gas sensor.
Step 5: Required Arduino Libraries
This code need 2 Arduino library. You can download Arduino IDE.
- ESP8266
- Blynk
Go to Sketch -> Include Library -> Manage Libraries
Now search for ESP8266 and install
Search for Blynk and install
Step 6: Code
You can download the code from below link and open it using Arduino IDE.
You have to unzip the the zip file after download and open it. Just add the Auth Token and your WiFi details in the code.
- Open the blynk app and tap on create a new project. Fill the details as shown below
- You will receive the Auth token on your registered email id.
- Tap on + sign to add below highlighted widgets
- Add a notification widget as well.
- Configure the gauge with below details.
- Also configure the LED
- Set the Value Display widget as per below settings
- And finally your Blynk project setup is complete. You can rearrange the widgets and place them as you wish.
Step 9: Building and Testing
We have connected the components as per the circuit diagram and now its time to test the project.
For both the alert LED will glow and buzzer will start beeping.
- You will receive below alert notification when flame sensor detects flame or fire.
- Once the smoke sensor detects smoke and the value in the gauge goes beyond 500 then smoke alert will be detected. You can change the value in the code as per your need.
If you have a PCB project, you can visit the NEXTPCB website to get exciting discounts and coupons.
Here are midsummer sales at NextPCB
1. Up to 30% off for PCB oders
2. Up to 20% off for PCBA oders
Only 0$ for 5-10pcs PCB Prototypes https://www.nextpcb.com/


Comments