

Hardware components | ||||||
 |
| × | 1 | |||
 |
| × | 1 | |||
Software apps and online services | ||||||
 |
| |||||
In our last blog post we learned how to use the SONOFF Smart Switch to control a relay from Ubidots. In this case, we'll learn how to control an Air Conditioner with the SONOFF TH, a variation of the original one that includes temperature and humidity sensors. Using these readings, we'll use Ubidots' Event engine to turn on or off your air conditioner automatically, depending on the room temperature.
OverviewCompared to the $30 WiFi smart plugs out there, the SONOFF is a great alternative for making smart home and even industrial IoT projects at a larger scale. Moreover, it is based on the popular ESP8266 Wi-Fi chip, making it compatible with the Arduino environment and other resources like our ESP libraries at Ubidots.
The SONOFF comes with its own firmware and mobile app, but we think that its main value actually lies in its form-factor and price. This is why we decided to do some hacking and unleash its full power!
RequirementsSetup1. Disassemble the SONOFF device, this is to access the SONOFF TTL pinout, which we'll need to program the onboard ESP8266. You will need to solder four pins, these are shown in the picture below.
2. Connect the UARTbee pins to the SONOFF pins, following this pinout:
UARTbee SONOFF
VCC -------> VCC
TX -------> RX
RX -------> TX
GND -------> GND
3. Go to the Arduino IDE, click on Files -> Preferences and enter this URL to be able to access ESP8266's libraries for Arduino:
http://arduino.esp8266.com/stable/package_esp8266com_index.json
into the Additional Boards Manager URLs field. This field supports multiple URLs, separating them with commas, in case you already have other URLs typed.
4. Open the Boards Manager from Tools -> Board menu and install ESP8266 platform. Select your ESP8266 board from Tools > Board menu after installation.
5. Download the UbidotsMicroESP8266 library here.
6. Now, click on Sketch -> Include Library -> Add .ZIP Library.
7. Select the .ZIP file of UbidotsMicroESP8266 and then click on “Accept” or “Choose”.
8. Close the Arduino IDE and open it again.
Create Ubidots Variables1. Login to your Ubidots account
2. Go to Sources and click on "Add new data source"
3. Set the name of the Data source.
4. Create four variables inside the Data source: Temperature, Humidity, Heat Index and Relay.
5. Copy the variable ID of all variables into the code snippet below.
We'll need two Ubidots Events: one to turn on the relay and another one to turn it off:
1. In your Ubidots account, go to Events and then click on "Add new Event"
2. Select the SONOFF data source you just created.
3. Select the Heat Index variable.
4. Set the trigger condition to "greater than 25", or your desired Heat Index (the SONOFF sends the data in Degrees Celsius)
5. Select "Set a variable" trigger type, then select the SONOFF data source again, then the "Relay variable"
6. Set it to "1" so the Events sets the Relay variable to "1" when the condition is met.
7. Repeat these steps to create a second event, but this time set the condition to "less than 20"and the value sent to the Relay to "0".
Here is the code that turns on/off the SONOFF device, to use this code don't forget to change WIFISSID and PASSWORD with your network credentials, and use the IDs of the variables we created.
To upload the code into the SONOFF you will need to put it into programming mode:
1. Connect the UARTbee to PC USB.
2. Press SONOFF button and disconnect the USB at the same time.
3. While pushing the button, connect the USB again.
#include "UbidotsMicroESP8266.h"
#include "DHT.h"
#define DHTPIN 14     // what digital pin we're connected to
#define DHTTYPE DHT11   // DHT 11
DHT dht(DHTPIN, DHTTYPE);
#define ID  "My_humedity_id"  // Put here your Ubidots variable ID
#define ID2  "My_Temperature_id"  // Put here your Ubidots variable ID
#define ID3  "My_heat_id"  // Put here your Ubidots variable ID
#define ID4  "My_relay_id"  // Put here your Ubidots variable ID
#define TOKEN  "MY_TOKEN"  // Put here your Ubidots TOKEN
#define WIFISSID "MY_SSID"
#define PASSWORD "MY_WIFI_PASSWORD"
#define RELAY 12
#define LED 13
Ubidots client(TOKEN);
void setup(){
   Serial.begin(115200);
   dht.begin();
   delay(10);
   pinMode(RELAY, OUTPUT);
   pinMode(LED, OUTPUT);
   digitalWrite(LED, HIGH);
   client.wifiConnection(WIFISSID, PASSWORD);
}
void loop(){
   // Wait a few seconds between measurements.
   delay(2000);
   // Reading temperature or humidity takes about 250 milliseconds!
   // Sensor readings may also be up to 2 seconds 'old' (its a very slow sensor)
   float h = dht.readHumidity();
   // Read temperature as Celsius (the default)
   float t = dht.readTemperature();
   // Check if any reads failed and exit early (to try again).
   if (isnan(h) || isnan(t)) {
       Serial.println("Failed to read from DHT sensor!");
       return;
   }
   // Compute heat index in Celsius (isFahreheit = false)
   float hic = dht.computeHeatIndex(t, h, false);
   client.add(ID, h);
   client.add(ID2, t);
   client.add(ID3, hic);
   client.sendAll();
   float setRelay = client.getValue(ID4);
   if (setRelay == 1.00) {
       digitalWrite(RELAY, HIGH); //On relay
       digitalWrite(LED, LOW); //On led
   }
   if (setRelay == 0.00) {
       digitalWrite(RELAY, LOW); //Off relay
       digitalWrite(LED, HIGH); //Off led
   }
}
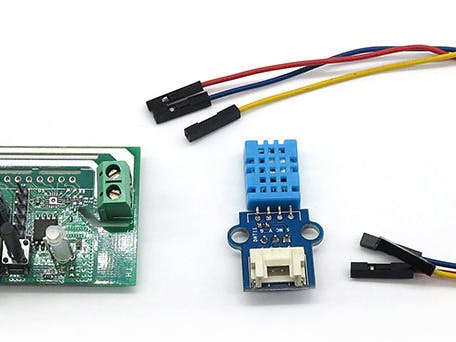
When you finish uploading the code, disconnect the UARTbee and SONOFF, then connect the DHT11 sensor.
Your SONOFF is ready to connect to a supply of 110-240V and to your air conditioner.
Putting it all togetherWe tested this project with a "SAMURAI Eole Crystal" fan. This machine required pushing a button to turn it on after plugging it to the AC outlet, so we soldered the ON/OFF button so it's always ON:
We then re-assembled the unit, connected it to AC and done!
Ubidots is a cloud service empowering thousands of engineers around the world to build IoT projects, both in education and the enterprise. To learn how Ubidots can help your business check out our features or leave us a message.


Comments