


Hardware components | ||||||
 |
| × | 1 | |||
 |
| × | 1 | |||
 |
| × | 1 | |||
| × | 6 | ||||
Software apps and online services | ||||||
 |
| |||||
| ||||||
Hand tools and fabrication machines | ||||||
 |
| |||||
 |
| |||||
 |
| |||||
 |
| |||||
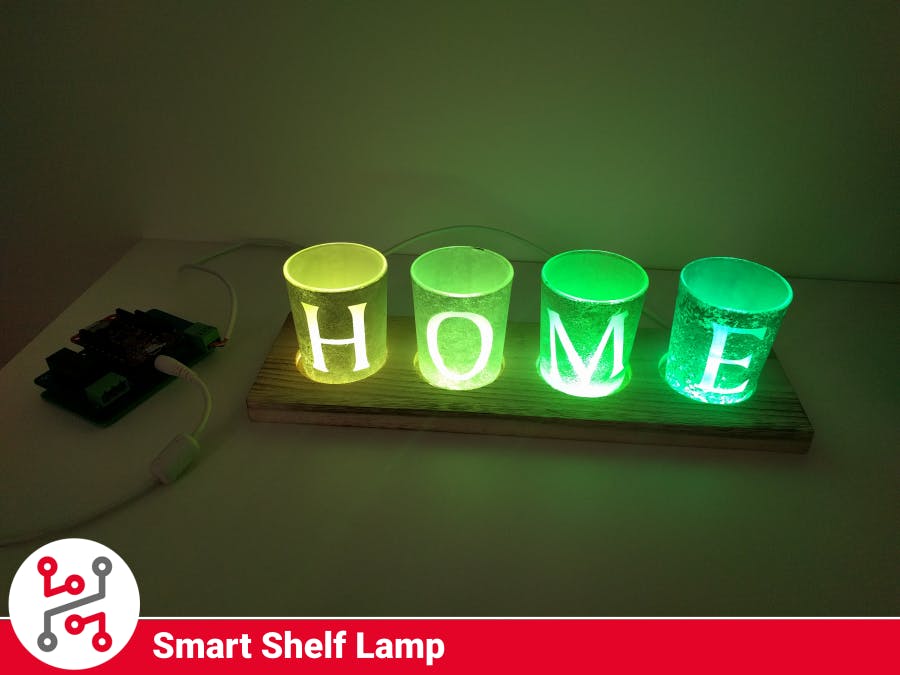
Make some cozy lamp for your shelf with HARDWARIO IoT kit and some LED rings. You will need to make some crafting with the lamp itself, but it should be easy enoúgh and I will describe it later.
1. Get all the hardware togetherYou will need Power Controller Kit for this project and some LED rings from ebay. I recommend buying a few more that you need because there can be some problems with them or you can destroy some of them while soldering them.
The last thing that you will need is some Tealight holder, we are using one from the Jysk but you can buy it from somewhere else, or you can use something completely different that you like.
You can watch the video below on how to build the Power Controller Kit so you are sure that you have it right.
2. Customize tealight holderYou will need to make the tealight holder a little bit better You will need some Drill and some Glue Gun.
First, you will make some holes for the LED rings, so they will stay in the place, you can use some advanced tool, but a sharp knife or file should do it just fine.
Put the ring into the hole you just made and drill some holes in each spot where the connectors are on the LED ring.
Next, you do some channel at the bottom so you can get the cables from one ring to another and connect them so you can use them as one LED strip.
Now you will have to some soldering and connect all the LED rings. Just connect GND to VCC and OUT to IN. Do this from the first to the last. The first ring will be connected to the Power Module of the HARDWARIO IoT Kit, you can look at the board on how to connect the wires to the connector.
If you did all the steps above your tealight holder should look like this, you can put some glue from the glue gun on the LED rings so they hold there better.
- Download HARDWARIO Playground,
- Flash firmware to the Core Module that was made for this project: bcf-radio-power-controller-rgb150
- This firmware is done for a lot more LEDs that you will probably have, but that is not a problem if you want to make it custom for your number of LEDs you can update the firmware by yourself. You can find all the information in the documentation.
- How to flash firmware is shown on the documentation page.
You need to pair the Core module with the Radio dongle that you are using, follow the instructions below to see how it is done.
- Connect your USB Radio Dongle to your computer.
- Open HARDWARIO Playground.
- Click Start Pairing the LED on the dongle should start blinking
- Connect the device that you want to pair into your computer or insert the batteries.
- Wait for the device to appear in the table
- It should add the device with the Alias: power-controller:0
After you did all this you can unplug the device from the computer and plug it into the power socket. The next steps will be done on the computer, so you can leave the device and focus on the NODE-Red.
5. Import flowOpen Node-RED in the Playground or Raspberry Pi and import this flow from the Attachments in the Menu -> Import -> Clipboard.
Do not forget to hit "Deploy" in the top right corner to apply the changes.
This flow ensures that you can control your lights with the Blynk on your mobile phone.
6. Blynk integrationThis project is ready for Blynk integration. How to set up Blynk with your HARDWARIO Playground is described in this guide.
Follow the guide if you want to make your own blynk app. If you want to use the one specified for this project in the Blynk app click this Icon and scan the QR code bellow.
In this application you can see 4 buttons that control all the effects, colors and brightness of the LED rings, so you can customize your lamp.
It is simple but you can, of course, customize it a little bit more.
7. Test your devicePut your lamp on some visible space, shelf or something like that and try it out, all the effects, colors and brightness. It should look like the one on the GIF below.
If you want to control this with just your Samsung watches, you can visit my other project that is using Blynk widget to control the LED strip.
You can have more of those lamps in your house, maybe in each room.
Make them so they are all connected, or make them separate so everyone can choose what effect they want. You can customize the whole project easily so feel free to try it.
Feel free to ask any questions about this project.
- Visit HARDWARIO page on hackster.io for more interesting projects or go directly to their website
- Go to HARDWARIO documentation to learn more about their modules and other possibilities of the platform.
- Try more firmware from HARDWARIO Playground or write your own, it is easy to start.
- Because everything is Open source you can get all firmware on GitHub, get some inspiration and try to make your own applications.
- Get your own HARDWARIO Hub to replace your computer in this project so you have always access to your applications.
- Check out more applications that can be used with HARDWARIO IoT Kit in Integrations section.


Comments