


Hardware components | ||||||
 |
| × | 1 | |||
 |
| × | 1 | |||
 |
| × | 1 | |||
| × | 1 | ||||
Software apps and online services | ||||||
 |
| |||||
Hand tools and fabrication machines | ||||||
 |
| |||||
 |
| |||||
If you want to have some security involved in your smart home or office, you can use some NFC, RFID, but that involves some cards or chips that you or your employees have to have.
Or you can use this project and fingerprint sensor by Adafruit so you can be authorized just by your finger.
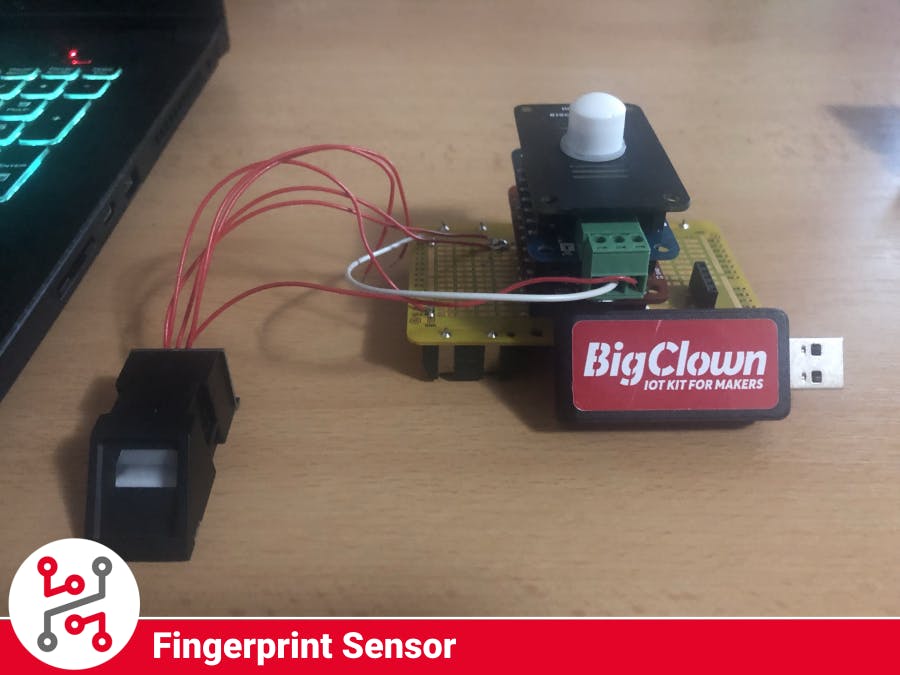
1. Build hardwareYou will need the Core Module,Relay Module, PIR Module, and Battery Module, from HARDWARIO IoT Kit and Fingerprint Sensor from Adafruit.
Put all the HARDWARIO IoT Kit modules together like this and you are ready to move on.
Next, you will need to solder the Fingerprint sensor onto the battery module. GND from the sensor goes to GND on the module, 3V3 goes to VDD, RX to TXD0 and TX to RXD0.
!ATTENTION: you might have a sensor that has RX and TX switched, so if the code does not work, try to switch the RX and TX pin!
2. Flash firmware- Download HARDWARIO Playground,
- Flash firmware to the Core Module that was made for this project: bcf-radio-fingerprint-sensor
- You can find it on my GitHub in releases.
- How to flash firmware is shown in the documentation.
You need to pair the Core module with the Radio dongle that you are using, follow the instructions below to see how it is done.
- Connect your USB Radio Dongle to your computer.
- Open HARDWARIO Playground
- Click Start Pairing the LED on the dongle should start blinking
- Connect the device that you want to pair into your computer or insert the batteries.
- Wait for the device to appear in the table
- It should add the device with the Alias: fingerprint-sesor:0
After you did all this you can unplug the device from the computer and insert the batteries, it will run on them without a problem. Next steps will be done on the computer, so you can leave the device and focus on the NODE-Red.
4. Import flowOpen Node-RED in the Playground or Raspberry Pi and import this flow from the Attachments in the Menu -> Import -> Clipboard.
Do not forget to hit "Deploy" in the top right corner to apply the changes.
In this flow, you will be able to start or stop enrolling on the Fingerprint sensor, just use the switch in the dashboard.
5. Test your deviceMove in front of the PIR sensor, the Fingerprint sensor will boot up and you will be able to place the finger onto it. If you didn't enroll that finger, nothing will happen and after some time the sensor will turn off again.
Start enroll in the dashboard, and move in front of PIR again. Place the finger onto the sensor, wait for the Core Module LED to blink, remove the finger and place there again and wait for the LED to blink again. After that, the sensor should turn off automatically.
Finally, you can authorize with that finger and you will get the ID into the Node-RED. The sensor iterates the ID by itself, so the first finger will have ID 1, second one 2 and so on.
This sensor can store up to 127 fingerprints.
SummaryAdd names to your IDs by making the array of names in the Node-RED so you know who and when authorized by the fingerprint. Work with confidence, so you have it extra safe.
You can unlock doors, send emails or change some theme of the room based on the ID, etc. just by connecting some nodes in the Node-RED, it is really simple.
You can add an LCD Module into this thanks to the Split Module, the bc_fingerprint module has all the events you can work with.
Feel free to ask any questions about this project.
- Visit HARDWARIO page on hackster.io for more interesting projects or go directly to their website
- Go to HARDWARIO documentation to learn more about their modules and other possibilities of the platform.
- Try more firmware from HARDWARIO Playground or write your own, it is easy to start.
- Because everything is Open source you can get all firmware on GitHub, get some inspiration and try to make your own applications.
- Get your own HARDWARIO Hub to replace your computer in this project so you have always access to your applications.
- Check out more applications that can be used with HARDWARIO IoT Kit in Integrations section.


Comments