

Hardware components | ||||||
 |
| × | 1 | |||
 |
| × | 1 | |||
| × | 1 | ||||
| × | 1 | ||||
| × | 1 | ||||
| × | 1 | ||||
| × | 1 | ||||
Many times we want to play something with friends and we need an electronic boards to count the points of each team or player. Based on this, we developed this project with Arduino.
The following project is to develop an electronic scoreboard with Arduino. Through this scoreboard, we will use two buttons to adjust the score for each player or team.
Next, we will start the discussion and development of the project step by step.
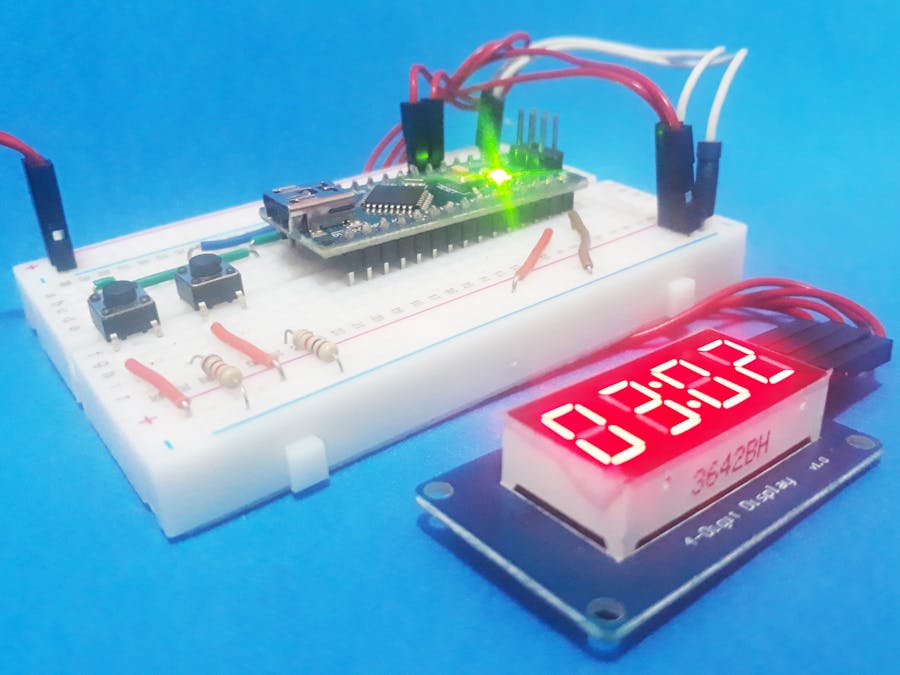
Project DevelopmentInitially, we present the electronic components used and the schematic assembly circuit of the project in Figure 1.
Through this circuit, we use two buttons to adjust the score on the electronic scoreboard.
The button attached to digital pin 6 adjust player 1's points, while the button attached to digital pin 7 adjusts player 2's score.
Points will be sent by Arduino Nano to the TM1637 display module.
Next, we will start discussing the project programming code.
The Logic Programming of the Electronic Scoreboard
Following is the complete code for the development of the electronic scoreboard with Arduino. Soon after, we will present the step by step discussion of the project.
#include <TM1637Display.h>

TM1637Display display(2,3);

byte CountP1 = 0, CountP2 = 0;
bool player1 = 0, player2 = 0;
bool PreviousStateP1 = 0, PreviousStateP2 = 0;

#define P1 6
#define P2 7

void setup()
{
      display.setBrightness(1);      // set display to maximum brightness

      pinMode(P1, INPUT);
      pinMode(P2, INPUT);

      display.showNumberDec(0,true,4,0);
}

void loop()
{
            player1 = digitalRead(P1);
            player2 = digitalRead(P2);

            delay(50);

            if(player1 == 1 && PreviousStateP1 == 0)
            {
             CountP1++;
             PreviousStateP1 = 1;
            }

            if(player1 == 0 && PreviousStateP1 == 1)
            {
             PreviousStateP1 = 0;
            }

            if(player2 == 1 && PreviousStateP2 == 0)
            {
             CountP2++;
             PreviousStateP2 = 1;
            }

            if(player2 == 0 && PreviousStateP2 == 1)
            {
             PreviousStateP2 = 0;
            }

              display.showNumberDecEx((100*CountP1) + CountP2, 0x40, 1, 4, 0);
}
First, we insert the TM1637 module library, declare all variables, and define the push-button pins.
#include <TM1637Display.h>

TM1637Display display(2,3);

byte CountP1 = 0, CountP2 = 0;
bool player1 = 0, player2 = 0;
bool PreviousStateP1 = 0, PreviousStateP2 = 0;

#define P1 6
#define P2 7
Soo after, in the void setup function was configured the display brightness, the pins were set as input and the zero value was printed in the TM1637 Display.
void setup()
{
      display.setBrightness(1);      // set display to maximum brightness

      pinMode(P1, INPUT);
      pinMode(P2, INPUT);

      display.showNumberDec(0,true,4,0);
}
All documentation of the TM1637 Display function can be accessed in the link: TM1637 Display Documentation
Now, in the loop function was implemented a code to increment two count variables using two buttons. Each button will increment each variable as is shown below.
void loop()
{
            player1 = digitalRead(P1);
            player2 = digitalRead(P2);

            delay(50);

            if(player1 == 1 && PreviousStateP1 == 0)
            {
             CountP1++;
             PreviousStateP1 = 1;
            }

            if(player1 == 0 && PreviousStateP1 == 1)
            {
             PreviousStateP1 = 0;
            }

            if(player2 == 1 && PreviousStateP2 == 0)
            {
             CountP2++;
             PreviousStateP2 = 1;
            }

            if(player2 == 0 && PreviousStateP2 == 1)
            {
             PreviousStateP2 = 0;
            }

              display.showNumberDecEx((100*CountP1) + CountP2, 0x40, 1, 4, 0);
}
In the loop, each pin will be read. Case one of the button is pressed, the variable CountP1 or CountP2 will be incremented according to the pressed button.
Finally, the value of count will be shown in the TM1637 Display as is presented in Figure 1.
To present the value in TM1637 Display was used the function presented below.
display.showNumberDecEx((100*CountP1) + CountP2, 0x40, 1, 4, 0);Through this function was calculated the value of count through the following equation: (100*CountP1) + CountP2.
Soon after, was activated the dots to separate the two values.
Therefore, it is a simple project that is possible touse in several games.
AcknowledgmentThanks to the PCBWay for support the our YouTube Channel and produce and assembly PCBs with better quality.
The Silícios Lab thanks UTSOURCE to offer the electronic components.


Comments