


Hardware components | ||||||
 |
| × | 1 | |||
 |
| × | 1 | |||
| × | 1 | ||||
| × | 1 | ||||
| × | 1 | ||||
| × | 1 | ||||
| × | 1 | ||||
| × | 1 | ||||
Software apps and online services | ||||||
| ||||||
| ||||||
 |
| |||||
| ||||||
| ||||||
| ||||||
Hand tools and fabrication machines | ||||||
 |
| |||||
 |
| |||||
| ||||||
 |
| |||||
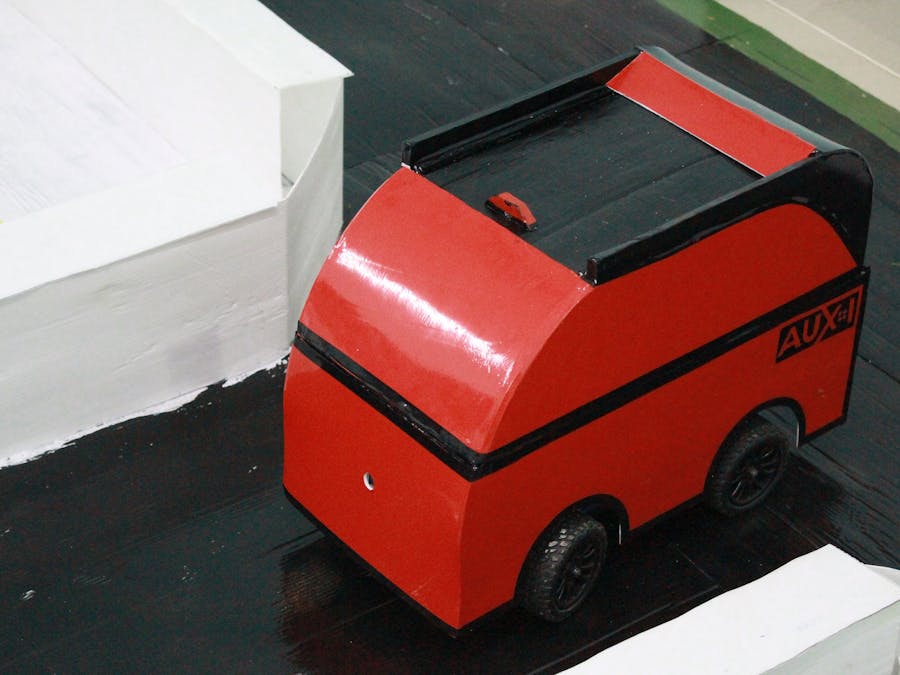
The word "Auxi" is an abbreviation for "auxilium," which means "assistance" in Latin. This helper uses its small computer brain and computer vision to assist people in carrying items. It employs TensorFlow-based machine learning on a Raspberry Pi for autonomous movement, using the supervised learning technique known as behavioural cloning. The purpose of Auxi is to serve as a shopping companion, and its development process and machine learning training are focused on that objective. Currently in its development stage, the project has implemented ML-based driving to move while avoiding obstacles and carrying items to a predetermined location.
Gathering ThingsWe selected the DonkeyCar platform for developing autonomous vehicles because it provides all the essential components, code, and tutorials required. To purchase one, visit https://www.donkeycar.com/.
The necessary items for our build are the donkey car kit, consisting of an RC car, servo driver board, top mount parts (which can be 3D-printed or laser-cut from the 3D model available at Thingiverse), screws and connectors, jumper wires, and a power bank.
DonkeyCar Simulator
Their software, which is built on the Unity game engine, allows us to simulate an autonomous car driving in a virtual environment, providing an experience that mimics real-life interaction. To learn more about it, visit the given page, or alternatively, proceed with the build in the physical world by skipping this section.
To avoid difficulties, replace the non-XT60 battery connector with a new XT60 one. Similarly, if the RC car's battery is not a LiPo battery, replace it with one from the link in the product description since LiPo batteries are long-lasting and easily chargeable with a suitable charger. Remember to switch the battery jumper on the ESC when swapping batteries.
Secure the 3D-printed or laser-cut parts and top mounts using the provided screws, ensuring that the wires from the servo and ESC are threaded through the top mount.
Software PartRegarding the software, there are two subparts:
- Installing the software on the Raspberry Pi
- Installing the software on the Host PC
Install Raspberry Pi OS and enable WiFi
Enable SSH
Enabling SSH before the first boot allows access to the RPi's terminal without requiring a connected display, which is disabled by default in Raspbian. To resolve this, open Notepad++ and save the file as SSH without entering anything, ensuring that there is no file extension. Then eject the SD card, insert it into the RPi, and power it up with a 5V 2amp power supply. If the Pi does not connect to the WiFi automatically, troubleshoot using keywords like "wpa_supplicant.conf headless Raspberry Pi."
Enable Interfacing
It is advisable to update the OS once the RPi is booted up. Run the following commands:
sudo apt-get update && sudo apt-get upgradeThen, type in
sudo raspi-config to open a new window. You may optionally change the username and password, and enable I2C and camera from the interfacing option. Also, select "expand filesystem" from the advanced options. Hit enter and reboot the system.
Installing Files:
- Dependencies
sudo apt-get install build-essential python3 python3-dev python3-pip python3-virtualenv python3-numpy python3-picamera python3-pandas python3-rpi.gpio i2c-tools avahi-utils joystick libopenjp2-7-dev libtiff5-dev gfortran libatlas-base-dev libopenblas-dev libhdf5-serial-dev git

sudo apt-get install libilmbase-dev libopenexr-dev libgstreamer1.0-dev libjasper-dev libwebp-dev libatlas- Virtual env
python3 -m virtualenv -p python3 env --system-site-packages
echo "source env/bin/activate" >> ~/.bashrc
source ~/.bashrc- Install Donkey Car
mkdir projects
cd projects

git clone https://github.com/autorope/donkeycar
cd donkeycar
git checkout master
pip install -e .[pi]
pip install tensorflow==1.13.1
Validate TensorFlow install
python -c "import tensorflow"Using terminal Install minconda python
wget https://repo.anaconda.com/miniconda/Miniconda3-latest-Linux-x86_64.sh
bash ./Miniconda3-latest-Linux-x86_64.sh
Create a folder with the name projects and change to that folder. Clone DonkeyCar Github repo
git clone https://github.com/autorope/donkeycar
cd donkeycar
git checkout master
To create a Python anaconda environment
conda update -n base -c defaults conda
conda env remove -n donkey
conda env create -f install/envs/ubuntu.yml
conda activate donkey
pip install -e .[PC]
Optional Install TensorFlow GPU (For host PC with Nvidia-based GPU)
conda install tensorflow-gpu==1.13.1
Create a local folder
donkey createcar --path ~/mycar
Note: After closing the Anaconda Prompt, when you open it again, you must run
conda activate donkey
to re-enable the mappings to donkey-specific Python libraries.
Adding Brains to the HardwareTo combine the Pi and the car, a motor driver board is used as an intermediary to establish communication between both devices since the Pi is not capable of controlling the motors on its own. This motor driver uses the I2C protocol to communicate. To connect the motor driver to the RPi,
- Connect the VCC of the motor driver to any 3.3V pin of the RPi
- Connect the GND of the motor driver to any GND pin of the RPi
- Connect the SDA and SCL to the same pins on the RPi.
Refer pinout diagram of Raspi
Connection From RC Car to the Motor Driver
Connect the two cables from the RC car to channels 0 and 1 of the motor driver, ensuring that the polarity is correct. The throttle cable, which comes from the ESC, is connected to channel 0, while the steering cable, which comes from the front servo, is connected to channel 1. Make sure that the red wire from the car is connected to the red connector on the driver, the black wire from the car is connected to the black connector on the driver, and the data wire (white in this case) is connected to the yellow/orange part of the connector.
Connection From Raspi to the Camera Module
Connecting the camera module is easy, follow this video by the Raspberry Pi Foundation.
Calibrating RC CarTo configure the speed and turning angle of the RC car, access the Pi using SSH and open the myconfig.py file located in the ~/mycar/ directory using the nano editor. This file contains the car's settings that can be edited as needed. For calibration instructions, refer to http://docs.donkeycar.com/guide/calibrate/.
DrivingThe next step after completing the calibration process is to SSH into your Raspberry Pi using your smartphone or PC and enter the command to start the driving mode.
cd ~/mycar
python manage.py drive
To control the DonkeyCar, open a web browser on another device connected to the same network as the Raspberry Pi. Search for this specific address and a web-controller interface will appear.
<your car's IP's address>:8887
To ensure good data collection, practice driving around the track a few times. When ready to record data, restart the python manage.py process and press "Start Recording" on the web controller. Stop the recording immediately if you crash or run off the track by pressing "Stop Car" or tapping the Triangle button on the joystick to erase the last 5 seconds of records. After collecting 10-20 laps of good data (5-20k images), stop the car with Ctrl-c in the SSH session, and locate the data in the "data" folder of the most recent tub folder. Repeat this process until satisfactory results are obtained.
To train an ML model, it's not feasible to use the RPi due to its lack of computing power. Therefore, data must be transferred from the RPi to a capable PC for training. The data can be transferred to a Linux machine using the rsync command, but if this is not an option, WinSCP can be used to transfer files to a Windows machine. However, transferring individual files proved to be slow, so the solution was to zip the files on the RPi, transfer the zipped file, and extract it on the host computer. This approach worked seamlessly, and training could be done on a capable machine.
Training Data
- Restart the virtual env
virtualenv env -p python3
source env/bin/activate
- Move to donkeycar folder
cd donkeycar
- Start Training
python ~/mycar/manage.py train --tub ~/mycar/tub --model ~/mycar/models/mypilot.h5
The training process should finish within a few epochs. After it's done, retrieve the trained model from the ~/mycar/models/ folder and transfer it to the Rpi's ~/mycar/models/ folder using Rsync. If Rsync doesn't work, use WinSCP instead. Once the trained model is transferred, start the car and drive it in autonomous mode.
python manage.py drive --model ~/mycar/models/mypilot.h5To experience autonomous driving, go to the web controller at your car's IP address followed by port number 8887. You can change the mode and pilot to one of the following options:
- User: This mode allows you to control both the steering and throttle.
- Local Angle: In this mode, the locally-hosted trained model controls the steering.
- Local Pilot: In this mode, the trained model takes control of both the steering and throttle, but it's not very reliable at the moment.
Repeat the training process until you get hold of a good set of datasets and models.


_t9PF3orMPd.png?auto=compress%2Cformat&w=40&h=40&fit=fillmax&bg=fff&dpr=2)


Comments