


Hardware components | ||||||
 |
| × | 1 | |||
 |
| × | 1 | |||
 |
| × | 19 | |||
 |
| × | 1 | |||
 |
| × | 1 | |||
Software apps and online services | ||||||
 |
| |||||
This project has been developed with the goal to create an Application which uses Machine Learning / AI-Technologies and solves a real world problem. In order to quickly develop a prototype, the “Smartphone Sensing Framework – SSF” is used.
Smartphone Sensing FrameworkThe Smartphone Sensing framework (SSF) provides a collection of modules and a quick way to develop context aware apps on android in an experimental way.
Idea and Application:
- Victor Kallenbach, Daniel Stümke
- dionysios.satikidis@gmail.com, jan.seyler@gmail.com
Tools:
https://github.com/MrDio/Smartphone-Sensing-Framework
https://github.com/MrDio/Applied-AI-Technologies
- Python 3.6
- Tensorflow / Keras
ProblemCats love to be outside. So some people install a cat door to give their pet the freedom to left and enter the house at any time. But if you don't want to get some unwanted visitors you have to install a system which can recognize your cat. Current solutions use a special collar or implanted chips. But cats hate collars and implanting a chip is expensive and stressful for the cat.
The IdeaTo solve that issue, we build a cat door which is equipped with a camera and a Raspberry Pi 3. You should be able to upload a picture of your cat as a reference. The door will only open if the cat in front of it looks similar.
ConceptWe are using a Single Shot Detector (SSD) to extract the cat face out of the camera picture. The extracted cat face is passed to the input of a Siamese Neural Network, which compares various features from the reference picture and the camera picture. If the pictures are similar enough, the cat door lock will be opened.
The used SSD is a MobileNet v1 240. To train the SSD we used the Kaggle Cat Dataset which contains over 9,000 Cat pictures with annotated facial features. The total number of iterations was 150,000.
As a starting point for our Siamese Network architecture we used the Model explained by Gregory Koch. For the training we used 10 pictures of 19 different cats, which we found on Instagram. We used a batch size of 5 and a total number of 2,000 iterations to train our Siamese Network Model.
Basis HardwareIf you want to build your own cat recognition system you need the following pieces of Hardware:
- RaspberryPi 3+
- RaspberryPi Camera v2.1
- Intel Movidius Neural Compute Stick
We also build an demonstrator with some smooth visual effects, therefore you need:
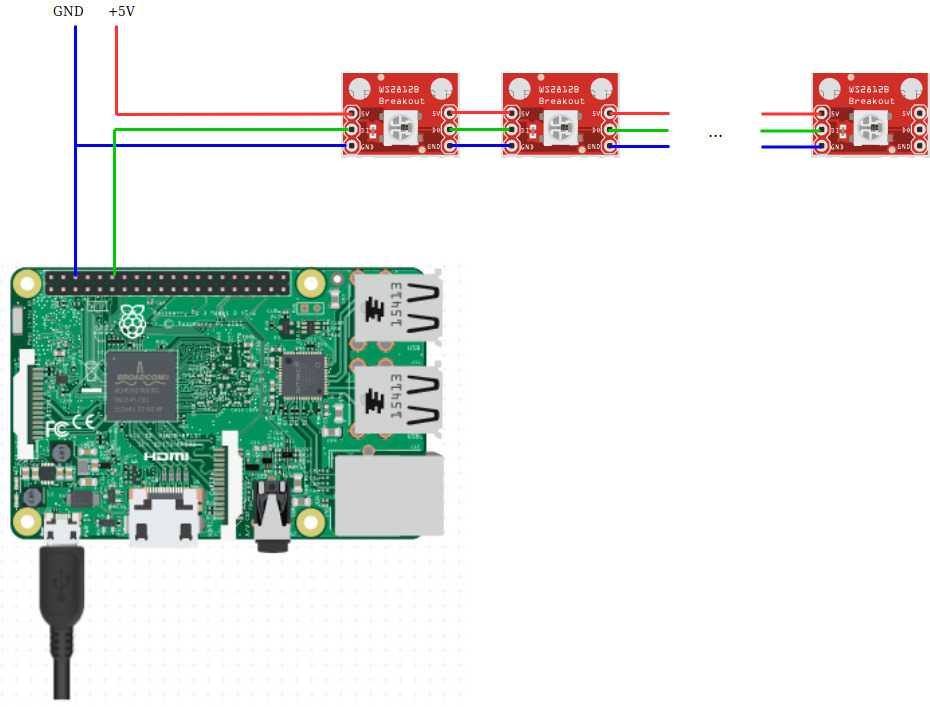
- 19 WS2812B RGB LEDs
- 2mm Perspex Panel
- 50cm x 50cm wooden Panel
- 5V Power suppply
The gate has an height of 24cm and a width of 21cm. We crafted it in a wood workshop. The LEDs were soldered in a line with a distance of 3cm. They are controlled by the RaspberryPi using the rpi_ws281x library.
We are using the Intel Movidius Neural Compute Stick (NCS) to run the SSD. This increases the average FPS from 2 to about 15. In order to run the Model on the Compute Stick we installed the OpenVino Library and loaded the SSD as frozen graph.
# load ssd
net = cv2.dnn.readNetFromTensorflow(                     \
    './model/mobilenet_ssd/sorted_inference_graph.pb',   \
'./model/mobilenet_ssd/output_new.pbtxt')The Network which is used to compare the camera image and the reference image is implemented with Python keras. You can think of it as a feature extractor which looks for significant characteristics (like fur colour, ear shapes, etc.).
Our network contains two paths with four identical Convolutional Neural Networks (CNNs). The total number of Parameters is 8,433,709. Surprisingly the prediction time takes only about 280ms even tough the calculations are performed on the CPU.
def get_siamese_model(input_shape):
   """
       Model architecture based on the one provided in:
       http://www.cs.utoronto.ca/~gkoch/files/msc-thesis.pdf
   """
   # Define the tensors for the two input images
   left_input = Input(input_shape)
   right_input = Input(input_shape)
   # Convolutional Neural Network
   model = Sequential()
   model.add(Conv2D(12,(10,10),activation='relu',input_shape=input_shape))
   model.add(MaxPooling2D())
   model.add(Conv2D(24, (7,7), activation='relu'))
   model.add(MaxPooling2D())
   model.add(Conv2D(24, (4,4), activation='relu'))
   model.add(MaxPooling2D())
   model.add(Conv2D(32, (4,4), activation='relu'))
   model.add(Flatten())
   model.add(Dense(4096, activation='sigmoid'))
   # Generate the encodings (feature vectors) for the two images
   encoded_l = model(left_input)
   encoded_r = model(right_input)
   # Layer to compute the absolute difference between the encodings
   L1_layer = Lambda(lambda tensors:K.abs(tensors[0] - tensors[1]))
   L1_distance = L1_layer([encoded_l, encoded_r])
   # Add a dense layer with a sigmoid unit to generate the similarity score
   prediction = Dense(1,activation='sigmoid')(L1_distance)
   # Connect the inputs with the outputs
   siamese_net = Model(inputs=[left_input,right_input],outputs=prediction)
   # return the model
   return siamese_net
A problem which we had to solve was, that our Siamese Network expects input images with the dimensions 128 x 128, but the SSD doesn't always return images with a width/height ratio of 1:1. The solution was to insert a padding on the smaller side of the image before resizing them, so that the face doesn't get stretched.
Due to the fact, that the rpi_ws281x library is only available for Python 2.7 and we are using Python 3 for our Cat Face Recognition we had to find a workaround. The solution we used is separated in two independent Scripts. One Script runs on Python 2.7 and is controlling the LEDs and receives commands via an UDP Socket. The other Script, which is doing all the work, sends depending on its state a command to the LED-Control Script which then changes the animation.
You can see the awesome looking result in the Video at the top of the page :)


_3u05Tpwasz.png?auto=compress%2Cformat&w=40&h=40&fit=fillmax&bg=fff&dpr=2)
Comments