


Hardware components | ||||||
 |
| × | 1 | |||
 |
| × | 1 | |||
 |
| × | 1 | |||
 |
| × | 1 | |||
Software apps and online services | ||||||
 |
| |||||
| ||||||
 |
| |||||
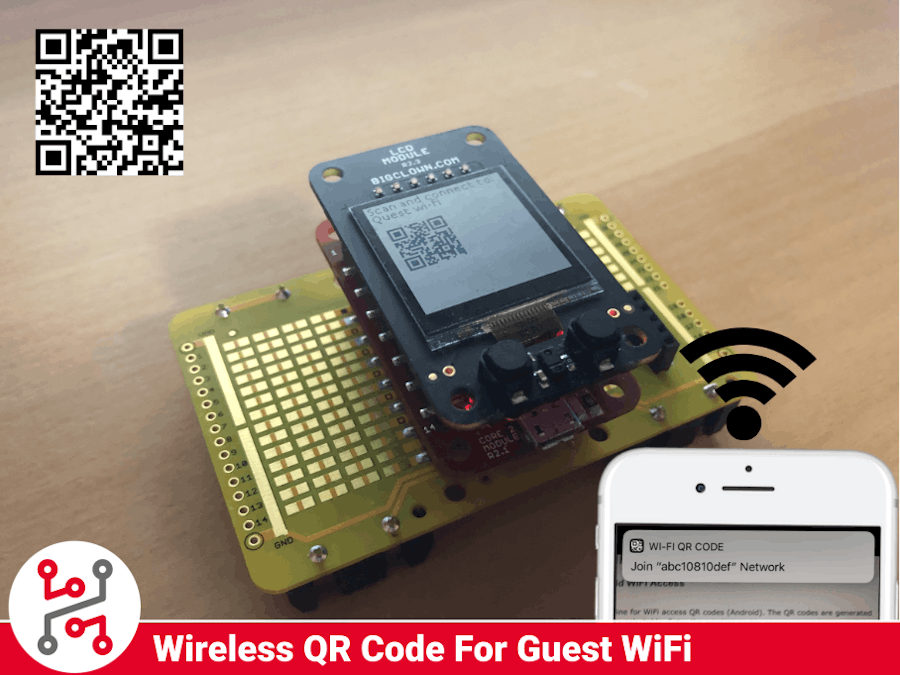
In my company, they are changing the WiFi password all the time. They put little paper in the kitchen so everybody can join, but who wants to write all the long and secure passwords into their phones? After a few days, the letter is gone and nobody remembers it. So I came up with a solution that will make it easier for everybody to connect without any papers.
With HARDWARIO IoT Kit technology and MQTT messages, they just send the new password through radio and you can connect with a QR code that is on the HARDWARIO IoT Kit LCD module. It is low power so it can run on batteries for a long time.
1. Build hardwareConnect Core Module with your Battery Module, then connect LCD Module to it. You can use Mini-Battery Module if you want to make it a little bit smaller.
For more information about all the modules you can visit Documentation.
2. Flash firmware- Download HARDWARIO Playground.
- You can see documentation page on how to flash the firmware with HARDWARIO Playground.
- You will need the bcf-radio-qr-wifi-terminal firmware for this project.
You need to pair the Core module with the Radio dongle that you are using, follow the instructions below to see how it is done.
The same thing will go if you are using a Raspberry Pi as a server, just access the Raspberry through the IP address instead of the Playground
- Connect your USB Radio Dongle to your computer.
- Open HARDWARIO Playground
- Click Start Pairing the LED on the dongle should start blinking
- Connect the device that you want to pair into your computer or insert the batteries.
- Wait for the device to appear in the table
- It should add the device with the Alias: qr-terminal:0
- Click Stop Pairing
Open Node-RED in Playground (Functions tab) or on your Raspberry Pi and import this simple function. Just copy everything, go to Menu -> Import -> Clipboard and paste it there.
In this function you can fully customize what will be on the display, just change the QR code information in the String builder function flow.
After Import hit Deploy in the top right corner to upload the change.
5. Set up QR codeNode-RED function is ready to set up your own QR code.
Open the Dashboard tab in the Playground. Fill in your information like SSID and Password into the text box, you have to hit enter after each text box. QR code on LCD should change after few minutes or you can hit the left button on the LCD module and it will change immediately
If you have everything done you can get one of the 3D printed enclosures and put this terminal anywhere you like so all your quest will have easy access to it.
If you press the right button you can change the page on the display from the QR code to the written informations.
SummaryYou can use this in your company building or if you have WiFi for quests in your house you can use it for them, so they simply scan the code when they come in.
Also, it can be used in hotels where you just want to change the password after some time but you don't want to print them out again.
The code can be changed simply so that the QR code is referring to something else, your company page, some info for visitors, you name it.
I will be happy to answer any questions in a comment, so feel free to ask.
- Visit HARDWARIO page on hackster.io for more interesting projects or go directly to their website
- Go to HARDWARIO documentation to learn more about their modules and other possibilities of the platform.
- Try more firmware from HARDWARIO Playground or write your own, it is easy to start.
- Because everything is Open source you can get all firmware on GitHub, get some inspiration and try to make your own applications.
- Get your own HARDWARIO Hub to replace your computer in this project so you have always access to your applications.
- Check out more applications that can be used with HARDWARIO IoT Kit in Integrations section.


Comments