


Hardware components | ||||||
 |
| × | 1 | |||
 |
| × | 1 | |||
 |
| × | 1 | |||
 |
| × | 1 | |||
Software apps and online services | ||||||
 |
| |||||
 |
| |||||
XinaBox produces a range of 80+ modular xChips, which include cores/CPUs, sensors, power, communication, output, and storage, using a connectivity standard without wires, soldering, breadboards or hardware knowledge
xChip CW01 (ESP82666 Core) is a microprocessor and Wi-Fi module, that enables users to send/receive data from XinaBox's modular xChips to/from the cloud.
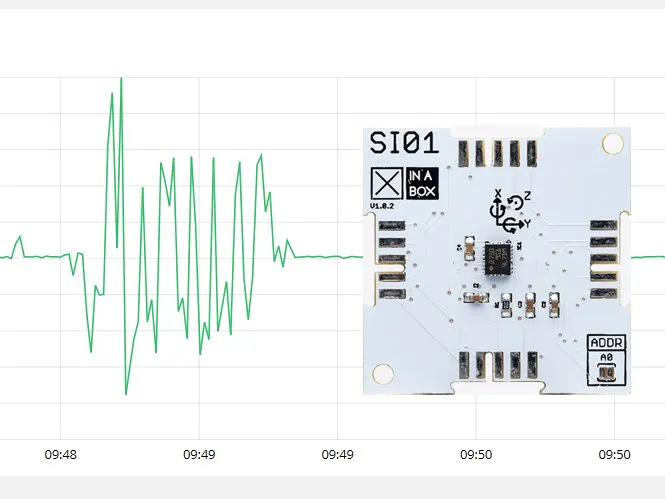
xChip SI01 (LSM9DS1) is an IMU 9DoF module that comprises of 3 sensors, an accelerometer that measures acceleration of the X, Y and Z axes, a magnetometer that computes orientation to magnetic north, on the X, Y and Z axes, therefore we can calculate which direction we are facing as well as the angle at which we are leaning. The last sensor is the gyroscope that measures our orientation to the center of the earth.
Vibration sensors are used in a variety of applications, such as in industrial machines to detect faults. The xChip SI01’s accelerometer detects static and dynamic acceleration in three axes. Using the acceleration values, we can determine the vibrations and visualize them on a graph.
By the end of this guide you will be able to build your own vibration sensor using XinaBox xChips and Ubidots that will display a real time graphical plot on the Ubidots dashboard.
Requirements● 1x CW01 - Wi-Fi Core (ESP8266/ESP-12F)
● 1x SI01 - IMU 9DoF (LSM9DS1)
● 1x IP01/IP02 – Simple/Advanced USB Programming Interface (FT232R)
● 1x XC10 - 10-Pack xBus Connectors
● Arduino IDE
● Ubidots Account
1.Hardware Setup
2.Installing Arduino Libraries
3.Result
4.Summary
1. Connect xChips CW01, SI01 and IP01/IP02 together using the XC10 xBus connectors. You may connect it as shown in the image below. Please see this guide on how to assemble xChips generally.
2. Then connect IP01/IP02 to the USB port of PC.
3. Select “XinaBox CW01” Board in Arduino IDE for uploading code, after installing required Arduino cores/libraries.
2. Installing Arduino Libraries1. Install Arduino IDE 1.8.8
2. Install these cores/libraries into Arduino IDE:
NOTE: If you are not familiar with how to install libraries, please refer to the links: Installing Arduino libraries and Installing cores.
3. ResultFor demonstration, I have used my mobile phone as a vibrator. Notice that the graph is a straight line until I turn on vibrations.
4. SummaryIn this project we have shown you how to make a vibration sensor using XinaBox xChips CW01 and SI01. The project plots real time vibrations value on the Ubidots dashboard to visualize. The project is useful in detecting faulty conditions of machines. The project is simple to build and requires little or no hardware knowledge.


Comments