


Hardware components | ||||||
| × | 1 | ||||
Software apps and online services | ||||||
 |
| |||||
| ||||||
Our project was devised, designed and partly implemented by three students of Engineering in Computer Science at Sapienza University of Rome, as an homework for IoT classroom.
Here you can find a summary slide presentation about it:
Here the Git repository of the project for FULL CODE:
The idea was to use Bluetooth beacons to make something different from what they're used for most of the time (advertising). So we decided to make an Android app (our first) able to capture data from beacons through Bluetooth connection, send it to cloud, store and process it and then give back some useful information to the client (the smartphone).
At first we wanted to use beacons as a parking lot status monitor (fixed as installed sensors or mobile as moving sensors given to entering clients). The problem was the lack of useful sensors (like presence or light sensors) so we moved to a different idea.
In our final implementation we decided to use beacons as they were fixed in every parking sector and at entrance. When a client with our opened app and working Bluetooth+GPS connection enabled, enters the field of action of a single beacon a map is displayed on his screen. Then when a button is pressed data about his device and time in which connection was established are sent to Azure IoT then Azure Stream Analytics and finally to an Azure SQL DB server. In this way we can make an (auto) query on the DB asking for number of clients entered in that sector that day.
At the moment the query can be done only through an API call from any authorized device gaining as response a JSON message. It will not be difficult to make possible in future to do API call and response job from the app itself. As well as a login mechanism in order to obtain data about client identity and to generate also a unique code for every client. For now we use a unique ID obtained from the android system working on the device, but it's a temporary solution.
About the hardwareWe used three different (but very similar) Bluetooth beacons produced by Sensoro company. They use BLE connection to transmit frames with information about their identity (SN, UUID, Major ID, Minor ID) and when connection is established, sensor data as well (temperature and accelerometer, not available on center device in the image below).
As a starting point we took the Sensoro repository where we found a ready-to-use Android SDK (also iOS SDK was present). So we built our Android app around it. You can look at BootCompleted sample app in the repository linked and start from it or you can follow this guide lines if you want to create a brand new app.
1) Import jars
After you downloaded the SDK you can import the libraries .jar files into Android studio. Build a new libs fold at root directory and unarchive the downloaded SDK to the folder.
The SDK includes following modules:
- sensoro-scanner-<Version>.jar
- sensorocloud-<Version>.jar
- sensorobeaconkit-<Version>.jar
- //添加gson包
- implementation 'com.google.code.gson:gson:2.8.5'
- //网络请求包
- implementation 'com.loopj.android:android-async-http:1.4.9'
- implementation 'org.apache.httpcomponents:httpcore:4.4.1'
2)Modify AndroidManifest.xml
- Add uses-permission to AndroidManifest.xml
<manifest
...
    <uses-permission android:name="android.permission.BLUETOOTH" />
    <uses-permission android:name="android.permission.BLUETOOTH_ADMIN" />
    <uses-permission android:name="android.permission.INTERNET" />
    <uses-permission android:name="android.permission.ACCESS_FINE_LOCATION"/>
    <uses-permission android:name="android.permission.WAKE_LOCK" />
...
</manifest>
- Add service to AndroidManifest.xml
<manifest
...
    <application
     ...
        <service android:name="com.sensoro.beacon.kit.BeaconService"/>
        <service android:name="com.sensoro.beacon.kit.IntentProcessorService"/>
    ...
    </application>
...
</manifest>
3) Initialize the app
As first thing you need to setup cloud uploading sensor data (battery status, UMM) as false in our case because we will use Azure services instead. Then we can start ranging service.
SensoroManager sensoroManager = SensoroManager.getInstance(context);
/*
 Check whether the Bluetooth is on
*/
if (sensoroManager.isBluetoothEnabled()) {
    /* Enable cloud service (upload sensor data, including battery status,
      UMM, etc.)。Without setup, it keeps in closed status as default.
    */
    sensoroManager.setCloudServiceEnable(false);
    /*
     Enable SDK service
    */
    try {
        sensoroManager.startService();
    } catch (Exception e) {
        e.printStackTrace(); // Fetch abnormal info
    }
}
- SDK works with Bluetooth 4.0. Bluetooth needs to be on before enabling the SDK to work properly.
- The design of the SDK adopts singleton pattern. It is recommended to initialize it at the inherited Application.
If the Bluetooth of the Android device is off, please use following code to request switching one the Bluetooth:
Intent bluetoothIntent = new Intent(BluetoothAdapter.ACTION_REQUEST_ENABLE);
startActivityForResult(bluetoothIntent, REQUEST_ENABLE_BT);
4) Setup sensor data monitoring
You may detect the presence of Beacon by employing and setting-up BeaconManagerListener,Sample code:
BeaconManagerListener beaconManagerListener = new BeaconManagerListener() {
    @Override
    public void onUpdateBeacon(ArrayList<Beacon> beacons) {
        // Refresh sensor info
    }
    @Override
    public void onNewBeacon(Beacon beacon) {
        // New sensor found
    }
    @Override
    public void onGoneBeacon(Beacon beacon) {
        // A sensor disappears from the range
    }
};
sensoroManager.setBeaconManagerListener(beaconManagerListener);
The refresh frequency of sensor info here is 1 time per second; when a new sensor is found, a return of sensor's disappearing will be sent if this specific device is not found in range in 8 second.
Tips:
- Please setup before enabling the SDK.
5) Monitor if the device is in range
The presence or disappearance of the device usually triggers certain operations. Code below will be used to determine whether SmartBeacon-4AA with SN "0117C5456A36" is entering or leaving the range:
BeaconManagerListener beaconManagerListener = new BeaconManagerListener() {
    @Override
    public void onUpdateBeacon(ArrayList<Beacon> beacons) {
        // Refresh sensor info
    }

    @Override
    public void onNewBeacon(Beacon beacon) {
        if (beacon.getSerialNumber().equals("0117C5456A36")){
            // Yunzi with SN "0117C5456A36" enters the range
        }
    }

    @Override
    public void onGoneBeacon(Beacon beacon) {
        if (beacon.getSerialNumber().equals("0117C5456A36")){
            // Yunzi with SN "0117C5456A36" leaves the range
        }
    }
};

sensoroManager.setBeaconManagerListener(beaconManagerListener);
Tips:
- The callback function is run in a non-UI thread. Please do not perform any UI related operations in the callback function, otherwise it may cause an exception running of the SDK. Please excute your code with Handler or Activity.runOnUiThread if necessary.
So far, you have integrated the SDK to your project. For more technical details, please refer to complete SDK documents.
Now we need to pass data to Azure platform.
AZURE IoT HUB PLATFORMAzure IoT Hub is Microsoft’s Internet of Things connector to the cloud. It allows you to manage data sent from different devices and to analyse them. Azure IoT Hub enables reliable and secure bi-directional communications between millions of IoT devices and a backend. In our case we use it to receive data from an android application running on a psychical android device.
Before running the application you need to create an IoT Hub and register a device with the hub. One of the possibilities to register a new device and to associate it to an IoT Hub is using the Azure Cloud Shell.
In Debian and Ubuntu you can download the Azure CLI with apt in the following way:
1. Get packages needed for the install process:
sudo apt-get update
sudo apt-get install curl apt-transport-https lsb-release gpg
2. Download and install the Microsoft signing key:
curl -sL https://packages.microsoft.com/keys/microsoft.asc | \
    gpg --dearmor | \
    sudo tee /etc/apt/trusted.gpg.d/microsoft.asc.gpg > /dev/null
3. Add the Azure CLI software repository:
AZ_REPO=$(lsb_release -cs)
echo "deb [arch=amd64] https://packages.microsoft.com/repos/azure-cli/ $AZ_REPO main" | \
   sudo tee /etc/apt/sources.list.d/azure-cli.list
4. Update the repository information and install the azure-cli package:
sudo apt-get update
sudo apt-get install azure-cli
In order to run the Azure CLI you can now tap the az command on your terminal. To sign in, use the azlogin command and sign in with your account credentials in the browser.
I. First Step: Create an IoT HUB
In order to create a new IoT Hub:
1. Log in to the Azure Portal
2. Choose +Create a resource, then choose Internet of things
3. Click on Iot Hub from the list on the right and you will see the following screen:
where:
- Subscription: Select the subscription to use for your IoT Hub.
- ResourceGroup: You can choose an existing resource group or create a new resource group.
- Region: This is the region in which you want your hub to be located
- IoTHubName: Put in the name for your Iot Hub. This name must be globally unique.
4. Click Next:Sizeandscale to continue creating your IoT Hub
Now you will be redirected to the following page:
On this screen you can take the default and just click on Review+Create.
5. Once clicked on Review+Create you will be redirected on this page in order to review your choices:
6. On this page click on Create to create your new IoT Hub (this passage will take few minutes).
7. On your terminal run the following command to add Microsoft Azure IoT Extension for Azure CLI:
az extension add --name azure-cli-iot-ext
II. Second step: Register a device
1. In order to register your device on the azure iot hub platform, you need to perform the following command from your terminal:
az iot hub device-identity create --hub-name YourIoTHubName --device-id MyAndroidDevice
where:
- YourIoTHubName is the name you choose for your IoT hub
- MyAndroidDevice is the name given to your device at the time of the registration
2. Run the following command in your terminal to get the deviceconnectionstring for your device:
az iot hub device-identity show-connection-string --hub-name YourIoTHubName --device-id MyAndroidDevice --output table
Save your device connection string which looks like the following string:
HostName={YourIoTHubName}.azure-devices.net;DeviceId=MyAndroidDevice;SharedAccessKey={YourSharedAccessKey}
3. Download our github project, open Android Studio and import our project. Once done that, open the file gradle.properties and replace Device_Connection_String with your device connection string, generated as before.
4. In Android Studio click File > Sync Project with Gradle Files and verify the build completes.
Now your Azure IoT Hub is configured.
AZURE SQL DATABASE and AZURE SQL DATABASE SERVERAzure SQL Database is a general-purpose relational database-as-a-service (DBaaS) based on the latest stable version Microsoft SQL Server Database Engine. An Azure SQL Database with its own set of resources is managed via a SQL Database server, so when you create a new Azure SQL Database you must define also a SQL Database Server to manage it.
A SQL Database Server is a logical construct used to manage different SQL Databases. It must exist before you can create the Azure SQL database.
I. Create a SQL Database Server
In order to create a new SQL Database Server from the Azure Portal:
1. From the navigation bar click on Create a Resource > Databases, search for SQL Server(logical server) from the search bar.
2. Once find click on the name and after on Create, you will be redirected to a new page similar to the following:
Compile the form and click on Create.
II. Create an Azure SQL Database
Once you have created a SQL Server as shown before, you can create a new Azure SQL Database:
1. Select Create a Resource from the navigation bar of the Azure Portal
2. Select Databases and then select SQLDatabase to open the Create SQL Database page
3. First compile the ProjectDetails form, that is similar to this one:
where:
- Subscription is one of your subscription (for example the one related to the IoT Hub)
- ResourceGroup is the same resource group of your IoT Hub
Second compile the Database Details form, that is similar to this one:
- Database name: Enter a name for your database
- Server: Select an existing server or create a new one as shown before
- Want to use SQL elastic pool: Select the No option
- Compute + Storage: Select Configure Database and for our project select the Basic service tier with 5DTUs and 2GB of storage. Select Apply
4. Select the Additional settings tab and, in the Datasource section select None
5. Leave the rest of the values as default and click on Review + Create at the bottom of the form
6. Review the final settings and click on Create
7. In order to Query your database, on the SQLDatabase page for your database, select QueryEditor (Preview) in the left menu, enter ADMIN informations and select OK. Now you can query your SQL database with a normal SQL query. Once writter the query, select Run and then review the query result in the Result pane.
III. Create a table into the Database
1. Go into the query editor (as shown before) and with the CREATE TABLE sql instruction create a new table with the following fields:
- devID (varchar)
- beaconID (varchar)
- temperature (varchar)
In order to interconnect Azure IoT Hub with a (SQL) database we used another service provided by Microsoft Azure: Azure Stream Analytics. Azure Stream Analytics integrates with Azure IoT Hub to enable real-time analytics on data from IoT devices and applications.
I. First step: Create the Stream Analytics Job
In order to create a new stream analytics job first go to the Azure portal and then:
1. Select Create a Resource in the left side of the Azure portal
2. Select Data + Analytics > Stream Analytics job from the result list
3. You will be redirected to a page that is similar to the following:
where:
- Job name: Identifier for the stream analytics job
- Subscription: Select the Azure subscription that you want to use for this job (better be the same as that of the Azure IoT Hub)
- ResourceGroup: Select the same resource group as your IoT Hub
4. Select Create in order to create the new Stream Analytics job (this operation can take few minutes)
Stream Analytics is characterized by an input source and an output source. In our case the input source is the Azure Iot Hub created as shown before, while the output source is an Azure SQL database. We need to configure both the input source (called job'sinput) and the output source (called job'soutput).
II. Second step: Configure job input
1. From the navigation bar of your stream analytics job select Inputs > Add Stream input > IoT Hub
2. You will be redirected to a page that is similar to the following:
where:
- Input alias: identifier of the job's input
- Subscription: it is the Azure subscription that has the storage account you created (it is not mandatory to select the same subscription of the Stream Analytics)
- IoT Hub: it is the name of the Azure IoT Hub created as shown before
3. Leave other options to default values and select Save to save settings.
III. Third step: Configure job output
1. From the navigation bar of your stream analytics job select Outputs > Add > SQL Database
2. You will be redirected to a page that is similar to the following:
where:
- Output alias: it is a name to identify the job's output
- Subscription: it is the Azure subscription that has the storage account you created (it is not mandatory to select the same subscription of the Stream Analytics)
- Database: select the SQL database created as shown before
- Username: database's admin username
- Password: database's admin password
- Table: name of the table created during the creation of the database
3. Leave the other options to default values and select Save to save settings.
IV. Fourth step: Define the transformation query
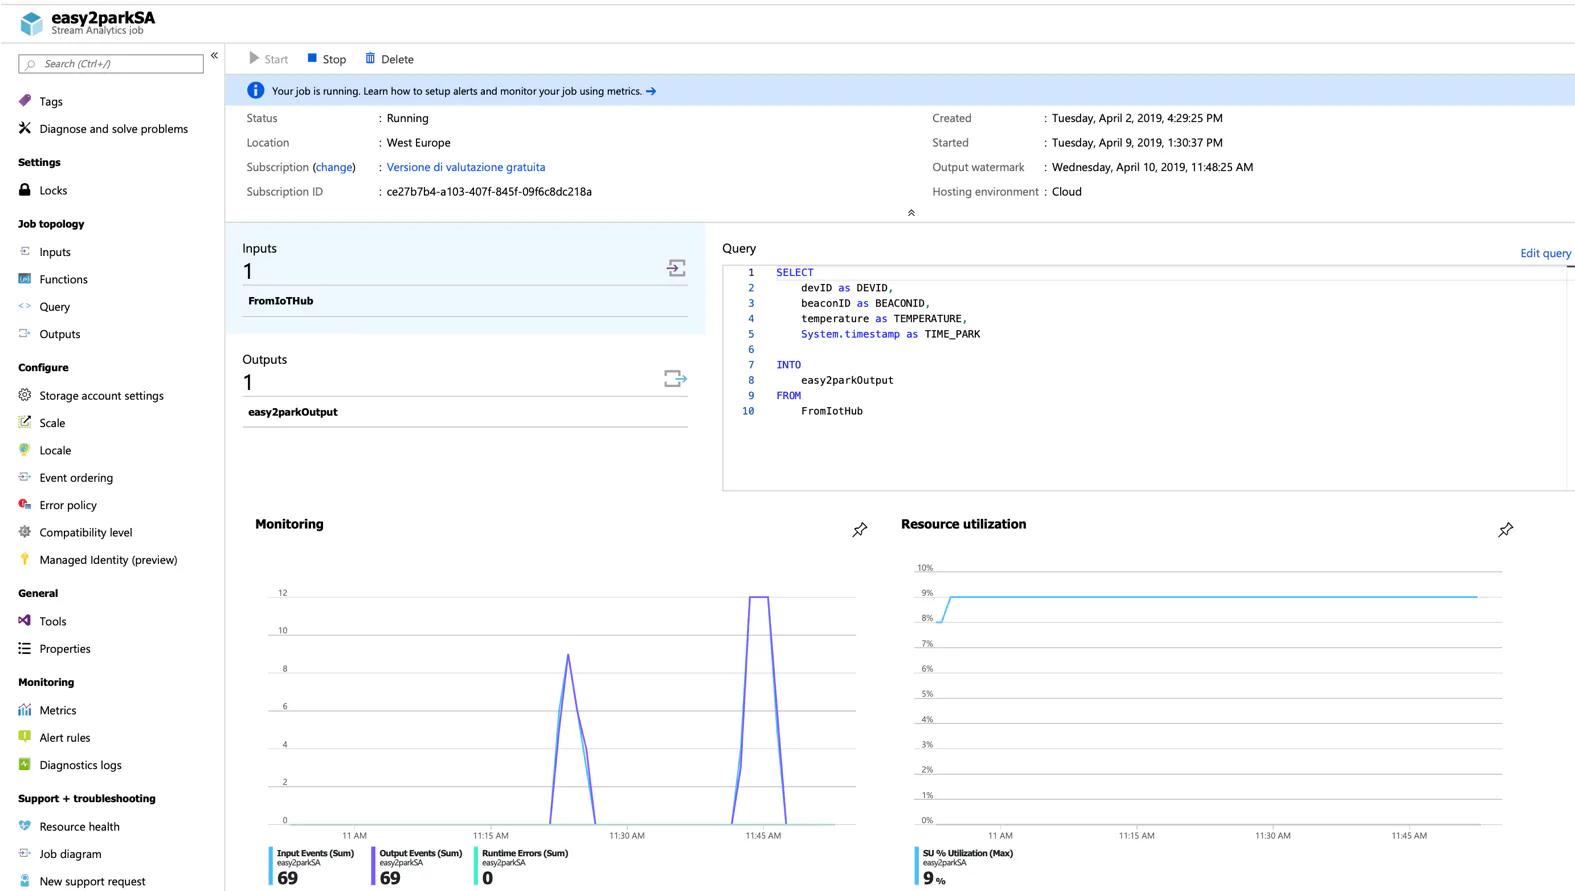
In order to connect the input stream with the output stream Azure provides a SQL-like language. This interconnection is done with a query that is called transformationquery. In order to define the transformation query for our application, from the navigation bar of your stream analytics job select Query and write the following query:
SELECT
    devID as DEVID,
    beaconID as BEACONID,
    temperature as TEMPERATURE,
    System.timestamp as TIME_PARK
INTO
    Your_Job_Output
FROM
    Your_Job_Input
where:
- Your_Job_Output is the job output created as before
- Your_Job_Input is the job input created as before
At this point the last thing to do is to make possible to access data on the db from our app. As pointed out at the beginning at the moment we will produce a secondary Android app just to visualize data but it would not be difficult to merge this functionality into our main app.
To do so we need to create another resource (last one, we promise) which is mobile app.
I. First Step: create mobile app resource
1. In the search box, type Mobile Apps.
2. In the results list, select Mobile Apps, and then select Create.
3. Choose a unique App name. This will also be part of the domain name for your App Service.
4. Under Resource Group, select our existing resource group.
II. Second step: configure the server project
1. Click the App Services button, select your Mobile Apps back end, select Quickstart, and then select your client platform (Android).
2. create a database connection:
Data connection must be successful:
3. Under 2. Create a table API, select Node.js for Backend language.
4. Accept the acknowledgment, and then select Create TodoItem table. This action creates a new to-do item table in your database.
5. Go into Development tools, click on AppService Editor (Preview) and then click on Go.
6. In the new tab opened go into api folder and create a new count.js file. Here you will define your API method which is a query on the db.
Test if your api call works from CLI with this command:
curl -X GET --header 'Accept: application/json' --header 'zumo-api-version: 2.0.0' 'http://eassy2parkmobileapp.azurewebsites.net/api/count'
If so you will see a json response with elements in the db.7. Download and run the Android app.
8. Visit the Azure Portal. Click Browse All > Mobile Apps > the backend that you just created. In the mobile app settings, click Quickstart > Android. Under Configure your client application, click Download. This downloads a complete Android project for an app pre-configured to connect to your backend.
9. Open the project using Android Studio, using Import project (Eclipse ADT, Gradle, etc.). Make sure you make this import selection to avoid any JDK errors.
10. Modify the code according to the API call inserted, replacing POST Add ToDo item calls with GET calls like the one in the command above.
11. Press the Run 'app' button to build the project and start the app in the Android debug mode on the smartphone.
For further informations about Azure here there are some useful links:
- Azure Portal
- Install Azure CLI on Linux via apt
- Create IoT Hub
- Create a single SQL Database
- Azure Mobile App
Here some screenshot from the final result:
We hope this guidelines will help you in the intent to integrate android apps with beacon sdks (overall Sensoro made ones) or android app with Azure services (bidirectionally) or both.
About usIf you want to have more information or you have some suggestion you can also contact us directly:


Comments