


Hardware components | ||||||
_ztBMuBhMHo.jpg?auto=compress%2Cformat&w=48&h=48&fit=fill&bg=ffffff) |
| × | 1 | |||
 |
| × | 1 | |||
| × | 1 | ||||
Software apps and online services | ||||||
 |
| |||||
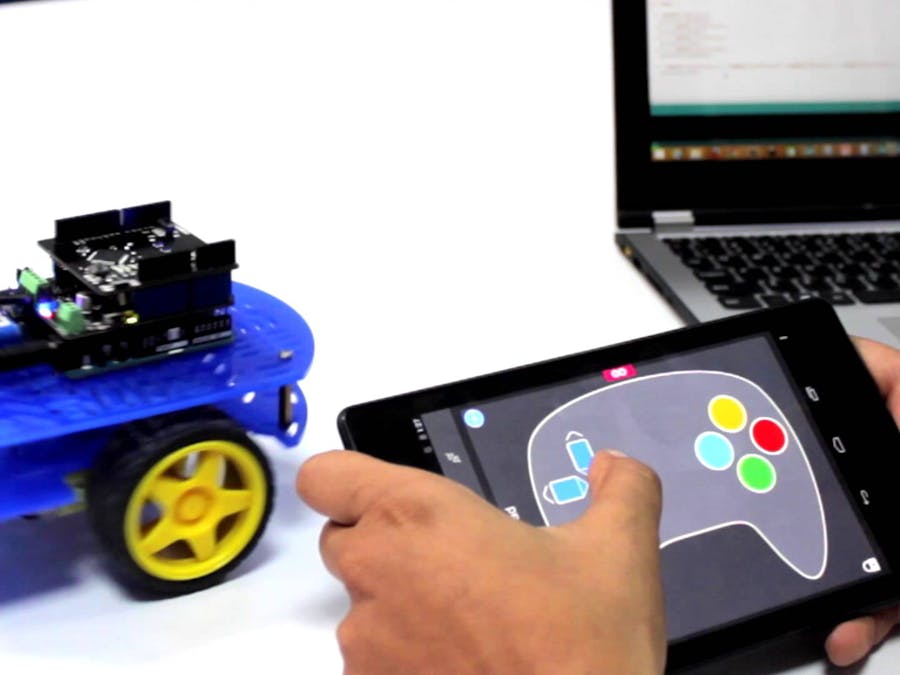
In this article we will make a two wheeled robot using Arduino, Adafruit motor shield v1 and 1Sheeld uses Bluetooth as its communication channel. This will be a two wheeled robot that will be controlled using the game pad in the 1Sheeld application to control the robot.
1Sheeld is a great layer of abstraction to make you use almost all the sensors in your mobile phone to interface with the Arduino.
The code will be so simple as we’ll use the Adafruit library to help us more in reducing our code and circuit wiring using Adafruit shield.
We’ll begin by listing the components then we’ll start off.
Throughout the tutorial I’ll show you the way around how to get the required applications either for your phones or for your PCs.
This tutorial requires basic Arduino knowledge (Arduino power and basic coding).
List of Components
· Arduino Uno / Mega
· PC with Arduino IDE installed
· 1Sheeld
· Android mobile phone with Bluetooth enabled and 1Sheeld application installed
· Adafruit motor shield (or any motor driver, you'll make the connections)
· 2-Wheel drive robot chassis
· 2 Dc motors
· Battery
· Castor wheel
· Wheels
· Wires (2 for each motor and 2 for power supply)
If you don't have a two-wheel drive robot chasis you can buy one online using AliExpress at about almost 10$ or you can make your own using a laser cutter at a nearby shop using a CAD file like this one.
You can get its CAD files using this link for free from GrabCAD
The center wheel is called caster wheel and its used to keep the robot stable on the ground.
1-2 Wiring the MotorsUsing a solder iron and tin solder the motor terminals to a male-male wire. While soldering I strongly recommend that you assign a color for a given motor terminal, so if you wire the upper terminal with a blue wire, do the same for the other motor.
This will help us in making the code and wiring consistent and avoid finding different directions when operating the motor.
After wiring the motors, install them on the robot chassis and place the Arduino in an appropriate place. near the batteries.
1-3 The 1Sheeld1Sheeld is an open-source product that simplifies the interfaces between your android phone (and soon iPhone) sensors, and the Arduino using Bluetooth technology.
You can literally use all the sensors in your phone to interact with the Arduino and even more than your phone's sensors. 1Sheeld's main page can be found here.
The pages explains the shield thoroughly so I'll let you explore its details and will just mentions the common catches and the starting tips. A direct link to the download section is here. You must download the library and add it to Arduino IDE to start using it. If you're wondering how to add a library check this link.
Preparing the shield
Download the 1Sheeld app using Google Play
Connect the shield to the Arduino -push it gently with equal force on both sides-
The Adafruit motor shield can supply power up to 4 motors, it will be placed on the top of 1Sheeld, if the motor shield doesn't block the pins unlike the one in the image, the order doesn't matter and I prefer placing the 1Sheeld on the top so it's easier for you to switch between upload mode and operating mode on 1Sheeld.
In this tutorial we'll use only 2, the motors are numbered according to this image, those numbers will be used in the coding process.
The +M (positive terminal -red-) and GND (negative terminal -black-) terminals will be connected to the battery or the power supply (12v ) which is fine by the Arduino, It also provides power for the Arduino.
The motor shield is opensource and you can find its details and price here although it's discontinued, you can buy any similar clone or check the latest version here, or you can make your own!
Connecting the motors to the motor shield
It's so simple as you'll choose a terminal and connect the 2 motor wires, you also should follow a standard connection for each motor, just the same as the wiring example.
You'll need Adafruit library for the motor shield, try the following steps:
- Download the GitHub project as a ZIP file from this link
- Uncompress the ZIP file
- Rename the uncompressed folder AFMotor. Be sure that there are the AFMotor.cpp and the AFMotor.h files in the AFMotor folder.
- Add the library to the Arduino IDE as mentioned in step 1-3
We'll use the game pad shield from the application. before using the mobile as a shield you need to find your 1Sheeld and connect to it, if you're being asked to enter a PIN code enter 1234.
After selecting your 1Sheeld board, you'll turn on the game pad shield.
Then open the shields menu by tapping on the rectangle and stay on the game pad shield screen.
So, Basically we want the robot to move according to the game pad keys, and in the following directions.
Up - Forward
Down - Backward
Left - Steer Left
Right - Steer Right
using two wheeled motors is called differential drive.
The library makes our lives easier by providing a simple way to run the motor (this image is from AFMotor.h code file.
The main difference between the brake condition and the release condition is that in the brake condition the motor is forced to stop at its place, but in the release condition the motor is free to move a little bit according to its inertia.
If you don't have Adafruit motor shield, you can use any motor driver/shield in the same manner, the code will just differ a little bit as you'll set the pins yourself but that follows the same concepts here.
I just edited the game pad shield example from the 1Sheeld library, the code is below. the code for version 2.3 is also added and it was written by Garry Gerwer
If all your connections follow one standard, this code will work perfectly, if the directions seem to be flipped all what you'll do is just flip the wires of a motor and check if it goes well.
Now you'll just upload the code to the Arduino (don't forget to turn the switch on the 1Sheeld to upload mode and switch it to operating mode after uploading the code).
Respect & Share the project it if you like it :) you can buy electronic components on utsource.net
You're done, Congratulations!!
If you want to check a tutorial that doesn't require lots of hardware and yet is fun check this one : Making a color mixer with the Arduino


Comments