


Hardware components | ||||||
 |
| × | 1 | |||
| × | 1 | ||||
 |
| × | 1 | |||
 |
| × | 1 | |||
 |
| × | 1 | |||
 |
| × | 1 | |||
 |
| × | 1 | |||
Software apps and online services | ||||||
| ||||||
| ||||||
| ||||||
 |
| |||||
 |
| |||||
 |
| |||||
Hand tools and fabrication machines | ||||||
 |
| |||||
TechCare: Baby Safe, an IoT solution to improve security and access to neonates, with face recognition using Thundercomm's AI kit.
According to the BBC, Chinese police reports that 20,000 babies were stolen yearly in China. But this number might be 10 times bigger, because of the lack of information. In China a baby girl can be sold for 8,000 US dollars, meanwhile a baby boy is twice the price.
Most of them disappear, but some others are sold or used as work slaves.
https://www.bbc.com/news/blogs-trending-35383319
In Mexico the number is not that high, but in the latest 9 years that number reaches 25 358 according to Registro Nacional de Personas desaparecidas, being 2017 the year with more kids kidnaped. 70% of that number were babies between 0 and 5 years.
https://www.imagenradio.com.mx/un-delito-que-crece-en-mexico-el-robo-de-ninos-y-su-desaparicion
https://www.csmonitor.com/1994/0630/30061.html
This is a huge problem all around the world, first because of the lack information. Authorities (talking about statistics) do not show the whole information, and also Medical providers are not aware of the problem they are facing. The System used nowadays is just a door with a lock, the most secure hospitals having an RFID control, and the ones that do not have anything, barely have a door handle.
What we know for sure, is that this number of missing babies can be reduced drastically, helping families and saving those lives.
We have created a 2-Factor Authentication system via Face Recognition and a keyboard password input. you can have a general grasp of the system looking at the following diagram:
Bill of materials (ideal).
- Thundercomm AI Kit.
- Raspberry Pi Zero w.
- Arudino Uno.
- Servo Motor MG995.
- Numeric Keyboard.
Optional:
- Solenoid Electrolock.(or in our case a Servo and a 3D printed Case)
- Darlington Transistor. (Or in our case an Arduino motor shield)
- 10k Resistor. (not in our solution)
- 2 Power Banks. 5v 10000mAh.
Software:
- Python.
- Watson IoT Platform.
- Raspbian.
- Android Studio
- Thundercomm's AI kit SDK
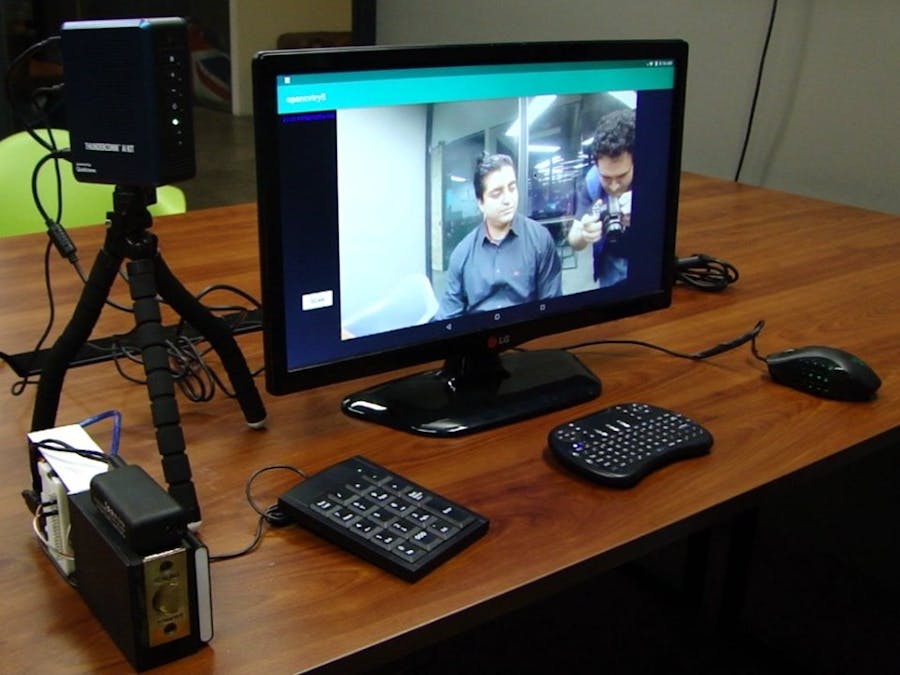
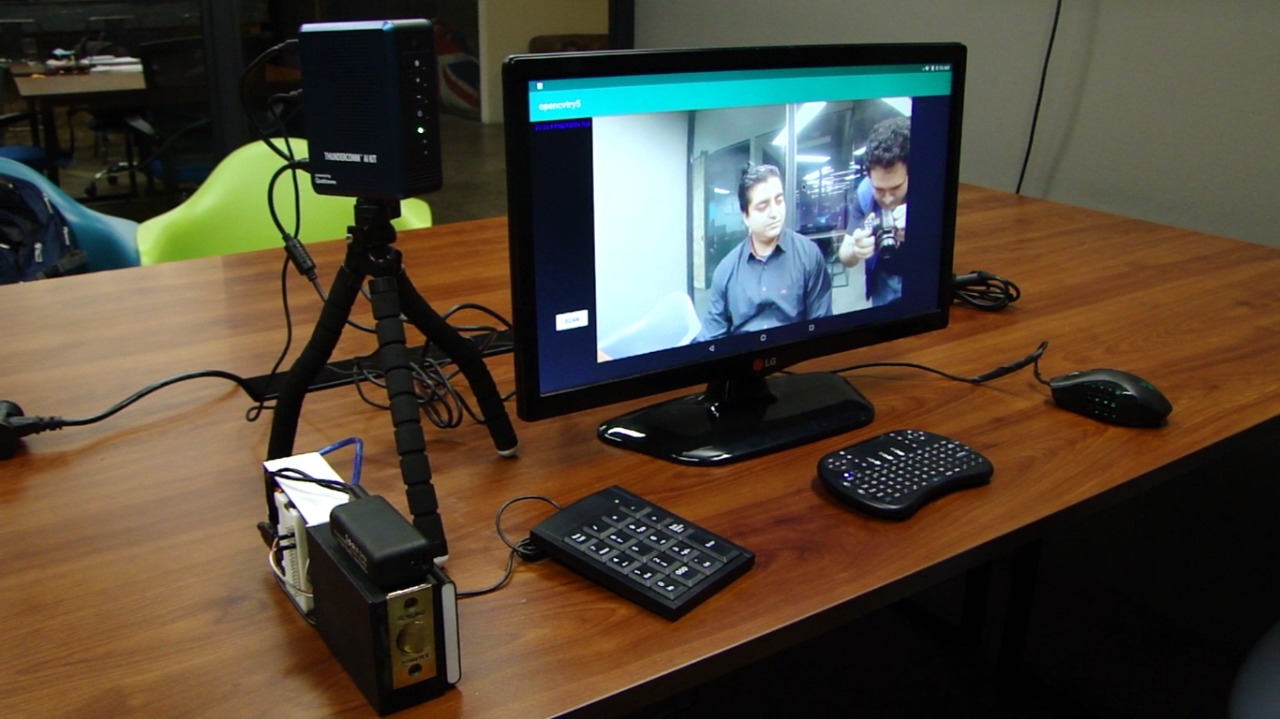
This is quite easy to do, the Thundercomm by itself is an amazing piece of hardware that runs natively on Android. So imagine that you are using an Android phone.
First connect it to the wall via the cable provided, and we recommend that you connect a keyboard, mouse and a monitor via its micro HDMI port. If you want to start press the power button for 5 to 6 seconds and release just as you would be turning on a phone.
Android Studio Setup :In short, what we will be doing here is; setting up Android Studio for OpenCV (little documentation online), setting up FaceSDK (we only have Thundercomm's documentation) and we are going to heavily steal from the official documentation, but will try to condense it a little. Finnaly, we will setup MQTT for Android Studio so you can send messages to your favorite broker (we are using IBM Watson IoT).
You need the following, unzip them and install them:
Android Studio (get the newest version):
https://developer.android.com/studio/
OpenCV for Android:
Android NDK
https://developer.android.com/ndk/
FaceSDK
http://www.45smart.com/app/download
Now comes the long part as we have to setup Android Studio to work with OpenCV.
-Import OpenCV module
Go to File-> new -> Import Module...
Then we select the directory like so:
- You'll have some errors so open the app build gradle and the OpenCV library build gradle and alter them so that the OpenCV gradle will have the same versions as the app gradle. (IMPORTANT)
- Sync Now (should work), if you have any other errors erase the ones caused by your manifest file as you have one of the newest versions of AS.
Then you have to add the dependency:
Then you have to go to app->JNI folder and rename it to jniLibs.
Then paste inside the copied archives.
Go to your gradle properties file and paste the following
android.deprecatedNdk=true
-When you compile this, you will get a warning so you can add the new number which will be a lease. (this will be altered in the near future but works for now).
Make sure your ndk path is correct in the local properties tab.
And that's the end of the setup!
Try this code in the MainActivity.java file inside the OnCreate object:
if(OpenCVLoader.initDebug())
{
Toast.makeText(getApplicationContext(), "OpenCV loaded correctly", Toast.LENGTH_SHORT).show();
}
else{
Toast.makeText(getApplicationContext(), "Nope, fail", Toast.LENGTH_SHORT).show();
}
Then Run it in your favourite emulator or device and it should work!
After this you can check on the code provided to run an application example or run the samples provided both by Thundercomm and OpenCV.
Face SDK Setup1. Do all the steps above as it will not work without a stable version of OpenCV in Android Studio..
2. Deploy Face SDK
If you have Git or linux follow suit, if you are using windows then; mkdir= make a folder, cp = copy, and FaceSDKSamplePATH= the directory of your Face SDK.
$mkdir -p (FaceSDKSamplePATH)/app/src/main/cpp/thirdparty/face_sdk_include/
$cp face_sdk_android/lib/* (FaceSDKSample PATH)/app/src/main/jniLibs/
$cp face_sdk_android/include/* (FaceSDKSamplePATH)/app/src/main/cpp/thirdparty/face_sdk_include/
MQTT setup for Android StudioThe code provided contains the main aspects that you can follow on to connect into any MQTT provider. We are using the Eclipse Paho library and service for the communication.
- Debug by creating a button in your XML file, you can always call it via pub which is our publish.
- Remember to setup everything including topic and follow the way it is indicated in the code.
- Add the following code in the dependencies part of the app build gradle:
compile('org.eclipse.paho:org.eclipse.paho.android.service:1.0.2') { exclude module: 'support-v4'}
-Add this also but by itself in the app build gradle:
repositories { maven { url "https://repo.eclipse.org/content/repositories/paho-releases/" }}
Remember that the Android manifest file should have all the permissions as shown in the manifest code.
Android development in generalWhat you have in the code below is our mutant from these three setups. Now you have two ways to proceed on your development, our current solution uses a combination of our own harvest and the Face SDK setup as we had to combine it with MQTT, OpenCV and other dependencies. The current solutions are very heavily dependant on OpenCV, if you have followed this guide, the sky is the limit. Hopefully the Android setup for OpenCV can help anyone that wants to continue developing on these platforms and is not an expert, as most of the information is scattered accross the web.
What we are doing here is using OpenCV to provide a face recognition, send the result via MQTT to the IBM Watson IoT broker. Then we are listening to the topic on python via the Raspberry pi Zero and then, actuating the Smart-Lock to give access or deny it.
We borrowed heavily from sources such as:
https://jayrambhia.com/blog/android-opencv-facedetection
Smart-lock Setup:For this we are using an Arduino uno with a motor shield and a raspberry pi Zero. We strongly reccomend to follow the ideal Bill of Materials for a more potent solution as we DIYed everything with materials at hand.
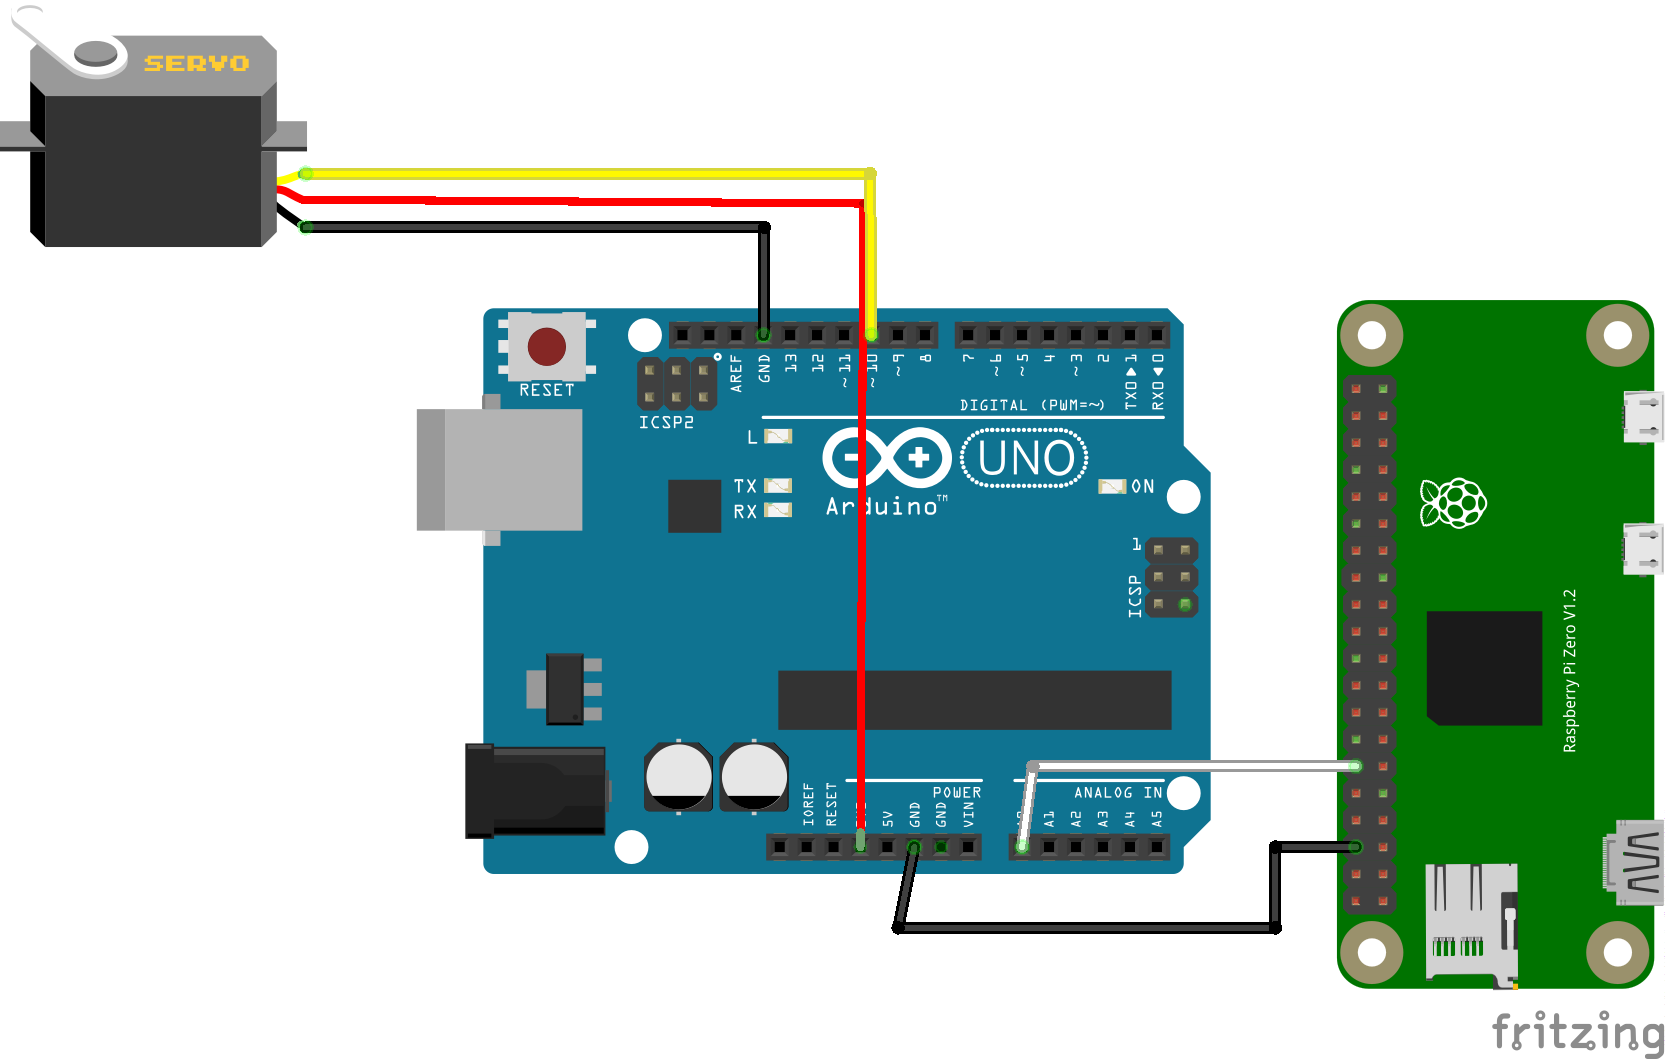
Arduino Setup:2. For the Arduino configuration we just have to connect our servo to pin 10 like in the diagram and flash the code provided. The code really just moves the servo from one position to the next 90 degrees.
2.1 The Smart-lock was made by ourselves from scratch as you can see in the image, a black 3D printed case was used, and an old doorlock.
2.2 Connect as the following diagram:
- For this point, it's also possible to use an Electronic Lock, RaspberryPi Zero w and TIP120, instead of our Servo lock with Arduino and Raspberry Pi connecting it through MQTT.
3.1. Download the operating system of the Raspberry Pi Zero.
- To download the operating system of the Raspberry enter the following link:
- Link: https://downloads.raspberrypi.org/raspbian_lite_latest
- We will download the lite version.
3.2. Flash the operating system in the SD as shown in point 1.2 but with raspbian.
- Through Etcher flash the raspberry operating system but DO NOT put it inside the raspberry yet.
3.3. Create a wpa_supplicant for the connection of the raspberry to the internet.
- Since we have flashed the operating system, we copy and paste the files from the "RaspberryPi" folder directly into the SD card.
- Then we open the "wpa_supplicant.conf" file with a text editor
- In between the quotes in the ssid line write your wifi network and in psk the network key.
country = us
update_config = 1
ctrl_interface =/var/run/wpa_supplicant
network =
{
scan_ssid = 1
ssid = "yourwifi"
psk = "yourpassword"
}
- We save the changes and remove the SD from the PC.
3.4. We then place the SD in the raspberry and connect it to its power source.
- The power source of a Raspberry Pi Zero is recommended to be from 5 volts to 1A minimum. We recommend the official ower supply for the Raspberry pi.
3.5. Once the Raspberry has already started, we need to access it through SSH or with a keyboard and a monitor.
- If you want to access it through SSH we need your IP.
- In order to analyze your network and obtain the number we will have to use one of the following programs.
- Advanced IP Scanner (Windows) or Angry IP Scanner program (Windows, Mac and Linux).
- In the following image you can see how we got the Raspberry IP.
3.6. Copy the program inside the "RaspberrySoft" folder using FileZilla to the raspberry.
- To pass the file via wifi to the raspberry we have to download another program called "FileZilla".
- Link: https://filezilla-project.org/download.php?type=client
- Once we have the program, we open it and input the following data in the upper bar to access the raspberry.
Host: RASPBERRYIP Username:pi Password:raspberry port:22
Press Quickconnect.
- Once we enter the Raspberry, we copy the file "exe.py and exe2.py" in the folder "/home/pi".
3.7. Since we have the file in the raspberry, now we have to connect the raspberry with ssh.
- To connect using ssh to the raspberry we need the Putty program.
- Link: https://www.chiark.greenend.org.uk/~sgtatham/putty/latest.html
- This program will let us access the command console of the raspberry.
- In Linux, just open the terminal and put the following command.
ssh pi@RASPBERRYIP
- Password: “raspberry”
3.8. First, we will install the necessary libraries for our program to work.
- For it to work we just have to input the following command.
sudo apt-get update && sudo apt-get install -y python-pip && pip install ibmiotf
This command will install the IBM Watson IoT library
3.9. Once the console is open, we will edit the file used in the previous paragraph to configure the IP of the Ultra96.
- In the Raspberry's terminal we will write the following command.
sudo nano exe2.py
- The command will open the text editor where we can go through the file "exe2.py".
- We change the Watson IoT credentials with our application credentials.
- To create a Watson IoT application you can follow this one:
https://github.com/altaga/The-Ultimate-IBM-Watson-IoT-Platform-Guide
- Since we changed that text, we will save the changes made by pressing "ctrl + o" and enter, and to exit the editor pressing "ctrl + c".
3.10. Input boot program for the Raspberry Zero. In order for the program to start together with raspbian, and for us to no longer need to execute it, we will write the following command.
sudo nano /etc/rc.local
Inside the file we will have to write the following to start both programs:
sudo python /home/pi/exe.py &
sudo python /home/pi/exe2.py &
- After adding that text, we will save the changes made by pressing "ctrl + o" and enter, to exit the editor press "ctrl + c".
3.11. Once we have finished editing this file, we are ready to connect everything. Before proceeding, disconnect the raspberry and the arduino from their sources because we are going to connect them to each other.
The Final Lock Module:After doing all this, and assembling, we will have a Smart-Lock like so:
For convenience we are now using batteries (two powerbanks) but a Lock system has to always, and I repeat, always be pluged to the wall, and more in a hospital setting as a Hospital has to have an emergency power supply.
Combining them togetherAs you can see now we have a smart lock that works via MQTT and an Android OpenCV mutant that does the same.
In order to open the door, then a 2-Factor authentication must be met, improving security by a long margin.
ShowcaseHere is the demo video of everything working together!
ConclussionThe new Baby Safe, is a device that could help fix this huge problem that the world is facing right now, while you are reading this, hundreds of babies around the world are being stolen from their families and lost the opportunity of being children.
This Baby Safe is a Lock for maternity areas, in which only the mother and authorized medical personnel can get access to babies. By introducing 2-Factor authentication based on hardware, the vision of smart hospitals is closer. A Hospital should the place where you seek to improve your life quality and your health. What is happening to those babies is the opposite.
Future Rollout- We will recommend adapting a webcamera or another usb camera to the thundersoft as its camera is only 8M pixels and not that powerful.
- The AI Kit is quite powerful and we have to delve even deeper in its capabilities.
- Deployment in a clinical situation.
- Add it to a database in order to increase the value substantially, that way we can track entries and exits.
- Expand platform to include RFID baby tags so we can have a much more potent solution.
Known issues and thoughts
- Face recognition via OpenCV is not that accurate, we have to work on that.
- Have to train a model much more, perhaps processing the image on Edge and then use a service like Rekognition from AWS or IBM recognition would be in order.
https://github.com/EddOliver/TechCare/wiki
https://github.com/egomez99/OPENCV_FaceDetection/blob/master/app/src/main/java/com/derzapp/myfacedetection/MainActivity.java
https://jayrambhia.com/blog/android-opencv-facedetection
https://www.hivemq.com/blog/mqtt-client-library-enyclopedia-paho-android-service
http://www.45smart.com/app/index
https://www.bbc.com/news/blogs-trending-35383319
https://www.csmonitor.com/1994/0630/30061.html
https://stackoverflow.com/questions/49669225/android-opencv-face-recognition


Comments