

Hardware components | ||||||
 |
| × | 1 | |||
 |
| × | 1 | |||
| × | 1 | ||||
| × | 1 | ||||
| × | 1 | ||||
| × | 2 | ||||
_ztBMuBhMHo.jpg?auto=compress%2Cformat&w=48&h=48&fit=fill&bg=ffffff) |
| × | 1 | |||
Eggs Incubation is an interesting topic among the Arduino enthusiastic. Basically, it is similar to the type of incubator which can be used as a substitute of poultry chicken to incubate the chicken eggs automatically. It will be helpful for the farmers to incubate the eggs automatically without the need of human intervention, by keeping the physical quantities such as temperature and humidity at required level, so that the fetuses inside them will grow and incubates without the presence of mother.
Furthermore, egg incubator will not only improve the poultry production considerably but will also help in the regularity of income making, enabling the farmers to be able to get transition into possible rural entrepreneurship.
This project uses a CavyIoT-DevBoard (firmware) and CavyIoT platform as a service..
With the help of Control Panel from anywhere we can
- Monitor live sensor data in Charts, Gauges.
- Control all operations of incubator.
- Set triggers to automate the incubator processing from remote location.
- Record all operations of incubator for further analysis.
- Convert a log file to PDF and JSON format.
- Can select the AUTO and MANUAL mode of operation.
- Registered account at CavyIoT developers site.
- ESP8266 board installed in your Arduino IDE.
If not registered then register your account at https://www.developers.cavyiot.com with your valid email id, it is free.After successful registration, within five minute you will get email verification code at registered email address.Login with your registered username and password. and verify your email. Once the verification is done, you will get free Demo device with validity of one month.(You can see Demo device in your client area )
If ESP8266 board is not installed in your Arduino IDE follow this step.The ESP8266 community created an add-on for the Arduino IDE that allows you to program the ESP8266 using the Arduino IDE and its programming language.Start Arduino and open Preferences window.Enter https://arduino.esp8266.com/stable/package_esp8266com_index.json into Additional Board Manager URLs field. You can add multiple URLs, separating them with commas.Open Boards Manager from Tools > Board menu and find esp8266 platform. Select the version from a drop-down box. Click install button. Don’t forget to select your NodeMCU 1.0 (ESP-12E Module) board from Tools > Board menu after installation.
The project is explained in 4 steps.First step- Is about how to flash CavyIoT firmware using Arduino IDE in NodeMCU to covert it into CavyIoT-DevBoard.
Explains in details about, How to
- connect CavyIoT-DevBoard with an Arduino.
- send data from sensor DHT11 and servo angle to server via Dev-Board.
- upload IoT-Incubator.ino sketch.
- Is for, how to control device from control panel and how to set triggers for automation.
- Finalize the project with enclosure arrangement.
OK! Let Start now !
Step 1: Flashing firmware overinternet using http-update.
- Download library official site or from GitHub. Do not unzip the downloaded library, leave as it is.
- In the Arduino IDE, navigate to Sketch > Include Library > Add.ZIP Library. At the top of the drop down list, select the option to Add.ZIP Library.
- Then select downloaded ZIP file and click Open.
- Return to the Sketch > Include Library menu. menu. You should now see the library at the bottom of the drop-down menu. It is ready to be used in your sketch. The zip file will have been expanded in the libraries folder in your Arduino sketches directory. The Library will be available to use in sketches, but with older IDE versions examples for the library will not be exposed in the File > Examples until after the IDE has restarted.
- Upload ESP8266-httpupdate sketch In the Arduino IDE, navigate to File > Examples > CavyIoTdevelopmentBoard-master > ESP8266-httpupdate and open this example sketch.
- Then select board and COM port properly. NodeMCU is selected in this example.
Don’t forget to select your 'NodeMCU 1.0 (ESP-12E Module)' board
- Before uploading ESP8266-httpupdate.ino sketch you need to replace Wi-Fi SSID and Password with your own.
- After Done Uploading open serial monitor (Baudrate:9600, Both NL & CR) and Reset the NodeMCU and wait for 2 minutes to complete flashing. You will see output on serial monitor as shown below:
Flashing Done!
Congratulation now you have your own CavyIoT-DevBoard !
Step 2:Interfacing with Arduino
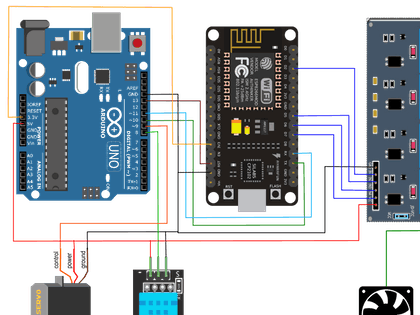
Make circuit arrangement as shown below.
IoT Incubator Circuit connection
Circuit description:
Arduino, DevBoard connection- Arduino Pin 10, 11, 13 connected to Tx, Rx, rst of Dev-Board.
Arduino, SensorandServoconnection
- Arduino Pin 9 connected to the servo control.
- Arduino Pin 8 is connected to Data pin of DHT11
- DevBoard Index pin 0 (D2 of NodeMCU) to IN1 of Relay Board
- DevBoard Index pin 1 (D5 of NodeMCU) to IN2 of Relay Board
- DevBoard Index pin 2 (D6 of NodeMCU) to IN3 of Relay Board
- DevBoard Index pin 3 (D7 of NodeMCU) to IN4 of Relay Board
Relayconnections are arranged
Relay-1 to control Bulb 100 Watt (heat source)
Relay-2 to control Humidifier
Relay-3 to control In-fan
Relay-4 to control Ex-fan
Power supply
- Arduino UNO (5 Volt via USB)
- DevBoard (3.3 V )
- Relay Board (5V)
- Bulb 100 Watt (240 V AC mains) via Relay1
- Humidifier (240 V AC mains )via Relay2 (assumed here is with inbuilt Adapter)
- 2 PC fan (12 V DC 1 Amp)Via Relay3 & Relay4 one is for air inlet and another is for Exhaust.
Note:Power supply to NodeMCU and Realy Board In the schematic is shown as, is driven from Arduino for convenience. But I recommend to use separate power supply to avoid load on USB supply.
And upload incubator.ino sketch to Aruino UNO board. Don't forget to replace your Wi-Fi SSID and password along with CavyIoT credentials in the sketch.
Now open serial monitor and see the output.The device you made is working well if it is as below.(Reset Arduino UNO if needed).
Arduino Serial output
Now login to CavyIoT And operate it from control panel.Check all buttons weather working properly or not.
To check servo function, I suggest check servo router timer of one minute by removing comment of code line 23, 80 and 81.
Incubator control panel.
Control Panel
Owe Amazing ! done !
Step 3: Now we will see how to set triggers for automation.
Go to the client area.
Menu Appears After click on 'Set Triggers' Button
Select sensor, condition and enter value for desired action from the menu.you can set up to four triggers for automation. It is very easy.
Click on save button to save setting result will be as below within one minute.On the screen of client area.
Now switch to AUTO mode of working and sit back in chair and see how the controls are working automatically. Arrange DHT11 sensor near Bulb to heat if temperature rises Bulb will OFF automatically.This ensures CavyIoT triggers are working from server.
One Important feature of DevBoard we are going to know about is Log file of all operations ! And for this you have run the circuit for a hour or two for testing. After that remove all connections of DevBoard from Arduino. Unplug Arduino from USB.
Method to Download log file from CavyIoT DevBoard.
- Connect B pin of DevBoard to ground ( D0 of NodeMCU).
- Plug USB cable of DevBoard to computer.
- And restart Nodemcu.
- Open Serial monitor
DevBoard Local Server Started.
Now connect to the Hot-Spot password admin@123, created by CavyIoT DevBoard for serving Log File.
after connecting browse to url http://100.100.100.100
From the download link download log file and save it to your computer. This log file is in CSV format. You can print, can convert in JSON /PDF format for analysis and so on. Online tool CSV to PDF is available for this on your control panel.
Output of CSV to PDF converter looks like,
CSV to PDF/JSON
(For all information about control panel link is given at the bottom of project).
Up to this point covered about Dev-Boards are
- how to download firmware
- Interfacing with Arduino
- How to download Log file.
And to finalize the project. Arrange the circuit as before download operation.and make an arrangement shown as as below in a wooden box.
In this arrangement two compartment are made, right one is for the 'Eggs tray router assembly,
- Egg tray router mechanism is arranged with servo motor.
- The exhaust fan is to control the excessive heat. This exhaust fan can be controlled via control panel.
- DHT-11 Sensor.
and in the left side arrangement is as,
- 100 watt bulb is used as a heat source.
- Humidifier
- PC fan (kept permanently ON) is to circulate air for the uniform distribution of temperature and humidity in the Eggs tray chamber. ( Note: not shown in the circuit)
- To minimize the heat and humidity leakage from the incubator, there is a inlet for the fresh air at the bottom of the box.
Diagram below shows the principle of egg tray mechanism.
hatching eggs are placed in setter trays with the air cell up and turned regularly through angles of 90° or 45° on either side of eggs’ long axis. Historically, arguments for the need to turn eggs frequently were (1) poor temperature distribution in the albumen and yolk and/or (2) the risk of the embryo and extra-embryonic membranes sticking to the inner shell membrane.
Turning is therefore essential during days 0-10, when the early extra-embryonic yolk sac membrane and sub-embryonic fluid are being formed, and the recommended frequency for turning Eggs is 4 times in a day ( see how it is implemented in the code ).
Important links for reference.


Comments