


Hardware components | ||||||
 |
| × | 1 | |||
 |
| × | 1 | |||
 |
| × | 1 | |||
 |
| × | 1 | |||
 |
| × | 1 | |||
 |
| × | 1 | |||
Software apps and online services | ||||||
 |
| |||||
Hand tools and fabrication machines | ||||||
 |
| |||||
Humidity is the presence of water in air. Its measurement and monitoring is critical as the amount of water vapour can affect many industrial and biological processes.
Humidity Sensor is of utmost importance when it comes to optimum functioning of medical devices like incubators, respiratory equipment's, etc. Even the imaging modalities like MRI, CT-SCAN; even CATHLAB. It is necessary to ensure that Relative percentage humidity doesn't cross the range 20%-60% in most of the cases, while it may vary in other places. If it exceeds it may damage electronic components in the imaging modalities or optimum working in the magnet room in case of MRI.
When the level exceeds, having an alert message send over the telegram application(if you are away from the main site) and alarming of the buzzer(useful for quick look if you are closer) can help rectify the problem immediately before it causes any issues.
So using this project it is possible to measure % relative humidity and send alert messages over telegram as well as ring buzzer if the level exceeds.
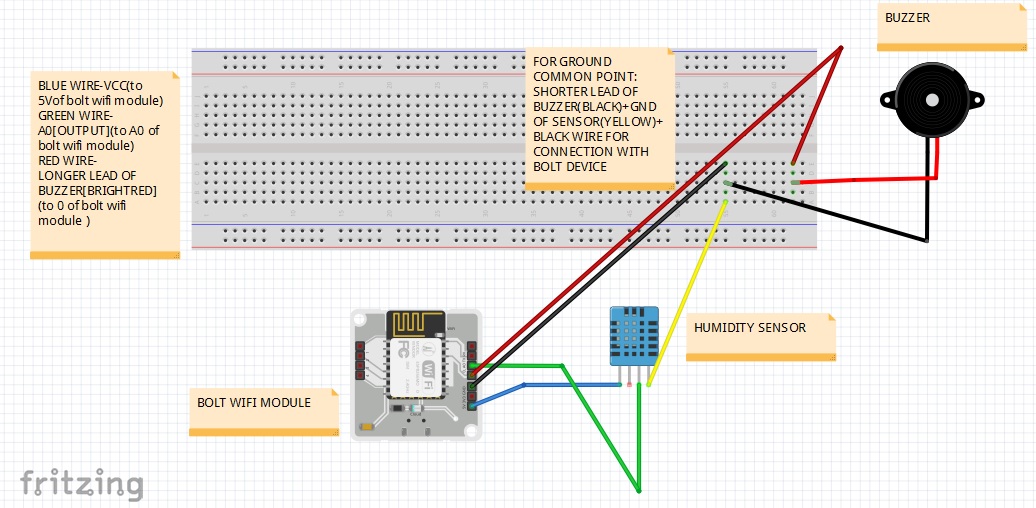
2. HARDWARE CONNECTIONSStep 1: Hold the sensor in a manner such that you can identify the pins of the sensor as VCC, GND and Output(A0) from your right. to left(Do not consider the Do pin)
Step 2:In the above image, VCC is connected to the blue wire, A0 is connected to the green wire and Gnd is connected to the yellow wire.
Step 3: Using male to female wire connect the 2 pins (A0 and VCC) of the sensor to the Bolt Wifi Module as follows:
- VCC pin of the sensor connects to 5v of the Bolt Wifi module.
- A0 pin of the sensor connects to A0 (Analog input pin) of the Bolt Wifi module.
Step 4: Connect the longer lead of the buzzer to a maroon wire of a two-pin connector(joined via green wire) and shorter lead of the buzzer to a black wire of a two-pin connector(joined via white wire).
Step 5: Connect the two pin connector on the breadboard. Connect the yellow wire (from the sensor) in the same line as the black of the two pin connector(as both are to be connected to GND of wifi module). Now insert one end of a red male-male connector wire to the same line as yellow and black on the breadboard and connect the other end to GND of the Bolt Wifi module.
Step 6: Now insert one end of a black male-male connector wire to the same line as maroon wire of the two-pin connector on the breadboard and connect the other end to Digital ''0" of the Bolt Wifi module.
Final connection outcome:
3. CONFIGURATION FILE
The python coding for this project has been done in Ubuntu. It is necessary to make a configuration file which will have the specific keys for each user/device and it will be imported in our main code with various attributes. Each new user will only have to change the contents the configuration file to use the product.
The API key and Device ID of the Bolt module can be obtained from your Bolt Cloud webpage
4. CREATION OF TELEGRAM CHANNEL AND BOT
Install the Telegram App and sign in using your mobile number. Then follow the following steps to create a telegram channel and bot.
New channel:
- Go to the home screen of the Telegram app.
- Swipe from the left side to reveal the menu.
- Click on "New Channel".
- It will ask you for a Name and Description for your channel. Give a suitable name and description. Adding photo is optional.
- In the next screen set the channel as Public.
- On the same screen, it will ask you to enter a permanent link for your channel.
- The channel link name is unique and only one can exist at one time.
- Save it as telegram_chat_id
- You have created a new channel.
New bot:
- On the Home screen of the app, click on the search icon on the top right and type in "botfather".
- In the search results, click on the correct result for "BotFather" as shown below. This will take you to a chat window with the "BotFather".
- Since we need to create a new Bot, go ahead and type in "/newbot" in the window.
- It will ask you to type in few more details like Bot name and Bot username.
- When your bot is created successfully, you will be shown a screen containing the Bot Token. This token is used to control your Bot as well as send messages on behalf of it.
- Bot token is saved as telegram_bot_id. The telegram_bot_id is saved as "bot" followed by the bot token.
- The telegram_bot_id will be used in the python code to send messages.
- You have created a new Bot.
Add channel to Bot:
- From the App home screen, open the channel we have created earlier.
- In the screen, click on the channel name on the top to open the information for the Channel.
- Click on the Administrators button so that we can add the newly created bot to the channel.
- Search for the bot that we have created using the Bot's username. Once you have found the correct Bot click on it to add it to the channel.
- You will now see the newly created Bot in the list of administrators for the channel.
5. EXPLANATION OF FEW AREAS
5.1 BUZZERWe are calling a function named digitalWrite()
This function has two parameter. The first parameter is pin number and the second parameter state.
To turn the LED ON, the state would be HIGH and to turn it OFF state would be LOW.
The pin no is "0" in our case
5.2 HUMIDITY SENSOR RANGE
The sensor_value is not the real percentage humidity, but infact is something as follows:
Humidity = (100 * sensor_value)/1024
This makes our minimum_value(20%) and maximum_value(60%) as:
minimum_value = (20*1024)/100 = 204.8
maximum_value = (60*1024)/100 = 614.4
6. Python O/P photo:7. TELEGRAM ALERT MESSAGE
8. PROJECT VIDEO


Comments