


Hardware components | ||||||
| × | 1 | ||||
 |
| × | 1 | |||
 |
| × | 4 | |||
 |
| × | 1 | |||
Software apps and online services | ||||||
 |
| |||||
| ||||||
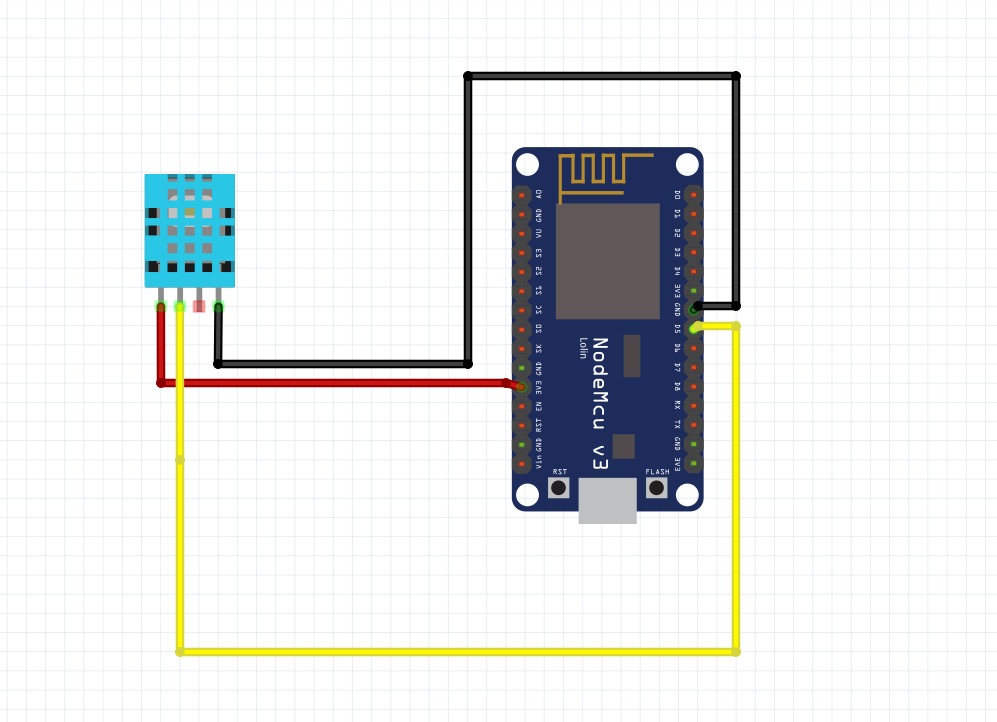
Connect the DHT11 sensor to the NodeMCU ESP8266 as follows:
DHT11 → NodeMCU ESP8266
- VCC → 3.3V
- DATA → D4 or the pin configured in the program
- GND → GND
Ensure that the wiring is properly connected before powering the NodeMCU.
Install the ESP8266 board package using the Arduino IDE Boards Manager.
Then select:
Tools → Board → ESP8266 Boards → NodeMCU 1.0 (ESP-12E Module)
Install the required libraries:
- DHT Sensor Library
- Adafruit Unified Sensor Library
- KiwisIoT LibrarySelect the correct serial port before uploading the program.
After completing the hardware connections, upload the program to the NodeMCU ESP8266.
The program performs the following operations:
- Initializes the DHT11 sensor.
- Connects the ESP8266 to Wi-Fi.
- Reads temperature data.
- Reads humidity data.
- Sends the sensor values to the KiwisIoT dashboard.
- Create a dashboard on the KiwisIoT platform and add widgets for displaying the sensor readings.
Configure:
- Temperature Display
- Humidity Display
Once the ESP8266 starts sending data, the dashboard widgets will display the sensor values in real time.
Step 5: Connect the ESP8266 to Wi-Fi :-Power the NodeMCU using the USB cable and upload the program.
After starting the device:
- The ESP8266 connects to the configured Wi-Fi network.
- The DHT11 sensor begins collecting temperature and humidity data.
- The ESP8266 sends the readings to KiwisIoT.
The Arduino Serial Monitor can be used to verify the sensor readings and data transmission.
Step 6: Monitor the Data on KiwisIoT :-Open the KiwisIoT dashboard after the ESP8266 successfully connects to Wi-Fi.
The dashboard displays:
- Live Temperature
- Live Humidity
The values are updated continuously based on the sensor readings.
Working Principle :-This project can be used for:
- Smart Home Monitoring
- Indoor Environmental Monitoring
- Smart Agriculture
- Greenhouse Monitoring
- Weather Monitoring
- Industrial Environmental Monitoring
- IoT Data Logging
- Remote Environmental Monitoring

Sudhakar N
 Sudhakar Natarajan


Comments