

Hardware components | ||||||
_ztBMuBhMHo.jpg?auto=compress%2Cformat&w=48&h=48&fit=fill&bg=ffffff) |
| × | 1 | |||
 |
| × | 9 | |||
 |
| × | 1 | |||
Software apps and online services | ||||||
| ||||||
| ||||||
| ||||||
Hand tools and fabrication machines | ||||||
 |
| |||||
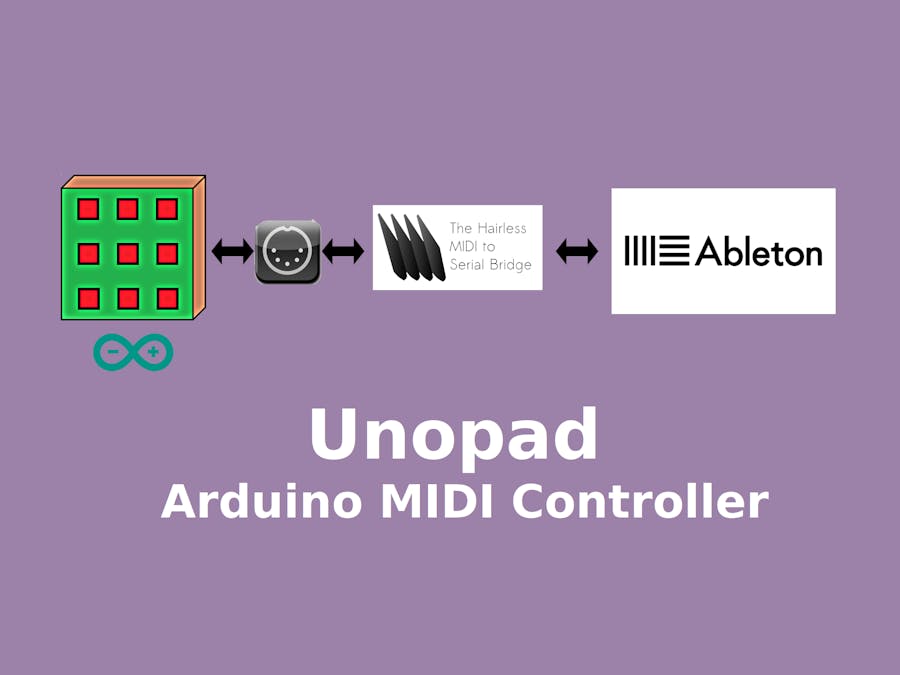
Most tutorials and projects for Midi controllers are based only on an explanation of the Arduino work, but not so much on using it in the DAW itself. I wanna to create a tutorial with all the necessary things in one place . With this project, I wanted to help beginners to better understand the process of creating and using a controller, and I hope that it will be useful to someone.
I have wanted to make a midi controller for a long time and I finally did it and now I will share the project with you. I used an Arduino Uno which does not have the ability to send MIDI messages via USB, so special programs had to be used for that (will be explained later in the text).
The following sections will describe the electrical circuit, the Arduino code, as well as how to connect to a computer and DAW, in this case Ableton.
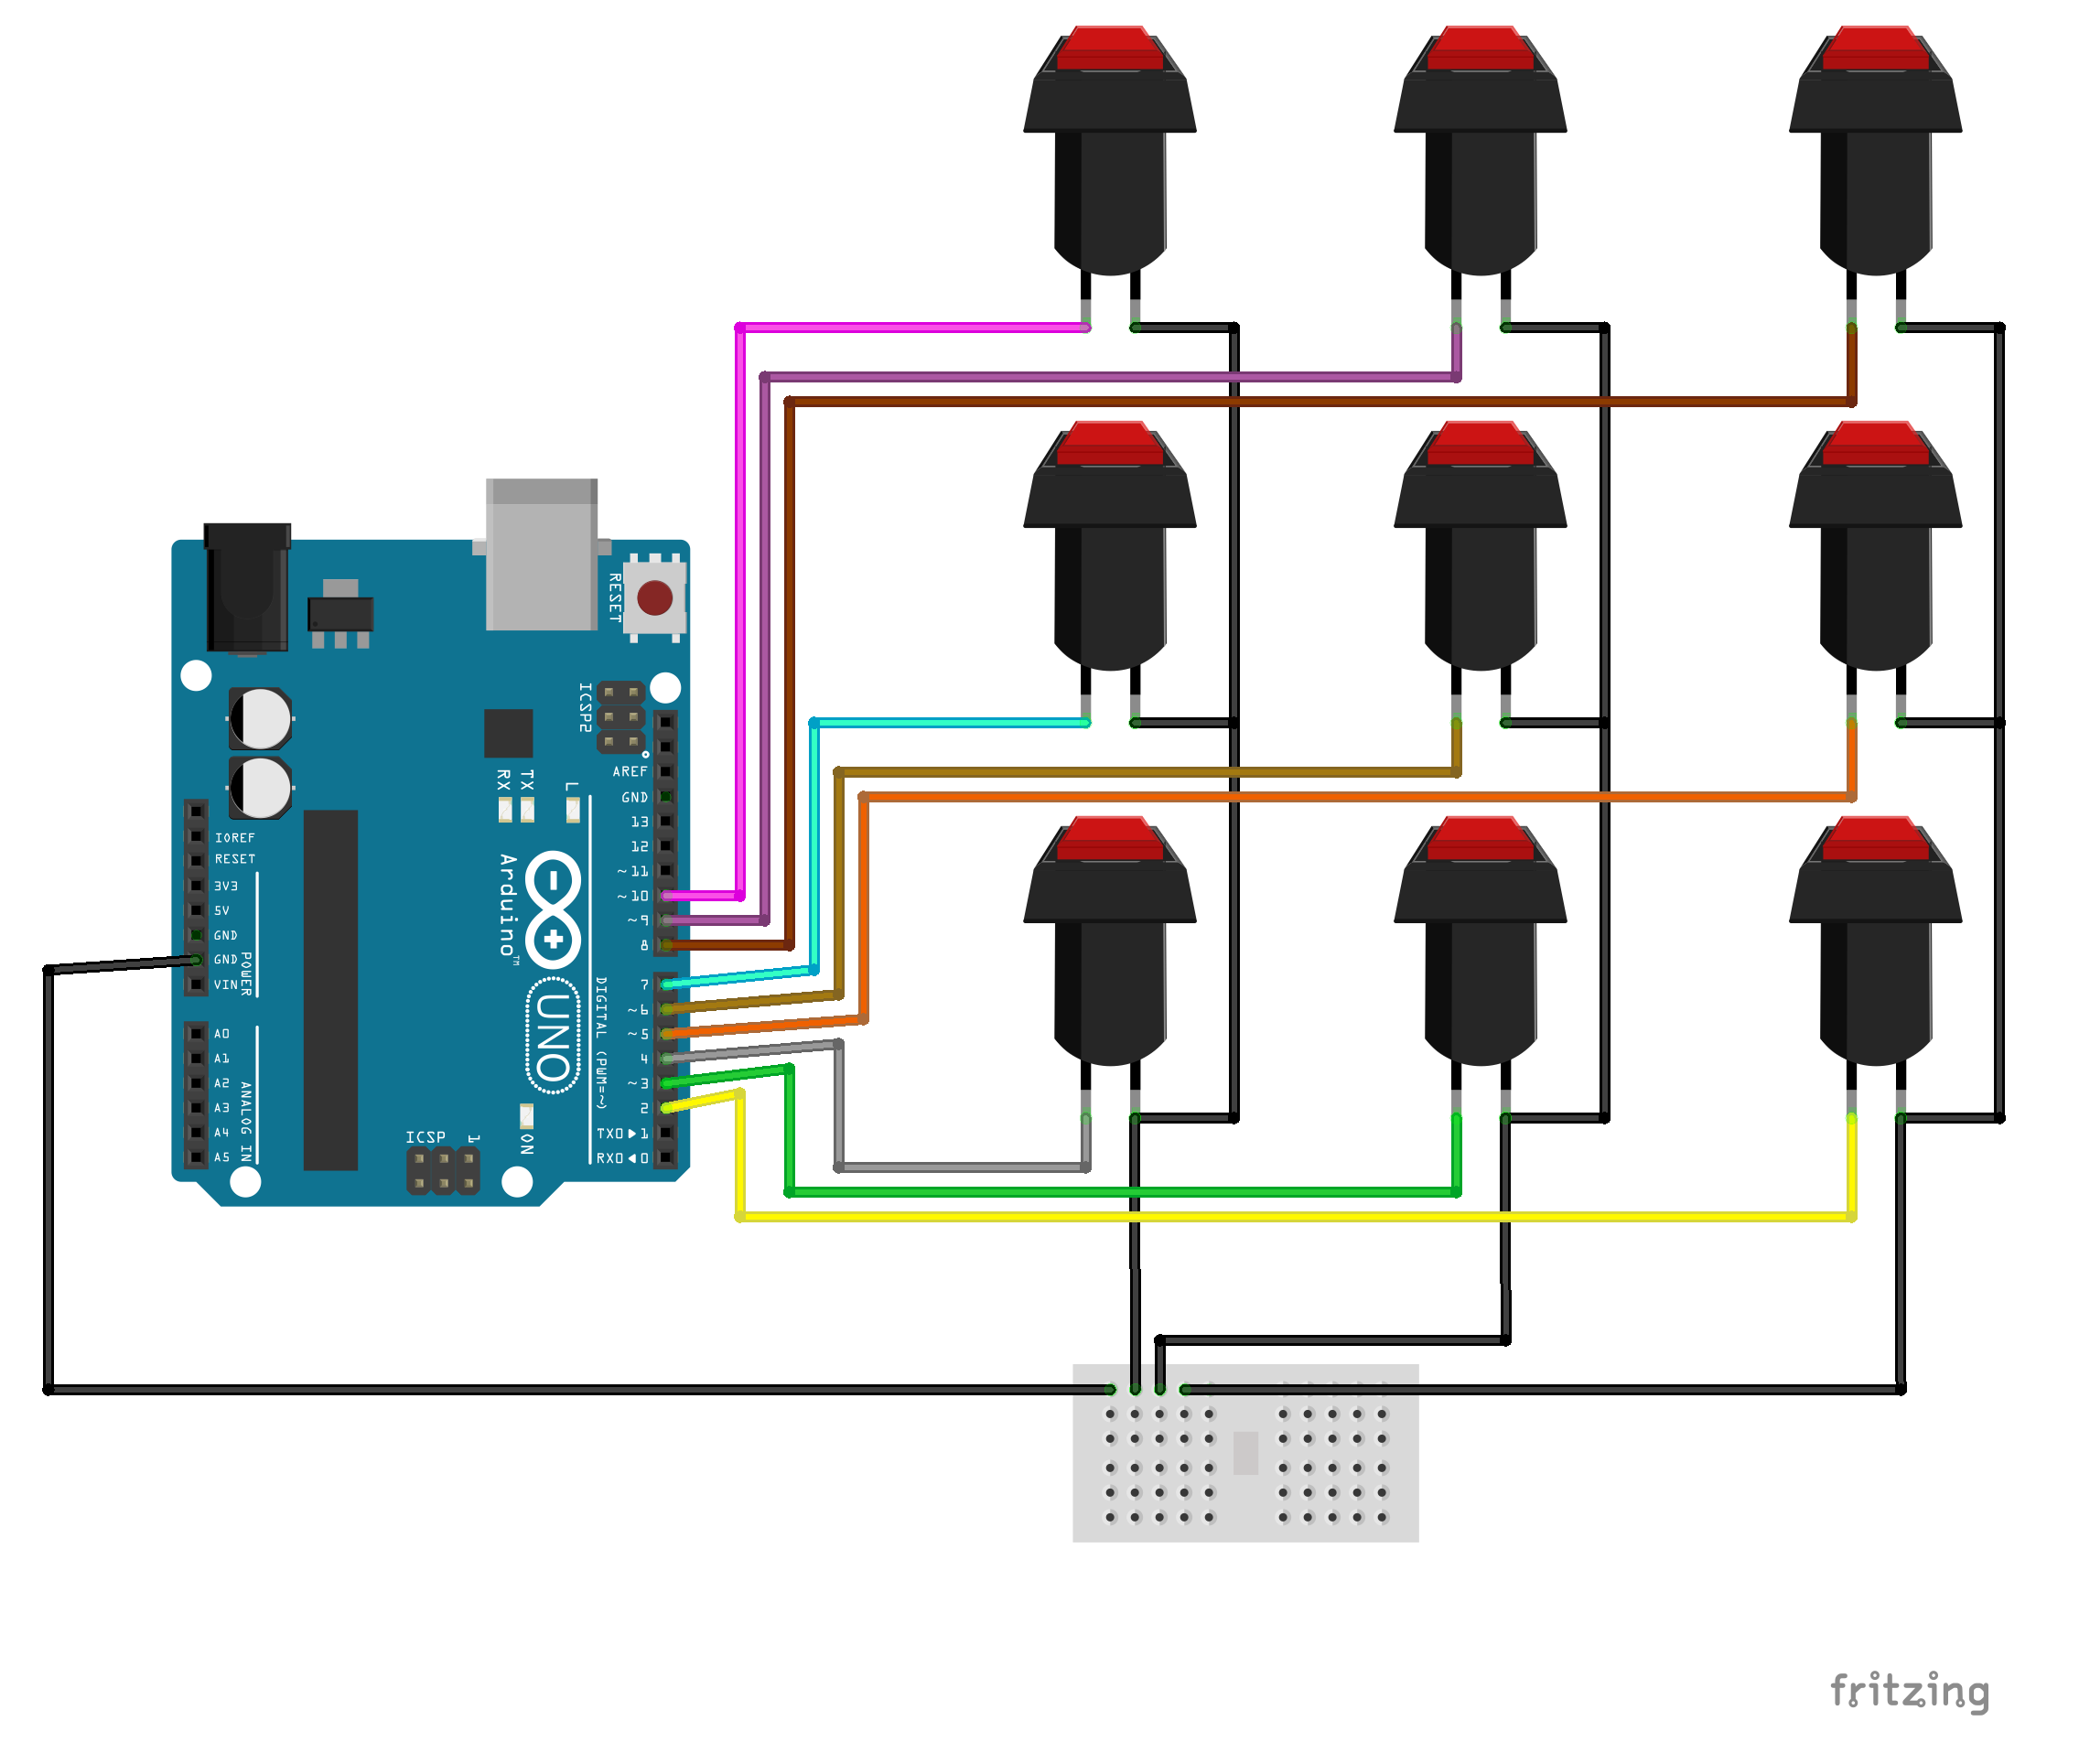
CircuitIt's a very simple circuit. I used 9 push buttons, but not in matrix, because I wanted ability to press multiple buttons (it's easier and I have unused digital pins - I use 9, in matrix would be 6).
Button 3 ==> D2
Button 2 ==> D3
Button 1 ==> D4
Button 6 ==> D5
Button 5 ==> D6
Button 4 ==> D7
Button 9 ==> D8
Button 8 ==> D9
Button 7 ==> D10
I defined 9 MIDI notes, from 36 to 45, and NOTE_ON and NOTE_OFF.
This MIDI tutorial will help you to understand how you can use the MIDI language to control any device that uses the MIDI protocol.
#define NOTE_ONE 36
#define NOTE_TWO 37
// Define all notes here.
#define NOTE_ON_CMD 0x90
#define NOTE_OFF_CMD 0x80
#define MAX_MIDI_VELOCITY 127
Because Arduino Uno cannot send MIDI notes to DAW by itself, we must use two additional programs - LoopMidi and Hairless MIDI<->Serial Bridge.
With LoopMidi we create a virtual MIDI port that we can use in Hairless Midi to connect with Arduino port.
Code explanationI created Button class and I use it like this:
int NUMBER_BUTTONS = 9;
Button Button1(4, NOTE_ONE);
Button Button2(3, NOTE_TWO);
Button Button3(2, NOTE_THREE);
Button Button4(7, NOTE_FOUR);
Button Button5(6, NOTE_FIVE);
Button Button6(5, NOTE_SIX);
Button Button7(10, NOTE_SEVEN);
Button Button8(9, NOTE_EIGHT);
Button Button9(8, NOTE_NINE);
Button *Buttons[] {&Button1,&Button2,&Button3,&Button4,&Button5,&Button6,&Button7,&Button8,&Button9};
To learn more about button implementation, see Buttons.cpp.
Because we do not use any resistors but only connect the button to the digital pin and ground, we use INPUT_PULLUP instead of INPUT.
//Buttons.cpp
pinMode(_pin, INPUT_PULLUP);
The only tricky part with this is that you aren't looking for a HIGH signal like you might assume – your button will give off LOW (0) when it's pressed.
     //  Button is pressed
     if (state == 0)
     {
        midiNoteOn(Buttons[i]->Note,127);
     }
     //  Button is not pressed
     if (state == 1)
     {
     }
This also means that initial button state is 1, not 0.
//Buttons.cpp
 _state = 1;
Every NOTE ON message requires its corresponding NOTE OFF message. When button is pressed, it's sends NOTE_ON message. When button is released, it's sends NOTE_OFF message, so in addition to the initial state, I added the last remembered state to the code.
//Buttons.cpp
 _lastState = 1;
We only send MIDI messages if current state is different than last state.
//Buttons.cpp
if(state!= _lastState)
{
//....
}
Use this two functions to send MIDI messages. Functions parameters are note and midiVelocity ( I used max velocity).
void midiNoteOn(byte note, byte midiVelocity)
{
     Serial.write(NOTE_ON_CMD);
     Serial.write(note);
     Serial.write(midiVelocity);
}
void midiNoteOff(byte note, byte midiVelocity)
{
     Serial.write(NOTE_OFF_CMD);
     Serial.write(note);
     Serial.write(midiVelocity);
}
I put the program logic in the function updateButtons function.
void updateButtons() {
 for (int i = 0; i < NUMBER_BUTTONS; i++) {
     int state = Buttons[i]->getButtonState();
     //  Button is pressed
     if (state == 0)
     {
        midiNoteOn(Buttons[i]->Note,127);
     }
     //  Button is not pressed
     if (state == 1)
 	midiNoteOff(Buttons[i]->Note,0);
     }
 }
Function is called inside of loop method.
void loop() {
 if (NUMBER_BUTTONS != 0) updateButtons();
}
As a beginner in using DAWs, I didn't know how to connect anything there. When I connected my Korg Nanokey, Ableton recognized it himself and I could use controller right away. This (of course) was not the case with the Arduino controller, as it is not a HID device and PC still recognizes it as an Arduino.
I'm gonna show you here how to connect and use your Arduino MIDI controller in Ableton Live 10.
- Connect with Ableton
Open loopMIDI and create new virtual MIDI port like on next images.
Open hairless-midiserial and assign Serial port, MIDI Out and MIDI In like on next images. For Serial port, we choose Arduino Uno port, and for MIDI in and out we use virtual MIDI port that we created in previous step.
Set the baudrate to the same rate in your Arduino sketch. Go to File>Preferences, and there you should set the baudrate.
If it's all done right, you could debug MIDI message sent by controller. Press button on controller and check for incoming MIDI messages in Hairless MIDI.
Do not close hairless MIDI!
Open Ableton Live, and go to Options tab, then Preferences. Link MIDI tab should look like on this example.
To check that everything is well connected and that Ableton is reading MIDI messages, we will look in the upper right corner of Ableton. The top box should blink when button on controller is pressed as shown in the next example.
Controller is ready for use!
- Use controller as Drum Rack or Keyboard
Select MIDI track. In Monitor section choose In, instead of Auto, and in MIDI to choose your speaker output. You should hear your keyboard now. The same should be done for Drum rack.
I used old speaker box for this project and some plastic I found at home. I cut both plastic plates to the dimensions of the case and drilled holes for the buttons and one LED that I will add later.
I also have another old speaker with same case that I will use for another MIDI controller, this time with knobs and joysticks.
- Button longpress for changing to CC mode.


Comments