/*
LiquidCrystal Library - Custom Characters
Demonstrates how to add custom characters on an LCD display.
The LiquidCrystal library works with all LCD displays that are
compatible with the Hitachi HD44780 driver. There are many of
them out there, and you can usually tell them by the 16-pin interface.
This sketch prints "I <heart> Arduino!" and a little dancing man
to the LCD.
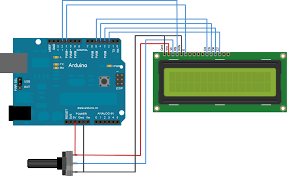
The circuit:
* LCD RS pin to digital pin 12
* LCD Enable pin to digital pin 11
* LCD D4 pin to digital pin 5
* LCD D5 pin to digital pin 4
* LCD D6 pin to digital pin 3
* LCD D7 pin to digital pin 2
* LCD R/W pin to ground
* 10K potentiometer:
* ends to +5V and ground
* wiper to LCD VO pin (pin 3)
* 10K poterntiometer on pin A0
created 21 Mar 2011
by Tom Igoe
modified 11 Nov 2013
by Scott Fitzgerald
modified 7 Nov 2016
by Arturo Guadalupi
Based on Adafruit's example at
https://github.com/adafruit/SPI_VFD/blob/master/examples/createChar/createChar.pde
This example code is in the public domain.
http://www.arduino.cc/en/Tutorial/LiquidCrystalCustomCharacter
Also useful:
http://icontexto.com/charactercreator/
*/
// include the library code:
#include <LiquidCrystal.h>
// initialize the library by associating any needed LCD interface pin
// with the arduino pin number it is connected to
const int rs = 12, en = 11, d4 = 5, d5 = 4, d6 = 3, d7 = 2;
LiquidCrystal lcd(rs, en, d4, d5, d6, d7);
// make some custom characters:
byte heart[8] = {
0b00000,
0b01010,
0b11111,
0b11111,
0b11111,
0b01110,
0b00100,
0b00000
};
byte smiley[8] = {
0b00000,
0b00000,
0b01010,
0b00000,
0b00000,
0b10001,
0b01110,
0b00000
};
byte frownie[8] = {
0b00000,
0b00000,
0b01010,
0b00000,
0b00000,
0b00000,
0b01110,
0b10001
};
byte armsDown[8] = {
0b00100,
0b01010,
0b00100,
0b00100,
0b01110,
0b10101,
0b00100,
0b01010
};
byte armsUp[8] = {
0b00100,
0b01010,
0b00100,
0b10101,
0b01110,
0b00100,
0b00100,
0b01010
};
void setup() {
// initialize LCD and set up the number of columns and rows:
lcd.begin(16, 2);
// create a new character
lcd.createChar(0, heart);
// create a new character
lcd.createChar(1, smiley);
// create a new character
lcd.createChar(2, frownie);
// create a new character
lcd.createChar(3, armsDown);
// create a new character
lcd.createChar(4, armsUp);
// set the cursor to the top left
lcd.setCursor(0, 0);
// Print a message to the lcd.
lcd.print("I ");
lcd.write(byte(0)); // when calling lcd.write() '0' must be cast as a byte
lcd.print(" Arduino! ");
lcd.write((byte)1);
}
void loop() {
// read the potentiometer on A0:
int sensorReading = analogRead(A0);
// map the result to 200 - 1000:
int delayTime = map(sensorReading, 0, 1023, 200, 1000);
// set the cursor to the bottom row, 5th position:
lcd.setCursor(4, 1);
// draw the little man, arms down:
lcd.write(3);
delay(delayTime);
lcd.setCursor(4, 1);
// draw him arms up:
lcd.write(4);
delay(delayTime);
}


Comments