


I will show you the world's simplest way to trigger IFTTT events, then go on to show you a very simple way to trigger IFTTT events from your wrist, your PC, your tablet, or your phone. All without a complicated SDK or IDE anywhere in sight.
IOT, the Internet of things, is a hackster's delight. Now, due to a variety of free software and services, it is easier than ever before to get started. If you are able to read this article, you most likely have everything needed to get started.
BackgroundI am an avid fan of using the Samsung Gear S watch to do much more useful things than just being a fancy watch, or glorified step counter. Some of my efforts have resulted in a useful spreadsheet on my wrist (at least partially Excel compatible), a handwriting recognition input method that works very well on a screen too small to show a useful keyboard, an app that shows real time color weather radar images, a weather app that shows more detailed current weather and forecasts that can be shown with icons (it will even read the selected portions to you using TextToSpeach! - in a future release), and a full featured text file reader and editor.
For some time, it has been a wish to be able to connect my watch to the Internet of Things, from the convenience of simple "buttons on my wrist". This article shows how I was able to achieve that goal.
Don't worry if you don't have a Gear S smartwatch, this article will still provide some very useful information on how to very simply create some highly useful and easy to useIFTTT triggers.
By the time you finish this, you may also wish to become a Samsung Gear S owner! If so, they are readily available on ebay in good condition for about $150.
Create a Maker.com accountFirst you will need to create a maker account by browsing to https://ifttt.com/maker
If you don't already have an account, click the Sign up button:
Enter your email and a password, then click Create Account.
When your account is created, you will be given your own secret keyin the area where it says Your key is..., mine is blurred out in the image below. Copy this and save it somewhere safe, you will need it later when it comes time to trigger your recipe(s). Or you can always log back into your maker account to get it again.
Click the Create a New Recipe button.
Click "this":
Type in the word maker to narrow the options, then click the Maker icon:
Click Receive a web request:
Enter a name for your trigger, no spaces. Then click Create Trigger.
Now click "that":
Enter the word Google to narrow the options, then click the Google Drive icon:
Here, click Add row to spreadsheet:
You can leave these fields as they are for now, just click Create Action:
Next click Create Recipe.
Your recipe has been created. You can always come back to modify it, delete it, or create new recipes.
Run your triggerNow that you have created your trigger, I will show you just how easy it is to fire it.
https://maker.ifttt.com/yourtriggername/with/key/yourkey?value1=val1&value2=val2&value3=val3
Copy the line of text above, and paste it into notepad or other simple text editor. Then modify it slightly. Replace the word "yourtriggername" with the name of the trigger you created above. In the example above, I used the event name "mytriggername". Replace the word "yourkey" with the secret key you were given when you created your maker account.
Now copy that modified line of text and paste it into the address bar of your favorite browser, then press enter.
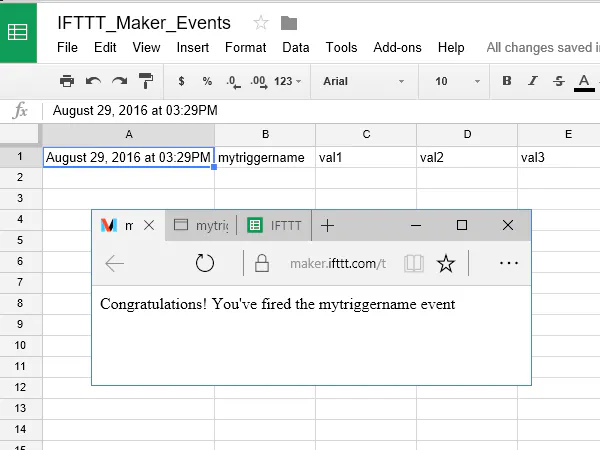
ResultsYou should see something similar to this in your browser:
And if you open up your google drive to the proper folder, you can see the trigger results:
And every time you run that url from your browser, a new row will be added to the spreadsheet.
Logging data with your triggerSince the values for value1, value2 and value3 are hardcoded into the url we are using, the same old data gets added to the spreadsheet every time we run it. That is pretty boring, and yes admittedly useless! Except for the fact that each row gets a time stamp, that says exactly when the trigger was run, and for some situations, that is enough.
If you want to log useful data, you would need to modify the val1, val2 and val3 portions of the line, for example to:
https://maker.ifttt.com/yourtriggername/with/key/yourkey?value1=test&value2=123&value3=ABC
At this point, you could simply copy and paste the appropriate url strings into your browser to fire the desired events, but it gets easier...
Use Desktop shortcuts to fire triggers.Right click a blank spot on your desktop, then choose New... Shortcut
Paste the URL you tested in the previous step into the location textbox, then click next:
Give the shortcut an easy to remember name, click finish.
Now every time you wish to run that trigger, just double click that shortcut! Create multiple shortcuts to multiple triggers, with different values. Change the shortcut icons, organize them in folders. Go trigger happy. Explore IFTTT for more options!
But wait. This is not as useful as it should be.
Running IFTTT triggers using simple web appsIt is actually very easy to create a simple web app to run an ifttt trigger, and I am about to show you how really easy it can be.
Using Liveweave.com to create a simple web appLiveweave is an HTML5 playground similar to the more well know JSFiddle. It has the unique ability to download the created web app as a single html file that can then be run in a browser from your desktop. OMG App was built to take advantage of this feature. Follow this link to find a super simple web app you can modify and run from any browser. http://liveweave.com/H2xcue
It will take you to a very simple web app, ready for you to modify and run.
The upper left section is the HTML section, it describes the document layout, and defines a button with the caption "fire" that runs the javasctipt function called "fire()" when clicked.
- The lower left section is the CSS section that defines what the button will look like.
- The upper right section is the Script section, that defines the JavaScript code that will run when the button is clicked.
- The lower right section is the web page preview section that shows what the web app will look like when run in a browser.
Once you have modified the line that that says "myKey=" to include the key that you used in the section above, you can then fire your IFTTT trigger by just clicking the big blue "fire" button. Again, you can play with the val1=, val2=, and val3= lines to log desired data.
A few simple additions to the Liveweave.com page allows you to change the values that are sent with the IFTTT trigger by choosing them from dropdowns. The additional code in the HTML section defines two dropdowns called "listone" and "listtwo". You can modify the options for each dropdown as desired.
When the "fire()" script is now run, it will use the options chosen from listone and listtwo as the values for val1 and val2. The link is: http://liveweave.com/auBXnO
And looks like this:
When now run, the chosen options are logged.
First I will describe how I am able to run a Liveweave web app on my wrist(watch), then how to run a Liveweave web app directly on your desktop.
The Samsung Gear S smartwatchAs a Samsung Gear App developer, I happen to own a Gear 2, a Gear S, a Gear S2 and a Gear Fit2. All very nice watches, but the Gear S is my everyday to wear watch, and ideal for hackstering purposes! The larger rectangular screen of the Gear S is ideal for my own purposes. The Gear S2 is nice, but reveals why computer screens have never been round. The Gear Fit 2 is a close second to the Gear S, even with the smaller screen, and lacking a speaker, but Samsung is not currently allowing 3rd party apps to be distributed through their Gear App Store.
OMG App - Oh My GearOMG App is an app for the Gear S that I created that allows liveweave type web apps to be uploaded directly to and run from the Gear S. It is available in both a paid and a free trial version. When I learned how easy it is to run IFTTT triggers from a web app, it was a simple step to create a web app in liveweave, then run it on my watch using OMG App. Much more information on using OMG App can be found here http://www.outofnoware.com/omg/2016/05/15/an-introduction-to-omg-app-part-1/
When you save a web app in liveweave, it gets assigned a 6 character code, which can be used to return to it at any time. Like the code above http://liveweave.com/auBXnO.
OMG App which runs on the Gear S allows you to simply enter that 6 digit code, auBXnO, then will grab it directly from the liveweave site in just a matter of seconds.
Gear S screenshotsAnd the resulting logged data in the Google spreadsheet.
Even with the spreadsheet open in google drive, the newly logged data shows up in a matter of seconds. Now this is very handy, and easily modified for many other purposes.
Running Liveweave web apps on your PCIn liveweave, under the tools menu, you will find the option to Download the weave as a single HTML file. When you click that, a file named source.html will be downloaded to your download folder. The name may include a number if more than one source file has been downloaded.
The source file is a simple HTML5 web page. You can copy it from the download folder to any convenient location, rename it as desired, then double click it to open it in your default browser. This works well with both windows PCs and tablets.
A have successfully used a similar procedure on my android table and phone. I do not have any apple or ios devices to test with, but suspect a similar procedure can be used there. Maybe someone can provide the required procedure with some feedback comments.
A little creativity and HTML5 programming knowledge can go a long ways towards making the Maker channel even much more interesting and useful! Add more buttons to the web app for multiple triggers, multiple values.
Adjust lights, lock and unlock doors, start your coffee maker, with over 380 channels and growing, the possibilities with IFTTT are endless.
My next articleI plan for my next huckster article to be on connecting my watch to my particle photon devices. Actually quite simple to do, and very handy as well!


Comments