


Hardware components | ||||||
 |
| × | 1 | |||
 |
| × | 1 | |||
| × | 1 | ||||
Software apps and online services | ||||||
 |
| |||||
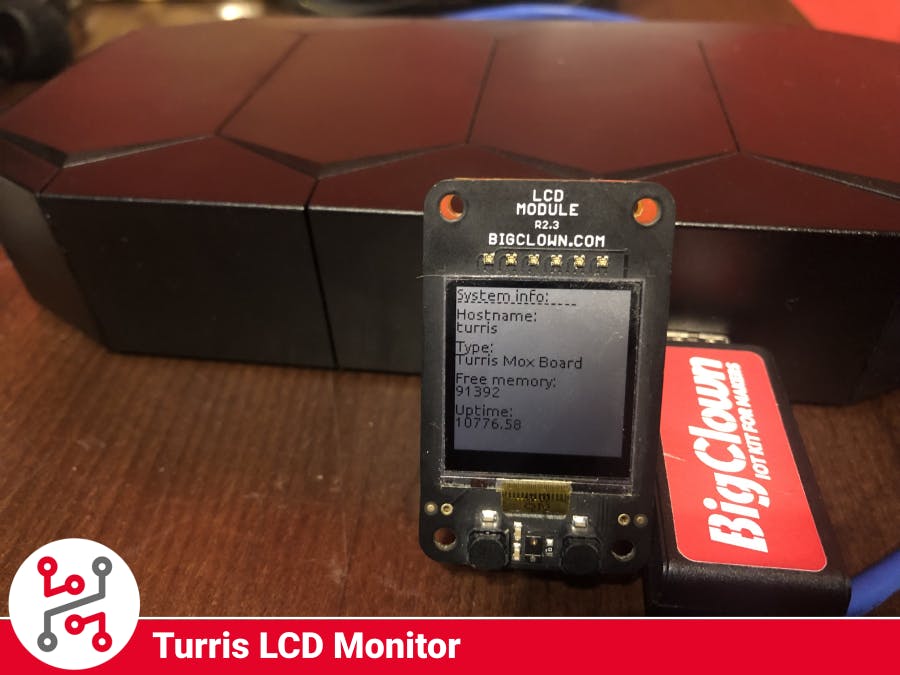
Have your own monitor for Turris MOX router so you always see how is your device doing. See your IP address, connect via QR code, get WiFi name and password or reboot your device if the uptime is too high.
All this is achievable with HARDWARIO IoT Kit solution and Node-RED.
1. Build hardwareYou will need just the LCD Thermostat Kit from HARDWARIO IoT Kit, don't worry about the Thermostat part, we will fix that in next steps.
And Turris MOX router that will serve as a gateway and also as the provider of the internet connection.
For the assembly of LCD Thermostat Kit, you can watch the video below but it is really simple. Just put all the modules together.
Put all of that into the 3D-printed enclosure and you are done with the hardware for now.
The second part is the Turris router. It is simple to use, just plug it into the socket, connect the cable from your ISP to the WAN port and your computer to one of the LAN ports.
Connect to the router by IP address 192.168.1.1 and follow the installation guide, it is pretty simple.
2. Flash firmware- Download HARDWARIO Playground.
- You can see documentation page on how to flash the firmware with HARDWARIO Playground.
- You will need the bcf-radio-turris-lcd-monitor firmware for this project.
You need to pair the Core module with the Radio dongle that you are using, follow the instructions below to see how it is done.
- Connect your USB Radio Dongle to your computer.
- Open HARDWARIO Playground
- Click Start Pairing the LED on the dongle should start blinking
- Connect the device that you want to pair into your computer or insert the batteries.
- Wait for the device to appear in the table
- It should add the device with the Alias: turris-mon:0
- Click Stop Pairing
After you did all this you can unplug the device from the computer and insert the batteries, it will run on them without a problem. Next steps will be done on the computer, so you can leave the device and focus on the NODE-Red.
4. Turris setupYou will need to do a little bit of work on the Turris to make this project work.
First, you need to set it up in the browser wizard so it is connected to the internet and running. You can check that in the browser environment.
After you have a stable internet connection you will need to download PuTTY.
Open the PuTTY and connect to your device with SSH. The IP address should be the same as in the Browser(Default: 192.168.1.1).
Log in as: root and password is the one that you did set up in the installation of the router. If not you should head to the Foris and check the Advanced administration part in the Password tab.
Set this to use a Foris password.
After you are successfully logged in the Terminal you will have to install some packages.
I will copy parts of code that is needed for all this to work, do it in the order and it will be fine.
First, update the packages.
opkg updateInstall git so you can download repositories.
opkg install git-httpNow you will need to download and install Node-RED for the communication
opkg install node
git clone https://github.com/dceejay/openwrt-node-red.git node-red
cd node-red/dist
opkg install node-red_0.20.6.ipk
After all this is done, you should go to this page and follow their tutorial on how to configure Turis for the HARDWARIO IoT Kit USB Dongle.
The last thing to do is to reboot the device so all the changes are saved.
rebootOpen Node-RED in the browser by typing the IP address of the device, it is the same again but with the port 1880(Default: 192.168.1.1:1880). Copy the Node-RED flow from the gitHub and paste it into the Menu -> Import -> Clipboard.
Do not forget to hit "Deploy" in the top right corner to apply the changes.
This flow will secure that all the needed data will be sent to the LCD terminal on demand. It will also format the message to the right format.
6. Test your deviceJust cycle through all the pages on the LCD module with the buttons(right is next page and left is previous).
To update data on the page or confirm the command on the page, press and hold both buttons simultaneously.
It should execute the command almost immediately and you should see the results.
With this you don't have to go to the online interface of the router or go to the router to reboot it. If you have some system that changes the password from time to time you just update the QR code and you are ready to connect to the WiFi again.
You can of course expand the firmware, add more pages, get more information, etc. Just follow the pattern that was set by me, it should be self explanatory.
Feel free to ask any questions about this project.
- Visit HARDWARIO page on hackster.io for more interesting projects or go directly to their website
- Go to HARDWARIO documentation to learn more about their modules and other possibilities of the platform.
- Try more firmware from HARDWARIO Playground or write your own, it is easy to start.
- Because everything is Open source you can get all firmware on GitHub, get some inspiration and try to make your own applications.
- Get your own HARDWARIO Hub to replace your computer in this project so you have always access to your applications.
- Check out more applications that can be used with HARDWARIO IoT Kit in Integrations section.


Comments