

Hardware components | ||||||
 |
| × | 1 | |||
 |
| × | 1 | |||
 |
| × | 2 | |||
 |
| × | 1 | |||
The LightBlue Bean, from PunchThrough Design, is lots of awesome in a tiny package. It packs in a temperature sensor, 3-axis accelerometer for positioning, programmable RGB LED, and even a little protoboard (which can be sawn off to give you even more space). I love using it for wearable and R/C applications. Let's jump in!
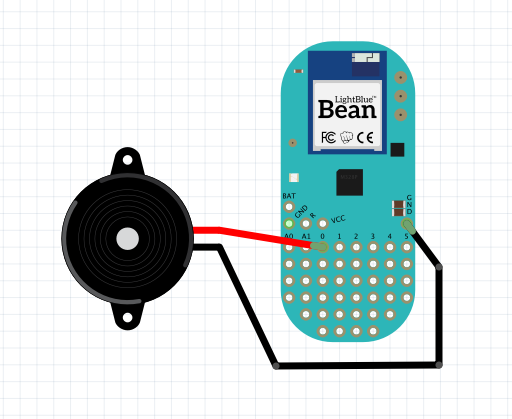
The SetupNo cables needed for this one! Break out your Bean and one of the included CR2032 batteries (standard 3-volt coin cells). We'll start with a couple example sketches that use the Bean on its own; after that, you'll hook up a standard piezo buzzer/speaker to pins digital 0 and GND.
Now, go download the Bean Loader software for your system.
We're working with standard Arduino code here, but the twist is that you'll probably be programming from an iOS device. Let's start with a simple example that shows off the RGB LED: click the BeanBlink sketch in the left sidebar, and you'll see a simple sketch that turns the LED red, green, and blue in sequence. This uses the standard 0-255 values for R, G, and B in order: for example, (255,0,0) is full red and everything else off, while (255,255,0) = full red plus full green = yellow. See below for the code.
To flash this to your board, hit the Bluetooth icon in the top Nav bar, and select your device from the list that appears. To the left, you see a signal strength reading – very useful for finding one particular Bean. Next, tap the arrow icon to upload. You need WiFi for this step, since it uses the cloud compiler.
Admire it for a bit, then let's load up AccelerationLed for something a little more active. This one uses the on-board accelerometer to detect which axis is facing up/down, and assigns each a color, so you'll see a color that represents the combination of all current g forces (and other acceleration, if you're moving it around). Go ahead and upload it, then move on: the accel tends to eat your battery pretty fast.
Note that you can customize any example by tapping in the text field, which will give you the option to duplicate it – locally or to Dropbox – for editing.
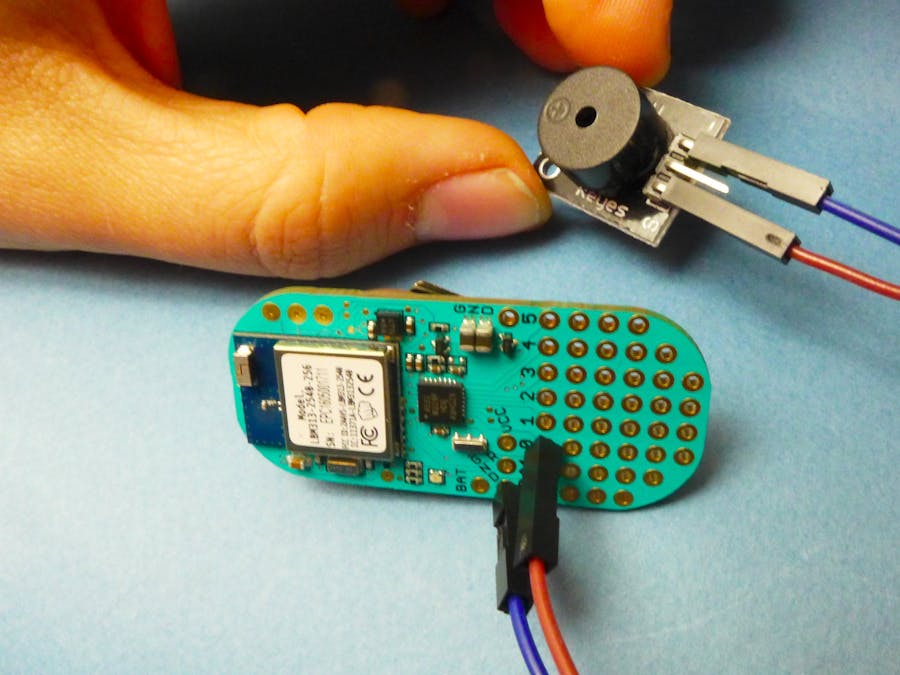
Project 1. Irritating BuzzerLet's throw a speaker on this thing! Hook up your little Piezo as shown above, and upload the code (adapted from this example for the module I was using).
This is a super simple sketch that plays a musical note. Play with the numbers and ratios to get different notes! My 1ms on/1ms off setting yields about a 500Hz signal, with roughly five hundred on/off cycles per second, not accounting for the extra processing time. That's fairly close to an A4, a useful note for tuning string instruments, though I wouldn't use this as a tuner. It's much better for annoying your office-mates.
Project 2. Graphical interface with Handy BLEHandy BLE is a fantastic companion app that makes it trivial to build visual/touch controls for your Bean. Start by grabbing the Color example code from Paul Shelley's GitHub. Paste that into a new sketch in Bean Loader and upload it. I've also copied the code below.
Fire up Handy BLE, and you'll see the default Color example. First, tap your device's name in the left sidebar and hit the Bluetooth icon to steal the connection from Bean Loader. Then, select the example app.
You're presented with a color wheel that triggers (more or less) corresponding colors on the Bean's RGB LED. Note that some have different behaviors: Red will cause the LED to stay red until something else is pressed, while Blue turns the LED off again as soon as it's released. That's because you can configure separate behaviors for when the button is pressed and released.
Down in the bottom-right is your Edit control, which allows you to position and edit elements; from each button's editing screen, you have the option to cancel the edits, save them, or delete the element. The commands you assign here correspond to the code uploaded in the Bean Loader app: take a look and play around with it!
See the video for more things I've controlled with this, including a HOLOGRAM MACHINE and a SPIDER ROBOT.
Have fun!
See the whole series of Hackster 101 tutorials on Hackster and YouTube


Comments