1. Introduction- This project would help every individual to measure the body temperature anywhere and at anytime as it is much faster than measuring with a thermometer and can monitor ourselves on the basis of previous graph and this system even predicts the temperature in future using Polynomial Regression.
2. Download telegram app on your Steps to sign up and install Go to Play Store or App store ad download the telegram App. Sign up for a new account by providing your mobile number. Telegram will send you OTP to verify your mobile number. Telegram allows us to create a new bot with the help of a bot called as "BotFather". It is a single bot to create and manage other bots. On the Home screen of the app, click on the search icon on the top right and type in "botfather". Since we need to create a new Bot, go ahead and type in "/newbot" in the window. It will ask you to type in few more details like Bot name and Bot username. When your bot is created successfully, you will be shown a screen similar to the one below and will contain the Bot Token. This token is used to control your Bot as well as send messages on behalf of it. Please keep this token secure as it will allow anyone to access your Bot. 2 From the App home screen, open the channel we have created earlier. In the screen, click on the channel name on the top to open the information for the Channel. Click on the Administrators button so that we can add the newly created bot to the channel. *Search for the bot that we have created using the Bot's username. Once you have found the correct Bot click on it to add it to the channel. *Please make sure you have clicked on the Administrators button in the previous step as this will allow our bot to post to the channel. *You will be asked to confirm the rights for the bot. Press on the tick mark on the top right to continue adding the bot to the channel. *Make sure that the bot has the rights to "Post Messages". *You will now see the newly created Bot in the list of administrators for the channel.
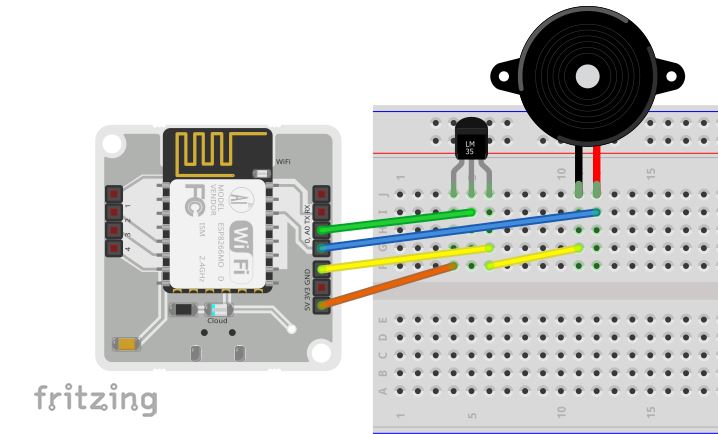
Hardware Connections LM 35 and Buzzer connections Hold the sensor in a manner such that you can read LM35 written on it. In this position, identify the pins of the sensor as VCC, Output and Gnd from your left to right. The small pin of the Buzzer must be connected to common Gnd of LM 35 and Long pin should be connected to pin 0 on BOLT device. Following pictures will help you with the connections. n the above images, VCC is connected to the orange wire, Output is connected to the green wire and Gnd is connected to the yellow wire. Using male to male wire connect the 3 pins of the LM35 to the Bolt Wifi Module as follows: 3 VCC pin of the LM35 connects to 5v of the Bolt Wifi module. Output pin of the LM35 connects to A0 (Analog input pin) of the Bolt Wifi module. Gnd pin of the LM35 connects to the Gnd. Buzzer short pin should be in parallel to yellow wire that is Gnd wire of LM 35 and Long pin is connected to pin 0 on bolt wifi module using blue wire. Short pin of buzzer connects yellow pin(Gnd) of LM 35 using breadboard.(refer 2nd fig of this section) Long pin(+ve) of buzzer connects pin 0 on Bolt device. The final circuit should look like the image below:
Step 4: Prediction Create account on the bolt cloud. Create a Product


Comments