


Hardware components | ||||||
 |
| × | 1 | |||
| × | 1 | ||||
 |
| × | 1 | |||
 |
| × | 1 | |||
| × | 1 | ||||
| × | 1 | ||||
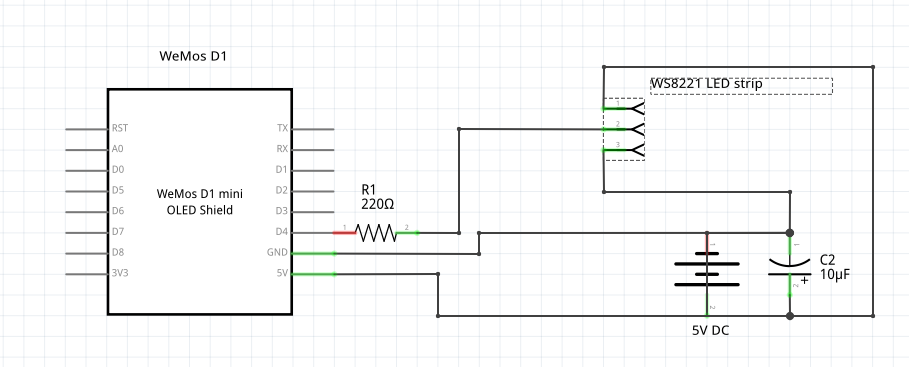
The LED strip is attached to a wooden strip with a channel routed down its middle. The capacitor is soldered across the main supply to the LEDs to provide a voltage tank for voltage surges and the resistor is soldered in on the data line of the LEDs. Make sure the data line is connected to the correct end of the LED strip, there are some arrows to indicate the data flow on the LED strip. The data line is connected to pin D4 on the D1 ESP8226 along with the earth and Vin power pin. I used a USB brick for the power supply but if you are using another DC supply then put in the voltage regulator and set its output to a little over 5 V. Wire in the switch between the battery source.
Installation of the library FastLED in the Arduino IDE and the ESP8226 board can be done from the boards manager which is found in the tools menu, look at the board and the boards manager is at the top of the list.
Make sure you restart the Arduino IDE and then connect the D1 ESP8226 board to a USB port on your computer. Check it by uploading the blink LED sketch. Disconnect the D1 ESP8226 from your computer, connect the earth wire to the D1 ESP8226 first and then the data pin to pin D4 and finally the power. Reconnect the board, check the port is selected for the D1 in the tools menu. Select the cyclone example from the FastLED examples in the file menu. Add this
#defineFASTLED_ESP8266_D1_PIN_ORDER
#include"ESP8266WiFi.h"
line before the FastLED library line at the top of the sketch.
Make sure the data pin is changed to 4.
#defineDATA_PIN 4
Compile the sketch and load it to the D1 ESP8226 board. Watch the LEDs light and move. Nothing happens!??..Check the earth, check the power, check the data pin number.
The sketch to run the project is below. Copy and paste it in a new sketch, compile it. Make sure the SSID name is the one you are looking for, line 9. Compile, upload it and check it is doing what you expect.
I added the Wifi manager library so now you can look at signal strengths of SSIDs you know the password of.
You are now ready to take some pictures. Off you go I am not explaining how to do that.


Comments