


Hardware components | ||||||
 |
| × | 1 | |||
 |
| × | 1 | |||
 |
| × | 1 | |||
Software apps and online services | ||||||
| ||||||
 |
| |||||
Hand tools and fabrication machines | ||||||
 |
| |||||
 |
| |||||
Hi Makers, I love building projects that combine engineering, embedded systems, and product design into something both useful and visually refined.
In this project, I created Sentra — The Smartest DIY CCTV Camera, a fully battery-powered smart surveillance system built around the ESP32-S3. Sentra combines live Wi-Fi video streaming, continuous SD card recording, motion detection, automatic night vision, real-time sound monitoring, and even robotic voice announcements into a compact custom-built device.
The entire enclosure and interface were designed in Autodesk Fusion 360 with a strong focus on clean aesthetics, portability, and a futuristic user experience. Alongside the hardware, I also developed a custom real-time dashboard that works directly in any browser — no apps, subscriptions, or cloud services required.
What makes this project special to me is that everything runs locally on the device itself. From motion analysis and adaptive infrared control to real-time voice synthesis and sensor monitoring, Sentra was designed to show how far modern DIY hardware can go when thoughtful engineering and creativity come together.
This project is my attempt to create a smart camera system that feels less like a typical DIY build and more like a real next-generation product.
Sponsored By NextPCBBuilding a hardware project can get expensive, but NextPCB makes it easier for makers, startups, and engineers. Right now, you can get up to $200 OFF on professional turnkey PCB assembly for orders of 10 units or less.
From PCB manufacturing and component sourcing to full assembly and testing, NextPCB handles everything in one place with reliable quality and fast service. Whether you're building an IoT device, robotics project, or custom electronics product, this offer is a great way to prototype professionally while saving money.
Try it out using my link to unlock a huge discount and claim your $200 OFF on PCBA orders!
Step 1: CAD DesignThe first step of this project was designing the complete enclosure and internal structure of Sentra. I created all the parts from scratch in Autodesk Fusion 360, focusing on clean curves, compact dimensions, proper component clearances, and easy assembly.
Since this camera is designed to be portable and battery-powered, I wanted the body to feel minimal, modern, and product-like rather than looking like a typical DIY electronics project, while keeping the overall design slim and clean.
For inspiration and reference during the design process, I also took ideas from this excellent project by Mukesh Sankhla. I highly recommend checking it out as well — it’s a beautifully designed and well-documented build.
Step 2: 3D PrintingOnce the CAD design was completed, the next step was printing all the enclosure parts. The design consists of three main printed components:
- Main Housing
- Top Cover
- Button Extension
For this build, I chose a gray PLA filament because it gives the camera a clean and modern product-like appearance while still being easy to print with high dimensional accuracy. PLA is a good choice for achieving smooth surface quality and maintaining the tight tolerances needed for proper assembly.
Step 3: Spekar AssemblyThe next step was installing the speaker inside the enclosure. I first trimmed the speaker wires to a suitable length and added a little extra wire to make the final assembly easier and cleaner.
After that, I removed the adhesive backing from the speaker and carefully placed it into the dedicated mounting area inside the main housing. I applied a small amount of pressure to secure it properly in position.
Step 4: Battery AssemblyThe next step was installing the battery into the enclosure. First, I soldered two wires to the battery terminals to make the power connection easier during the final electronics assembly.
The top cover was already designed with a dedicated battery compartment in Autodesk Fusion 360, so the battery fits neatly into place without wasting internal space. After positioning it inside the slot, I used a small amount of glue to secure it firmly.
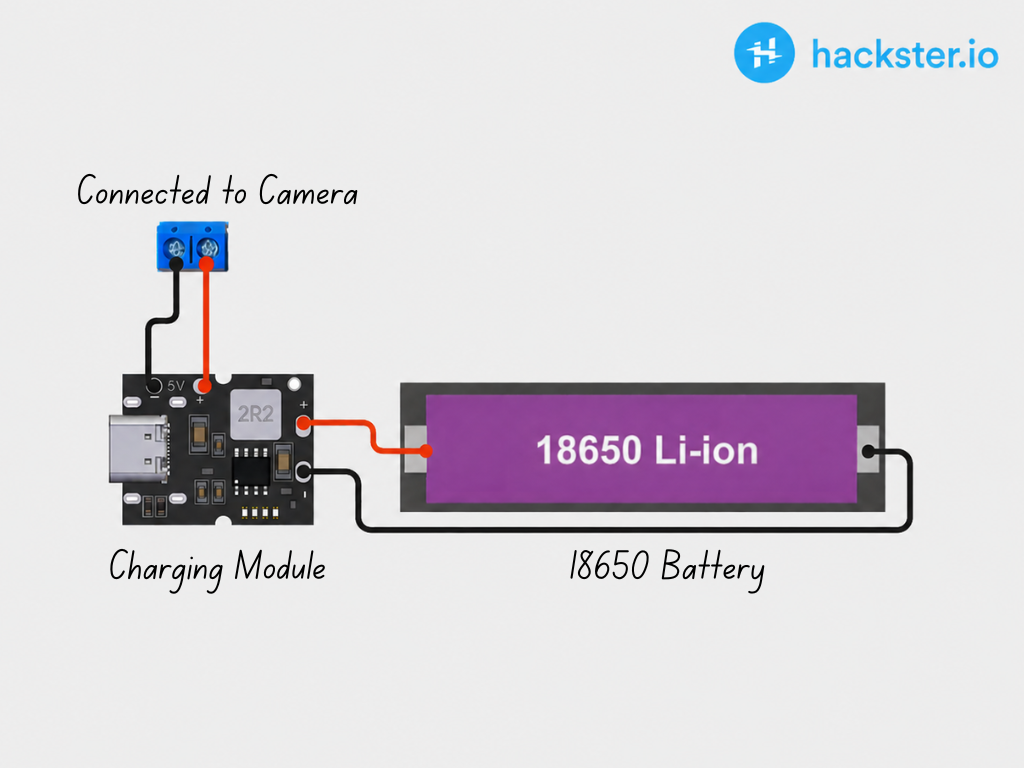
Step 5: Charging Module ConnectionThe next step was connecting the battery to the charging module. First, I soldered the battery wires to the correct positive and negative terminals on the module, making sure the polarity was connected properly to avoid damaging the circuit.
After that, I soldered another pair of wires to the 5V output terminals of the charging module. These output wires will later be used to power the main ESP32-S3 board inside Sentra.
Step 6: Configure CodeBefore uploading the code, you need to configure your Wi-Fi credentials and timezone inside the source Code. Simply replace the placeholder values with your own Wi-Fi network name and password:
#define WIFI_SSID       "Your SSID"
#define WIFI_PASS       "Your Pass"
#define TZ_OFFSET_SEC   -28800   // UTC-8 Pacific Standard Time (PST)
The timezone value is used for timestamps, recordings, and system time synchronization. You can change it depending on your region.
Step 7: Uploading CodeBefore uploading, make sure the following board settings are selected correctly inside the Arduino IDE:
- Board: ESP32S3 Dev Module
- PSRAM: OPI PSRAM
- Flash Size: 16MB (128Mb)
- Partition Scheme: Huge APP (3MB No OTA / 1MB SPIFFS)
- USB CDC On Boot: Enabled
- CPU Frequency: 240 MHz
- Upload Speed: 921600
The PSRAM and Flash Size settings are especially important because Sentra uses large buffers for video streaming, SD recording, and real-time processing. Incorrect settings may cause crashes, boot loops, or camera initialization failures.
Once everything is configured, connect the ESP32-S3 board using a USB cable, select the correct COM port, and upload the code. After flashing successfully, open the Serial Monitor to view the device IP address and system status.
Step 8: Control DashboardTo give Sentra a modern smart-device experience, we designed a fully custom premium control dashboard using HTML, along with custom styling and interactive controls.
The dashboard was developed to feel clean, futuristic, and easy to use while still displaying a large amount of real-time system information. It allows you to view the live camera stream, monitor motion activity, battery level, sound intensity, ambient light, SD card usage, and recording status directly from any browser.
We designed the interface to work across phones, tablets, and laptops without requiring any dedicated app installation. All communication happens directly with the ESP32-S3 over Wi-Fi, making the entire system lightweight and fully self-contained.
Along with real-time monitoring, the dashboard also provides quick controls for recording, siren activation, IR night vision, and voice announcements, helping Sentra feel more like a professional smart security product rather than a traditional DIY project.
Step 9: ESP32 S3 Camera AssemblyThe next step was installing the ESP32-S3 camera board into the main housing. I placed the board into the dedicated mounting position, and after positioning the board, I connected the speaker using its JST connector
The enclosure was designed to support standard screw mounting using 4 small screws for a secure installation. Since I did not have the screws available at the moment, I used a small amount of super glue to hold the board carefully in place for now.
Step 10: Charging Module AssemblyAfter preparing the charging module earlier, I carefully placed the module into its dedicated position and aligned the USB Type-C connector with the cutout on the side of the housing so the camera can be charged easily from outside.
Once the module was positioned properly, I connected the two 5V output wires from the charging module to the main board’s power input terminal, making sure the polarity was correct before powering the system.
Step 11: Button Extension AssemblyNow installing the small button extension piece. Since the ESP32-S3 board’s onboard button sits inside the enclosure, I designed this separate extension part to make it accessible from outside the case.
I simply aligned the printed button extension with the side opening and inserted it into its dedicated slot on the top cover. Once assembled, it presses directly against the internal push button, allowing easy access without opening the enclosure.
Step 12: Final AssemblyThe final step is closing the enclosure and completing the assembly. I carefully aligned the top cover with the main housing, making sure the camera lens, button extension, and internal wiring were positioned properly before closing the case. To secure everything firmly together, I used 3 screws from the back side of the enclosure.
Step 13: TestingBefore using Sentra, fully charge the battery through the USB Type-C port. Once the battery is charged, the camera is ready to use.
After startup, open the control dashboard in your browser using the ESP32-S3 IP address to access the live camera feed and all smart features.
Since Sentra is completely battery-powered and compact, you can easily carry it anywhere or mount it on a wall, desk, shelf, or any location you want to monitor. During testing, I verified live video streaming, SD card recording, motion detection, automatic night vision, sound monitoring, voice announcements, and dashboard controls to ensure everything worked smoothly together.
Seeing the entire system finally operate as a complete smart camera felt incredibly satisfying and really brought the whole project to life.
Step 14: ConclusionBuilding Sentra was a really fun and rewarding experience for me. I wanted to create a DIY CCTV camera that not only works well, but also feels modern, portable, and polished. From designing the enclosure in Autodesk Fusion 360 to building the dashboard and integrating all the electronics, every part of this project was designed and assembled from scratch.
What I enjoyed most was seeing all the different features come together into one compact device — live video streaming, motion detection, automatic night vision, sound monitoring, SD card recording, and even voice announcements, all running on a battery-powered ESP32-S3 system.
This project also helped me learn a lot about embedded systems, product design, and real-time software optimization. It showed me how powerful and capable small development boards can be when combined with creativity and careful design.
I hope this project inspires others to build their own smart devices and experiment with DIY technology.
Thank you for checking out Sentra!


_t9PF3orMPd.png?auto=compress%2Cformat&w=40&h=40&fit=fillmax&bg=fff&dpr=2)


Comments