

Hardware components | ||||||
 |
| × | 2 | |||
| × | 2 | ||||
| × | 1 | ||||
Software apps and online services | ||||||
 |
| |||||
So you want to make a project which involves communication between two different microcontrollers to send and receive data.
yes, you can use WIFI or Bluetooth here but the Distance is more than 200m which exceeds the WIFI or Bluetooth range.
the solution here is to use the nRF24L01 Modules by Nordic Semiconductor.
It operates in 2.4 GHz worldwide ISM frequency band and uses GFSK Modulation for data transmission. The data transfer rate can be one of 250kbps, 1Mbps, and 2Mbps.
ThanksUTSOURCE.net to offer electronic components for this project! you can check UTSOURCE.net, they deal in all kinds of electronics components like for example all the Components used in this project!
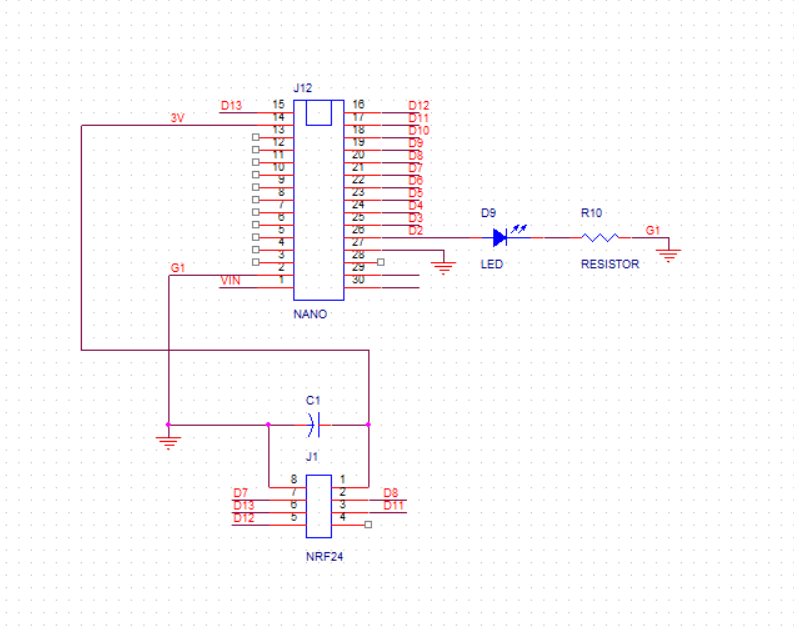
IMPORTANT FACTNRF24L01 module is not 5V Tolorant, so don't connect directly with any microcontroller's VCC or 5V port, instead use 3.3V if available or a voltage regulator (3.3V AMS1117 perhaps) to regulate the 5V into 3.3V.COMMUNICATION INTERFACE
The nRF24L01+ transceiver module communicates over a 4-pin Serial Peripheral Interface (SPI) with a maximum data rate of 10Mbps. All the parameters such as frequency channel (125 selectable channels), output power (0 dBm, -6 dBm, -12 dBm or -18 dBm), and data rate (250kbps, 1Mbps, or 2Mbps) can be configured through the SPI interface.
WHICH NRF24 to choose?In the example video, I used the nRF24L01 Module which have a range of between 100-200m roughly and can be bought for very cheap (2 for 5$)
There's also nRF24L01+PA/LNA Module which has an RFX2401C chip which is basically a range amplifier so it can be used at a range of 1000m. It costs 5$ for a single Piece but you'll get more range so its ideal for the long-distance project.
It's up to your requirement as the wiring, pinout, and footprint for both of these are the same so if you are using the nRF24L01 module in a PCB, you can swap that one with a nRF24L01+PA/LNA Module for better range.
I want to use this in a Drone Project so I will go with the Cheaper nRF24L01 Module 😁
"JUST DON'T SUPPLY ANY NRF MODULE WITH 5V VCC"
BASICSETUP
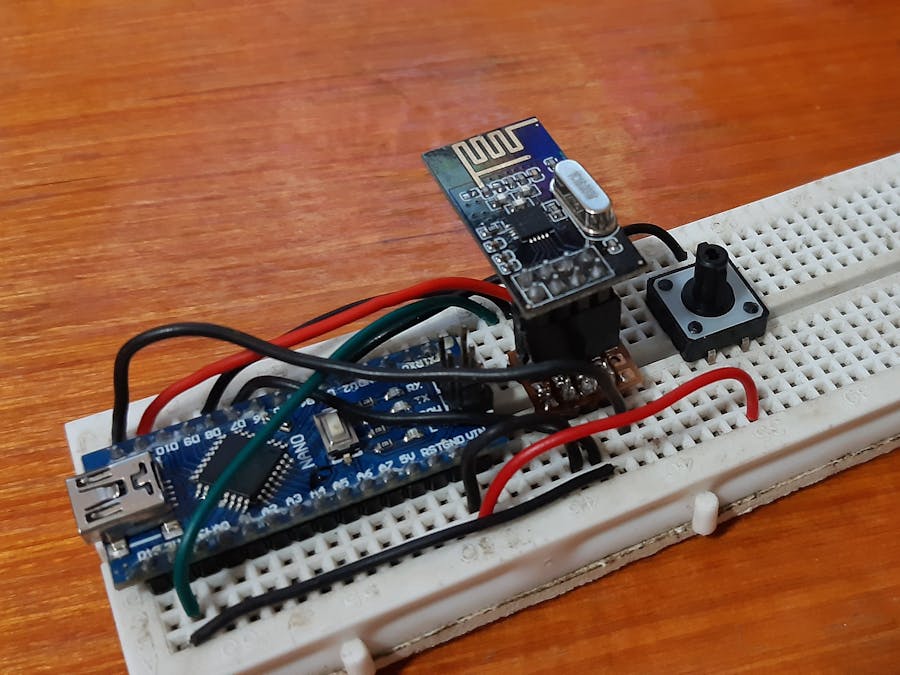
Now, as you can probably see, nRF24L01 is not exactly breadboarded friendly so we first need to make this Breadboard adaptor with Male & Female Headers soldered on the prototype board.
So after making the Breadboard adaptor, we can finally wire everything together.
WiringWiring for Reciever and Transmitter is basically the same
CODEAfter wiring the setup, upload the code provided for Reciever in the Receiver Setup and Transmitter in Transmitter Setup. Connect the Reciever Setup to your computer and open Arduino IDE's Serial Monitor.
if the wiring is correct, you will see the message on the serial monitor!
Great, now you can add stuff like LEDs, Buttons, Servos, Joysticks, and other stuff to this setup in order to control or transfer data VIA Radio Frequency 😎
More infowell, my goal here was to make an introduction post about the nRF24L01 module as I'll be using it in a future "DRONE PROJECT" which is this-
Its a Generic Drone setup but the Transmitter and Reciever is Custom and made from implementing Arduino nano and NRF24L01 module. I added Servo headers, Joysticks, buttons to the existing Schematic and prepared these two PCBs which I then gave to JLCPCB for samples!
Well, I'll post about this project soon, leave a comment if you need any help setting up the NRF24L01!


Comments