

Hardware components | ||||||
| × | 1 | ||||
| × | 1 | ||||
| × | 1 | ||||
 |
| × | 1 | |||
| × | 1 | ||||
| × | 1 | ||||
 |
| × | 1 | |||
 |
| × | 2 | |||
Software apps and online services | ||||||
 |
| |||||
| ||||||
 |
| |||||
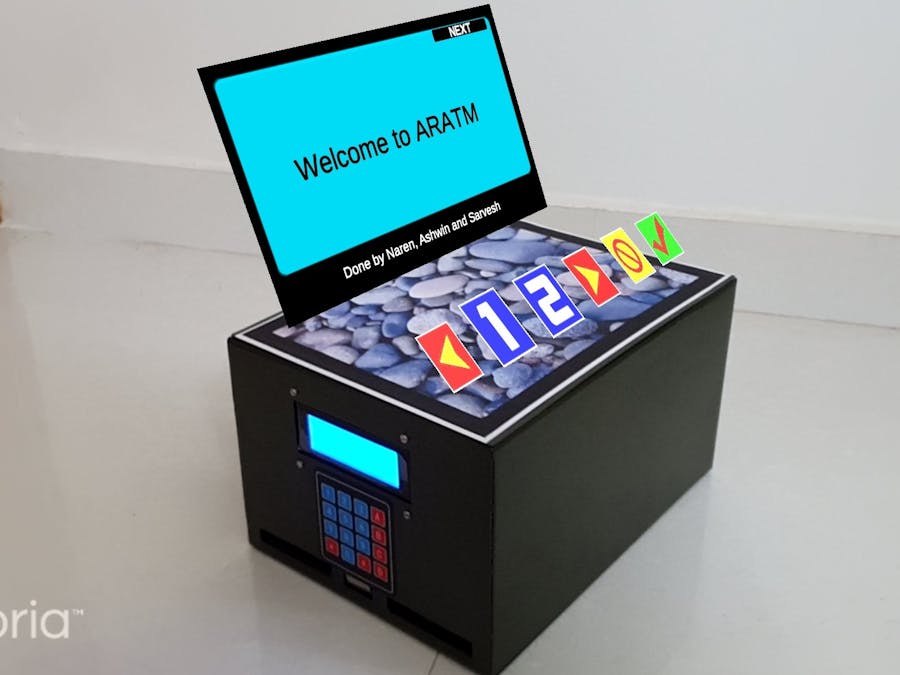
Augmented Reality is considered as a media that gives attraction and new experience for the users. Based on the previous research, it is stated that the use of Augmented Reality in banking brings a virtual experience for the users on transaction medium. A mobile application that uses Augmented Reality for banking may be considered as one of the methods to promote AR, because of the interactivity and virtual experience that the user can dispatch money from ATM without touching the keypad.
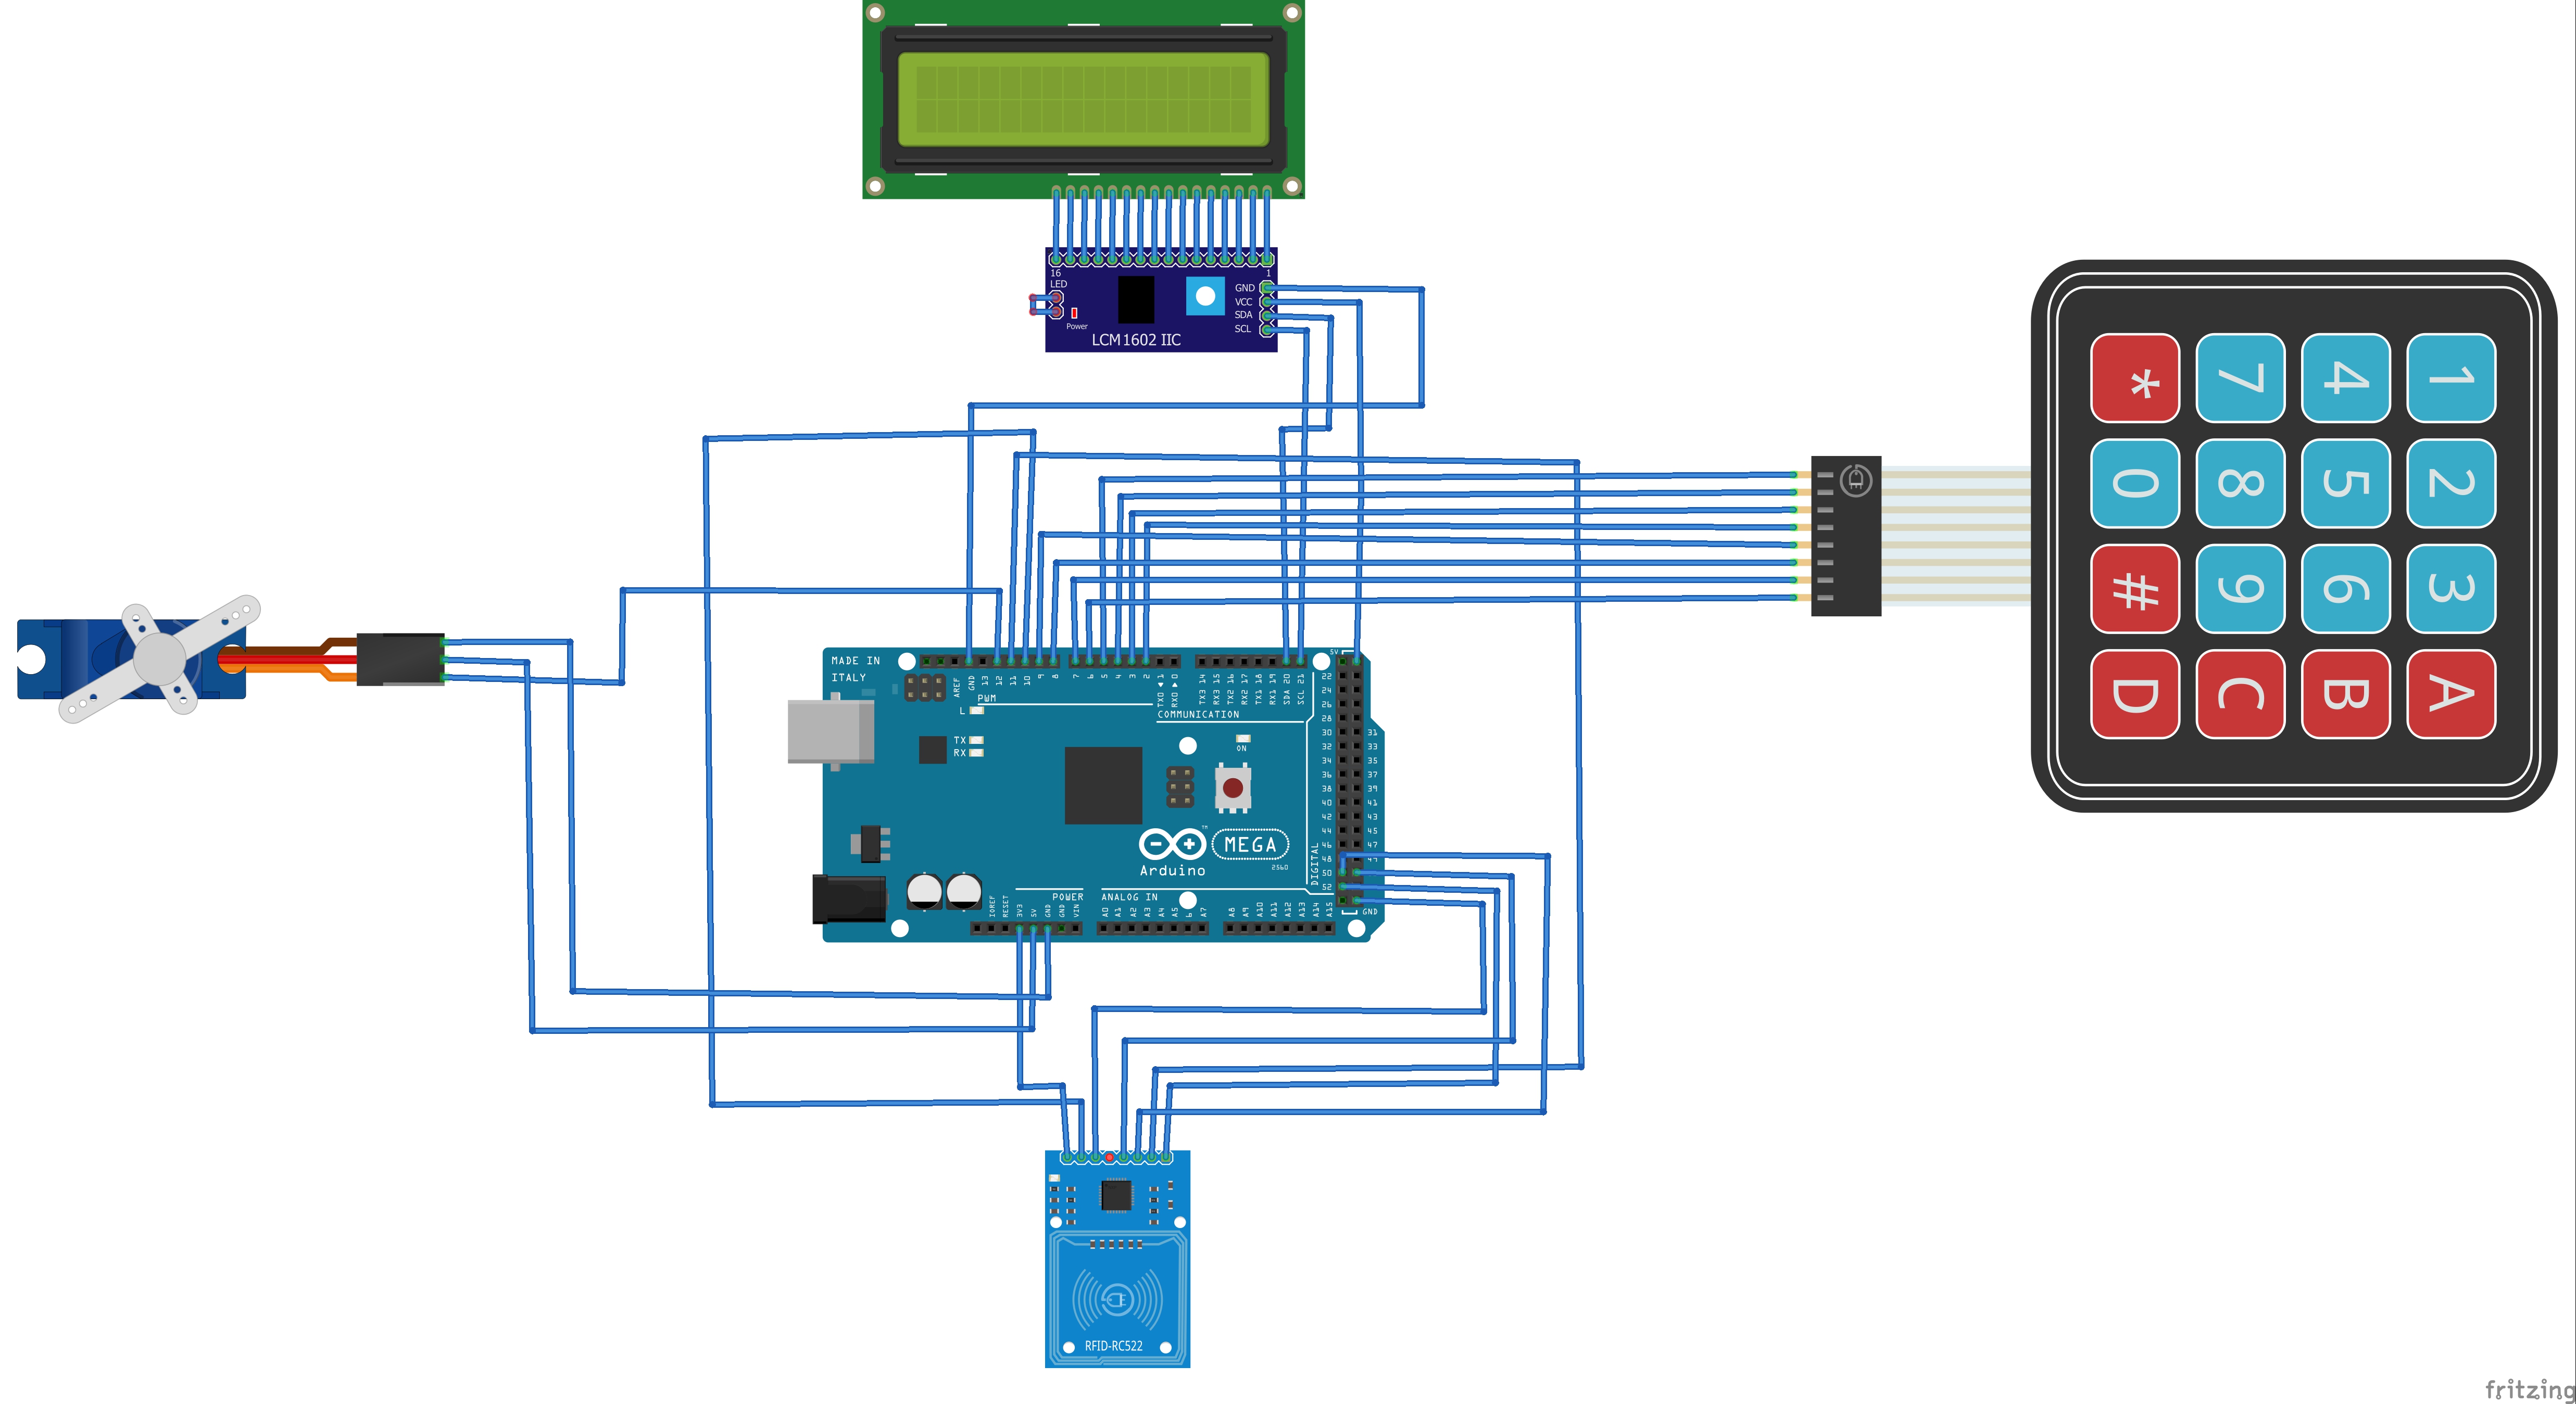
Block diagram
1 / 2 • ATATM application
The mobile application provides a much more secure option. Which also makes the user help more confident to use the ARATM.
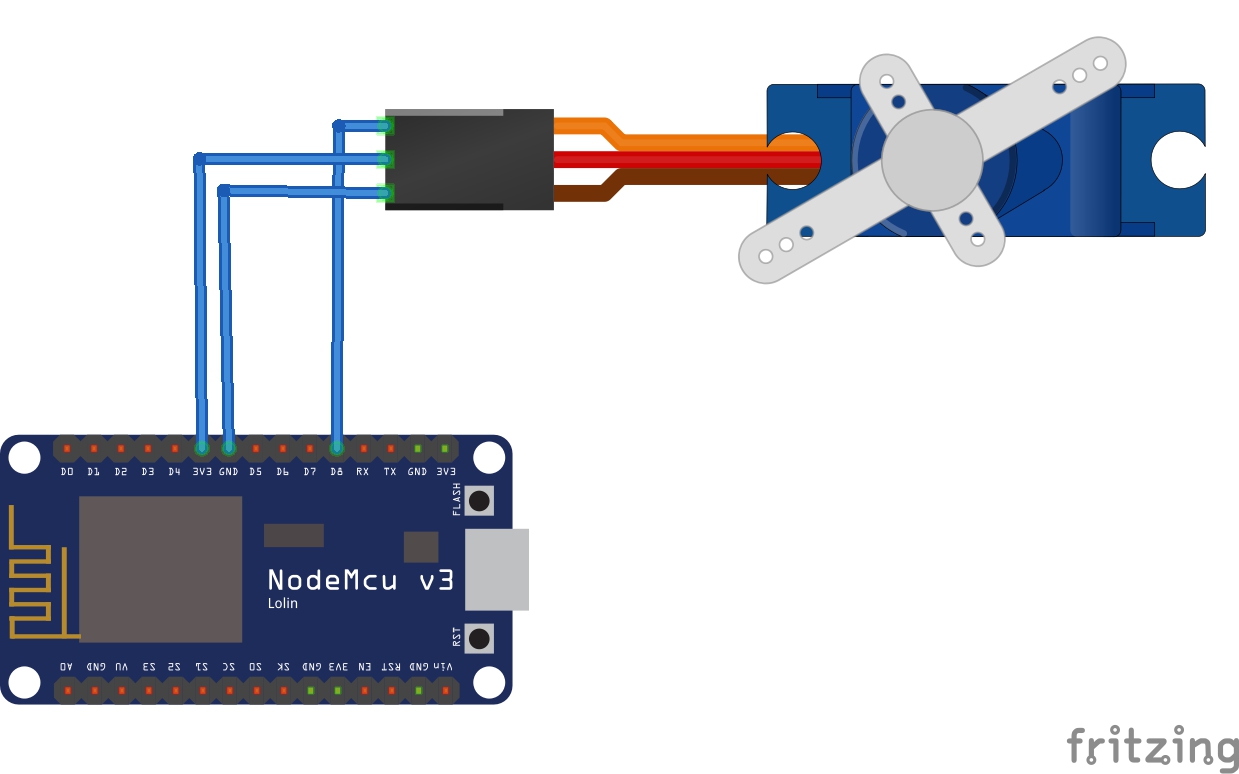
HARDWARE WORKING:
1 / 4
The model of mechanical assembly in my project.
Components assembly
ARARTM MODEL:
1 / 6 • Visual through mobile application
Working Video :
#include <ESP8266WiFi.h>
#include <Keypad.h>
#include <Servo.h>
#include <WiFiClient.h>
#include <PubSubClient.h>

//#define SS_PIN 4  //D2
//#define RST_PIN 5 //D1
//
//#include <SPI.h>
//#include <MFRC522.h>
//MFRC522 mfrc522(SS_PIN, RST_PIN);   // Create MFRC522 instance.
//int statuss = 0;
//int out = 0;

const char* ssid = ";//put your wifi network name here
const char* password = "";//put your wifi password here
const char* mqtt_server = "broker.hivemq.com";

WiFiClient espClient;
PubSubClient client(espClient);

const byte n_rows = 4;
const byte n_cols = 4;

char keys[n_rows][n_cols] = {
  {'1','2','3','A'},
  {'4','5','6','B'},
  {'7','8','9','C'},
  {'*','0','#','D'}
};

byte colPins[n_rows] = {D3, D2, D1, D0};
byte rowPins[n_cols] = {D7, D6, D5, D4};
Keypad myKeypad = Keypad( makeKeymap(keys), rowPins, colPins, n_rows, n_cols);
Servo myservo;
String passcode="";
String myPasscode="2113";

void setup(){
  Serial.begin(115200);
  myservo.attach(15); //attach the servo on pin D8)
  myservo.write(0);
  setup_wifi();
  client.setServer(mqtt_server, 1883);
  client.setCallback(callback);
  //Serial.begin(9600);   // Initiate a serial communication
//  SPI.begin();      // Initiate  SPI bus
//  mfrc522.PCD_Init();   // Initiate MFRC522
}


void setup_wifi() {
    delay(100);
  // We start by connecting to a WiFi network
    Serial.print("Connecting to ");
    Serial.println(ssid);
    WiFi.begin(ssid, password);
    while (WiFi.status() != WL_CONNECTED)
    {
      delay(500);
      Serial.print(".");
    }
  Serial.println("");
  Serial.println("WiFi connected");
  Serial.println("IP address: ");
  Serial.println(WiFi.localIP());
}

void callback(char* topic, byte* payload, unsigned int length)
{

  Serial.print("Message arrived in topic: ");
  Serial.println(topic);

  Serial.print("Message:");
  String message;
    for (int i = 0; i < length; i++) {
    Serial.print((char)payload[i]);
    message+=(char)payload[i];
    }
  if(message==myPasscode){
    publish("Approved");
    dispatchMoney();
  }else{
    publish("Denied");
  }
  Serial.println();
  Serial.println("-----------------------");

}
void publish(String msg)
{

     char message[100];
     msg.toCharArray(message,100);
    client.publish("/ABC/ATM/ACK", message);
    delay(100);
}


void reconnect() {
  // Loop until we're reconnected
  while (!client.connected())
  {
    Serial.print("Attempting MQTT connection...");
    // Create a random client ID
    String clientId = "ESP8266Client-";
    clientId += String(random(0xffff), HEX);
    // Attempt to connect
    //if you MQTT broker has clientID,username and password
    //please change following line to    if (client.connect(clientId,userName,passWord))
    if (client.connect(clientId.c_str()))
    {
      Serial.println("connected");
     //once connected to MQTT broker, subscribe command if any
      client.subscribe("/ABC/ATM/RCV");
    } else {
      Serial.print("failed, rc=");
      Serial.print(client.state());
      Serial.println(" try again in 5 seconds");
      // Wait 6 seconds before retrying
      delay(6000);
    }
  }
}


void loop(){
  if (!client.connected()) {
      reconnect();
    }
    client.loop();
}
void dispatchMoney() {
  Serial.println("Dispatching money...");
  myservo.write(90); //rotates the motor counterclockwise at slow speed
  delay(5000);
  myservo.write(0); //rotates the motor counterclockwise at slow speed

}
// Include required libraries
#include <MFRC522.h>
#include <LiquidCrystal_I2C.h>
#include <Keypad.h>
#include <Servo.h>
#include <SPI.h>

// Create instances
LiquidCrystal_I2C lcd(0x27, 20, 4);
#define RST_PIN         13      // Configurable, see typical pin layout above
#define SS_PIN          53         // Configurable, see typical pin layout above
MFRC522 mfrc522(SS_PIN, RST_PIN);
Servo sg90;

// Initialize Pins for led's, servo and buzzer
// Blue LED is connected to 5V
constexpr uint8_t greenLed = 7;
constexpr uint8_t redLed = 6;
constexpr uint8_t servoPin = 10;
constexpr uint8_t buzzerPin = 5;

char initial_password[4] = {'1', '2', '3', '4'};  // Variable to store initial password
String tagUID = "17 91 43 63";  // String to store UID of tag. Change it with your tag's UID
char password[4];   // Variable to store users password
boolean RFIDMode = true; // boolean to change modes
char key_pressed = 0; // Variable to store incoming keys
uint8_t i = 0;  // Variable used for counter

// defining how many rows and columns our keypad have
const byte rows = 4;
const byte columns = 4;

// Keypad pin map
char hexaKeys[rows][columns] = {
  {'1', '2', '3', 'A'},
  {'4', '5', '6', 'B'},
  {'7', '8', '9', 'C'},
  {'*', '0', '#', 'D'}
};

// Initializing pins for keypad
byte row_pins[rows] = {5, 4, 3, 2}; //connect to the row pinouts of the keypad
byte column_pins[columns] = {9, 8, 7, 6}; //connect to the column pinouts of the keypad

// Create instance for keypad
Keypad keypad_key = Keypad( makeKeymap(hexaKeys), row_pins, column_pins, rows, columns);

void setup() {
  // Arduino Pin configuration
  pinMode(buzzerPin, OUTPUT);
  pinMode(redLed, OUTPUT);
  pinMode(greenLed, OUTPUT);

  sg90.attach(servoPin);  //Declare pin 8 for servo
  sg90.write(0); // Set initial position at 90 degrees

  lcd.begin();   // LCD screen
  lcd.backlight();
  SPI.begin();      // Init SPI bus
  mfrc522.PCD_Init();   // Init MFRC522

  lcd.clear(); // Clear LCD screen
}

void loop() {
  // System will first look for mode
  if (RFIDMode == true) {
    lcd.setCursor(2, 0);
    lcd.print("Welcome to ARATM");
    lcd.setCursor(3, 2);
    lcd.print("Scan your card");

    // Look for new cards
    if ( ! mfrc522.PICC_IsNewCardPresent()) {
      return;
    }

    // Select one of the cards
    if ( ! mfrc522.PICC_ReadCardSerial()) {
      return;
    }

    //Reading from the card
    String tag = "";
    for (byte j = 0; j < mfrc522.uid.size; j++)
    {
      tag.concat(String(mfrc522.uid.uidByte[j] < 0x10 ? " 0" : " "));
      tag.concat(String(mfrc522.uid.uidByte[j], HEX));
    }
    tag.toUpperCase();

    //Checking the card
    if (tag.substring(1) == tagUID)
    {
      // If UID of tag is matched.
      lcd.clear();
      lcd.setCursor(5, 1);
      lcd.print("Loading...");
      digitalWrite(greenLed, HIGH);
      delay(3000);
      digitalWrite(greenLed, LOW);

      lcd.clear();
      lcd.setCursor(2, 0);
      lcd.print("Enter your code:");
      lcd.setCursor(8, 2);
      RFIDMode = false; // Make RFID mode false
    }

    else
    {
      // If UID of tag is not matched.
      lcd.clear();
      lcd.setCursor(3, 1);
      lcd.print("Access Denied");
      digitalWrite(buzzerPin, HIGH);
      digitalWrite(redLed, HIGH);
      delay(3000);
      digitalWrite(buzzerPin, LOW);
      digitalWrite(redLed, LOW);
      lcd.clear();
    }
  }

  // If RFID mode is false, it will look for keys from keypad
  if (RFIDMode == false) {
    key_pressed = keypad_key.getKey(); // Storing keys
    if (key_pressed)
    {
      password[i++] = key_pressed; // Storing in password variable
      lcd.print("*");
    }
    if (i == 4) // If 4 keys are completed
    {
      delay(200);
      if (!(strncmp(password, initial_password, 4))) // If password is matched
      {
        lcd.clear();
        lcd.setCursor(1, 1);
        lcd.print("Dispatching Money!");
        sg90.write(0); // Door Opened
        digitalWrite(greenLed, HIGH);
        delay(3000);
        digitalWrite(greenLed, LOW);
        sg90.write(90); // Door Closed
        lcd.clear();
        i = 0;
        RFIDMode = true; // Make RFID mode true
      }
      else    // If password is not matched
      {
        lcd.clear();
        lcd.setCursor(3, 1);
        lcd.print("Wrong Passcode!");
        digitalWrite(buzzerPin, HIGH);
        digitalWrite(redLed, HIGH);
        delay(3000);
        digitalWrite(buzzerPin, LOW);
        digitalWrite(redLed, LOW);
        lcd.clear();
        i = 0;
        RFIDMode = true;  // Make RFID mode true
      }
    }
  }
}

2 projects • 5 followers
Currently i am an student. I have been learning embedded systems for past 6 years and have build around 10+ projects with micro-controllers.
Thanks to Mithun Das.


Comments