

Hardware components | ||||||
 |
| × | 1 | |||
Hand tools and fabrication machines | ||||||
 |
| |||||
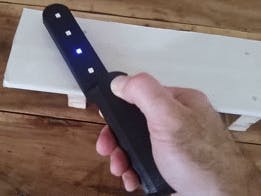
This cool little Pocket Metal Locator is sensitive enough to identify small nails and tacks in wood and compact enough to fit into awkward spaces making it convenient to carry and use for metal locating.
The unit has four independent search coils and color LED indicators making it easy to cover a larger search area quickly while being able to accurately identify the target.
This neat little device is self-calibrating with one button operation, rechargeable through a USB port and uses color LEDs, sound and vibration to indicate target strength.
Included in the tutorial is all of the designs, testing, code and 3D files required to build on your own. I hope you enjoy building and using this as much as I have!!
Step 1: Materials List and How It Works1. How It Works
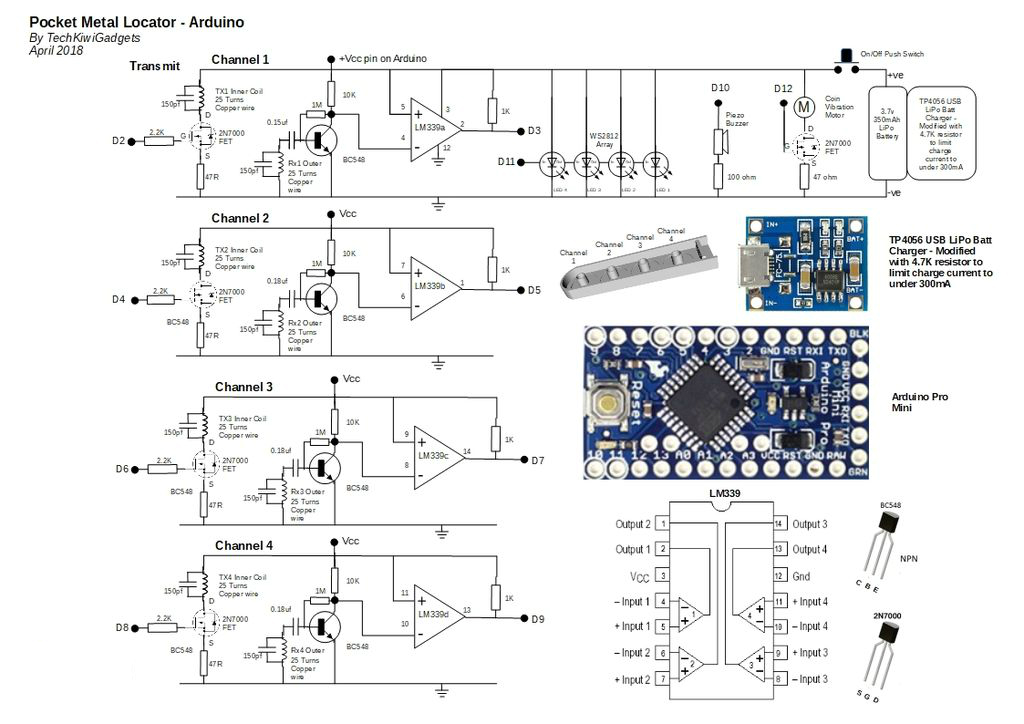
The Pocket Metal Locator uses four independent pulse induction search coils powered by an Arduino Pro Mini. Each search coil is made up of a separate TX and RX coil where a pulse is induced into the TX coil which creates an electromagnetic field around the RX coil. The changing field induces a voltage into the RX coil which is detected and amplified before the pulse width of the signal is read by the Arduino.
A smoothing algorithm in the Arduino code is used to remove noise from valid pulses making it very stable.
A calibration algorithm in the code takes an average of readings over a short period of startup and sets a series of thresholds to compare the signal against.
When a metal object comes within range of the electromagnetic field the field is disrupted and some of the energy is diverted from the RX coil into "Eddie currents" that form in the target object. This parasitic effect of the target object results in the pulse width detected in the RX coil reducing. Essentially we are measuring the loss of power into the target object.
When the pulse width detected in the RX coil drops below the threshold then the LEDs are lit, the buzzer is sounded and the Haptic Feedback motor triggered - dependent on a predetermined size of the target signal.
The circuit for this has evolved over the past year into a very stable and reliably performing detector. The coil configuration and orientation have been deliberately designed to maximize stability and depth detection.
2. Materials List
- 3.7v 350mAh LiPo Battery Size: 38mm x 20mm x 7.5mm
- TP4056 USB LiPo Battery ChargerData Sheet
- 4.7K resistor to limit LiPo battery charge current to below 300mA
- Arduino Pro Mini
- FTDI USB to Serial Module for Programming the Mini Pro
- LM339 Quad Differential Comparator Integrated Circuit
- Vero Board - 2 pieces cut to 20x9 holes and 34x9 (see photo for correct orientation)
- BC548 NPN Transistor x 4
- 2N7000 MOSFET Switch x 5
- Piezo Buzzer
- Coin Vibration Motor for Haptic Feedback
- WS2812 RGB LED Module x 4
- 1k Resistor x 4
- 10k Resistor x 4
- 47 Ohm Resistor x 4
- 2.2K Resistor x 4
- 150pf Ceramic Capacitor x 8
- 0.18uF Polyester capacitor x 4
- Roll of 0.3mm Enamel Copper Wire (normally come in rolls approx 25g Weight)
- PCB Mounted Push Button Switch
- Hot Glue Gun
- 10mm Drill Bit
- Handheld Drill
- Label Gun or Sticky Tape suitable to label 16 separate wires Hookup wire
- Access to a 3D Printer
3. Comparator Operation
I have had a number of questions about the operation of the LM339 so I thought I would give a more clear explanation.
The LM339 operates solely as a voltage comparator, comparing the differential voltage between the positive and negative pins and outputting a logic low or high impedance (logic high with pullup) based on the input differential polarity.
In this circuit, the positive input of the comparator is connected to the Vcc line and a pull-up resistor to Vcc is applied to the comparator output. In this configuration, in practice, the output voltage of the comparator stays high, until the input voltage on the negative input exceeds 3.5v
The operation can be explained from the LM339 Data Sheet which outlines the “input voltage range” being between 0 V to Vsup-1.5 V
When both IN– and IN+ are both within the common-mode range, if IN– is lower than IN+ and the offset voltage, the output is high impedance and the output transistor is not conducting
When IN– is higher than common mode and IN+ is within common mode, the output is low and the output transistor is sinking current. Link to Data Sheet and explanation below http://www.ti.com/lit/ds/symlink/lm2901.pdf
Step 2: Print the CaseThe 3D printed case was done using 5 separate prints. The dimensions and 3D files can be found here on Thingiverse. The design was centered on making the device easy to hold while ensuring the search coils were as close to the area being searched.
Carefully print out the case and remove excess plastic. It is important to do this step now so the electronic components can be aligned in the case before final hookup and testing.
Take the printed coil formers and wind 25 turns of copper wire onto each of them. Ensure you leave a good 20cm of extra copper wire for hookup to the main unit.
Use the holes printed in the formers to enable a consistent wind and orientation of coils for each former. As you do this, turn the former upside down and progressively glue the former into the base unit.
Follow the photo assembly as provided, the outcome being 8 coils mounted in the coil assembly with all wires consistently orientated, and long enough to connect to the main board unit in the upper enclosure.
Use the two wire guide blocks which have holes for each coil the printed base to keep track of each specific coil.
I placed the wires for the Inner Coils along the top and the outer coils along the bottom of the wire block so that I could keep track of each specific coil which makes it easier for connecting to the main board.
Step 4: Build the CircuitThe unit has four key circuits to build independently - Driver Board, Main Board, LED assembly and Rechargeable Power Supply. In this step, we will build the Driver Board and Main Board.
1. Driver Board
Use a craft knife to cut a piece of Vero Board along the holes 22x11 the result being a piece of Vero Board with 20x9 holes oriented as per the included picture. It's best to score across the holes on both sides of the board multiple times then gently snap off the excess board. Check that the board sits in the base of the enclosure with enough clearance on either side.
Using the photos and a 10mm Drill bit by hand carefully break the tacks shown on the bottom of the Vero Board. Follow the circuit Diagram and photo layout of components to assemble the circuit board being careful to ensure there are not shorted tracks.
Set this board aside for testing later.
2. Main Board
Use a craft knife to cut a piece of Vero Board along the holes 36x11 the result being a piece of Vero Board with 34x9 holes oriented as per the included picture. It's best to score across the holes on both sides of the board multiple times then gently snap off the excess board. Check that the board sits in the base of the enclosure with enough clearance on either side.
Using the photos and a 10mm Drill bit by hand carefully break the tacks shown on the bottom of the Vero Board.
Follow the circuit Diagram and photo layout of the Arduino and LM339 IC and other components to assemble the circuit board being careful to ensure there are not shorted tracks.
Set this board aside for testing later.
I have used WS2182 LEDs which have a built-in IC which enables them to be addressed by the Arduino using three separate wires however a broad range of colors and brightnesses color can be created by sending a command to the LED. This is done through a special library loaded into the Arduino IDE covered in the testing section.
1. Mounting the LEDs in the Coil Enclosure Lid
Carefully position the four LEDs so they are oriented correctly so that the VCC and GND connections are aligned and they are sitting in the center of the holes.
Use Hot Glue to fasten the LEDs into position.
2. Wiring the LEDs
Carefully strip and position three 25cm lengths of single core hookup wire across the contacts of the LEDs.
Solder these into place and ensure the center data wire is connected with IN and OUT contacts as per the photo.
3. Case Alignment Check
Check that the lid of the case will sit flush with the Coil Enclosure then use Hot Glue to hold the wires in place at the base end of the lid.
Set this aside for testing later.
Step 6: Assembling and Testing the Unit1. Preparing for Assembly
Before assembling we will test each board progressively to make it easier to troubleshoot issues.
The Arduino Pro Mini requires a USB serial board in order to be programmed by your PC. This enables the board to be smaller in size as it doesn't have a serial interface on it. To programme these boards you will need to invest in getting one as outlined in the part list.
Before loading the Arduino code you will need to add the Library "FastLED.h" as a library to drive the WS2182 LEDs.A series of Oscilloscope Traces have been provided for troubleshooting if there are issues.
There is also a screenshot of the IDE serial data output using the Graph Plot function which shows the pulse width output of each of the channels as well as the threshold value. This is useful during testing as you can see if each channel is performing to similar levels of sensitivity.
I have included two copies of the code. One has test serial data streaming for troubleshooting purposes.
NOTE: Do not connect the LiPo Battery unit until the very last step as accidentally shorting this out during assembly can cause the unit to overheat or even catch fire.
2. Test the Main Board
Before connecting the main board to anything it is advisable to attach the Arduino Serial Cable and verify that the code loads.
This will simply test that you have the Arduino is physically wired correctly and that the IDE and libraries are loaded. Load the code through the IDE which should load with no errors and no smoke should come out of any components!!
3. Connect the Driver Board
Follow the circuit diagram to connect the Driver Board to the Main Board and physically position the unit in the case to ensure items fit within the enclosure. This is a case of trial and error and requires persistence.
Load the code through the IDE which should load with no errors and no smoke should come out of any components!!
4. Connect the Coils Follow the circuit diagram to connect the Coils to the Main Board and physically position the unit in the case to ensure items fit appropriately. Carefully ensure the coils are aligned with the Driver Board and Main Board inputs as per the circuit diagram.
With the test code loaded the serial port will display the pulse width on the receive coil somewhere between 5000 - 7000uS. This can also be viewed using the IDE Graph Plotter.
This will enable you to troubleshoot each of the channels and also see the effect of moving a coin near the search coil which should reduce the pulse width as the target gets closer to the search coil.
If you have an oscilloscope you can also check the waveforms at various stages of the circuit to diagnose issues.
Once all channels are performing as per expected position the wires so that the case enclosure will assemble and close correctly.
5. Connect the LEDs
Carefully take the three wires from the Coil Enclosure LEDs and connect them to the main board. Load the code and verify the LEDs are operating correctly. Use glue to fasten the coil enclosure lid into place.
Step 7: Connecting the Rechargeable BatteryNOTE:
1. Do not connect the LiPo Battery unit until the very last step as accidentally shorting this out during assembly can cause the unit to overheat or even catch fire.
2. When handling the battery and charger ensure you are careful not to short out the battery connections.
3. LiPo batteries are unlike other rechargeables and overcurrent charging can be dangerous so ensure you configure the charge circuit correctly.
4. Do not connect the Arduino Serial Cable to the unit when the power button is depressed otherwise the battery could be damaged.
1. Modify The Charger Current Limit
The Pocket Metal Locator uses a LiPo Battery which can be charged using a Micro USB phone charger. The TP4056 USB LiPo Batt Charger Board is first modified with 4.7K resistor to limit charge current to under 300mA. Direction on how this can be done can be found here.
This requires you to remove the existing surface mounted resistor and replace with a resistor as shown in the photo. Once in place protect any unplanned movement of the resistor with some hot glue gun.
Before connecting to the main board, test the charger is working correctly by connecting a cell phone charger with a Micro USB port. The red charging light should come on when working correctly.
2. Install The Push Button Power Switch
Ensure the Push Button is mounted in the correct position so that it protrudes through the center of the enclosure lid then solder the Push Button in place. Install wires between the Push button switch and Charger Output and the VCC line on the Arduino as per the circuit diagram.
When installed correctly pushing the switch will activate the unit.
Fix the Battery in position using hot glue and ensure that the Micro USB socket is aligned to the hole in the case lid so that it can be charged.
Step 8: Final Testing and Operation1. Physical Assembly
The final step is to rearrange the wires carefully so that the case will close correctly. Use hot glue to fasten the mainboard into the lid and then close the lid into position.
2. Operating the Unit
The unit operates by calibrating after pushing and holding the power button. All of the LEDs will flash when the unit is ready to be used. Keep the push button down while searching. The LEDs change from Blue-Green, Red, Purple based on strength of target object. The haptic feedback occurs when the LEDs turn purple.
You are no ready to go and use for practical applications!!
Pocket Metal Locator
The unit has four independent search coils and color LED indicators making it easy to cover a larger search area quickly while being able to accurately identify the target.


_3u05Tpwasz.png?auto=compress%2Cformat&w=40&h=40&fit=fillmax&bg=fff&dpr=2)
Comments