_CdqCERIb6r.gif?auto=format%2Ccompress&gifq=35&w=400&h=300&fit=min)

Hardware components | ||||||
_ztBMuBhMHo.jpg?auto=compress%2Cformat&w=48&h=48&fit=fill&bg=ffffff) |
| × | 1 | |||
 |
| × | 1 | |||
I created battlebots using the Arduino UNO and cardboard was used to build the bodies. I tried to use affordable supplies and gave the kids creative freedom on how to design their battle bots. Battlebot receives commands from the wireless controller using joystick and nRF24L01 2.4GHz wireless module.
Step 1. Hardware and MaterialsYou will need the following materials to get started:
9v battery: https://amzn.to/2wPmnSP|| https://sea.banggood.com/custlink/KmKYdQw8Ii
Jumper wires: https://amzn.to/398mQhq || https://sea.banggood.com/custlink/vK3hds7SAZ
NRF24L01+ 2.4GHz Wireless RF Transceiver Module: https://amzn.to/30xQlp4 || https://sea.banggood.com/custlink/DmGEEnw9i4
9v Battery Clip Connector : https://amzn.to/32D4R0b || https://sea.banggood.com/custlink/mvDdYsw98s
Cardboard : https://amzn.to/39ufbKH
Natural Wood Craft Sticks : https://amzn.to/39rovPs || https://sea.banggood.com/custlink/3mKYdbw8je
Mini Breadboard : https://amzn.to/2JujS9e || https://sea.banggood.com/custlink/D3KhynuiIq
Dual Axis XY Joystick Module Arduino KY-023 : https://amzn.to/3gOcWFZ || https://sea.banggood.com/custlink/vGmyRQu98T
DC Motor 1:48 Gear Ratio Smart Car Robot + Wheel : https://amzn.to/3drHmvx || https://sea.banggood.com/custlink/GmDdYnfilm
L298N mini motor driver : https://amzn.to/2MoYeqI || https://sea.banggood.com/custlink/3m3dYbTIjV
Switch: https://amzn.to/2upTngE || https://sea.banggood.com/custlink/mG3yyNT8Oi
Male DC Barrel Jack Adapter for Arduino : https://amzn.to/2VwyKxx || https://sea.banggood.com/custlink/K3DhRNwSlL
Hot Glue Gun : https://amzn.to/31sIko3 || https://sea.banggood.com/custlink/GmvhYQ1ome
Soldering Iron Kit : https://amzn.to/3eHmp0i || https://sea.banggood.com/custlink/m3DYRAuL3k
Step 2. Build a BattleRobotThe idea behind this battlebot was to try to build a cheap as possible. I used cardboard for the body of robot instead of sheet metal, scissors instead of band saws, and hot glue instead of an ark of welder.
First, you need cardboard then cut out the shapes. If you dont like my design, you can design your own battlebot. Glue the pieces together except the top because we want to put the circuit into the body of battlebot.
Step 3. Programming the Battlebot and ControllerTo program the arduino you will need the RF24 library installed. So download the files below and open arduino IDE. Go to Sketch -> Include Library -> Add.ZIP Library and import 'RF24.zip' into there.Next you'll have to connect the arduino UNO and upload 'Battle_Robot.ino' to the arduino. Now unplug the Arduino UNO and connect the Arduino Nano and upload 'Controller.ino' to the Arduino. Remember to change the 'board' and 'port' settings also.
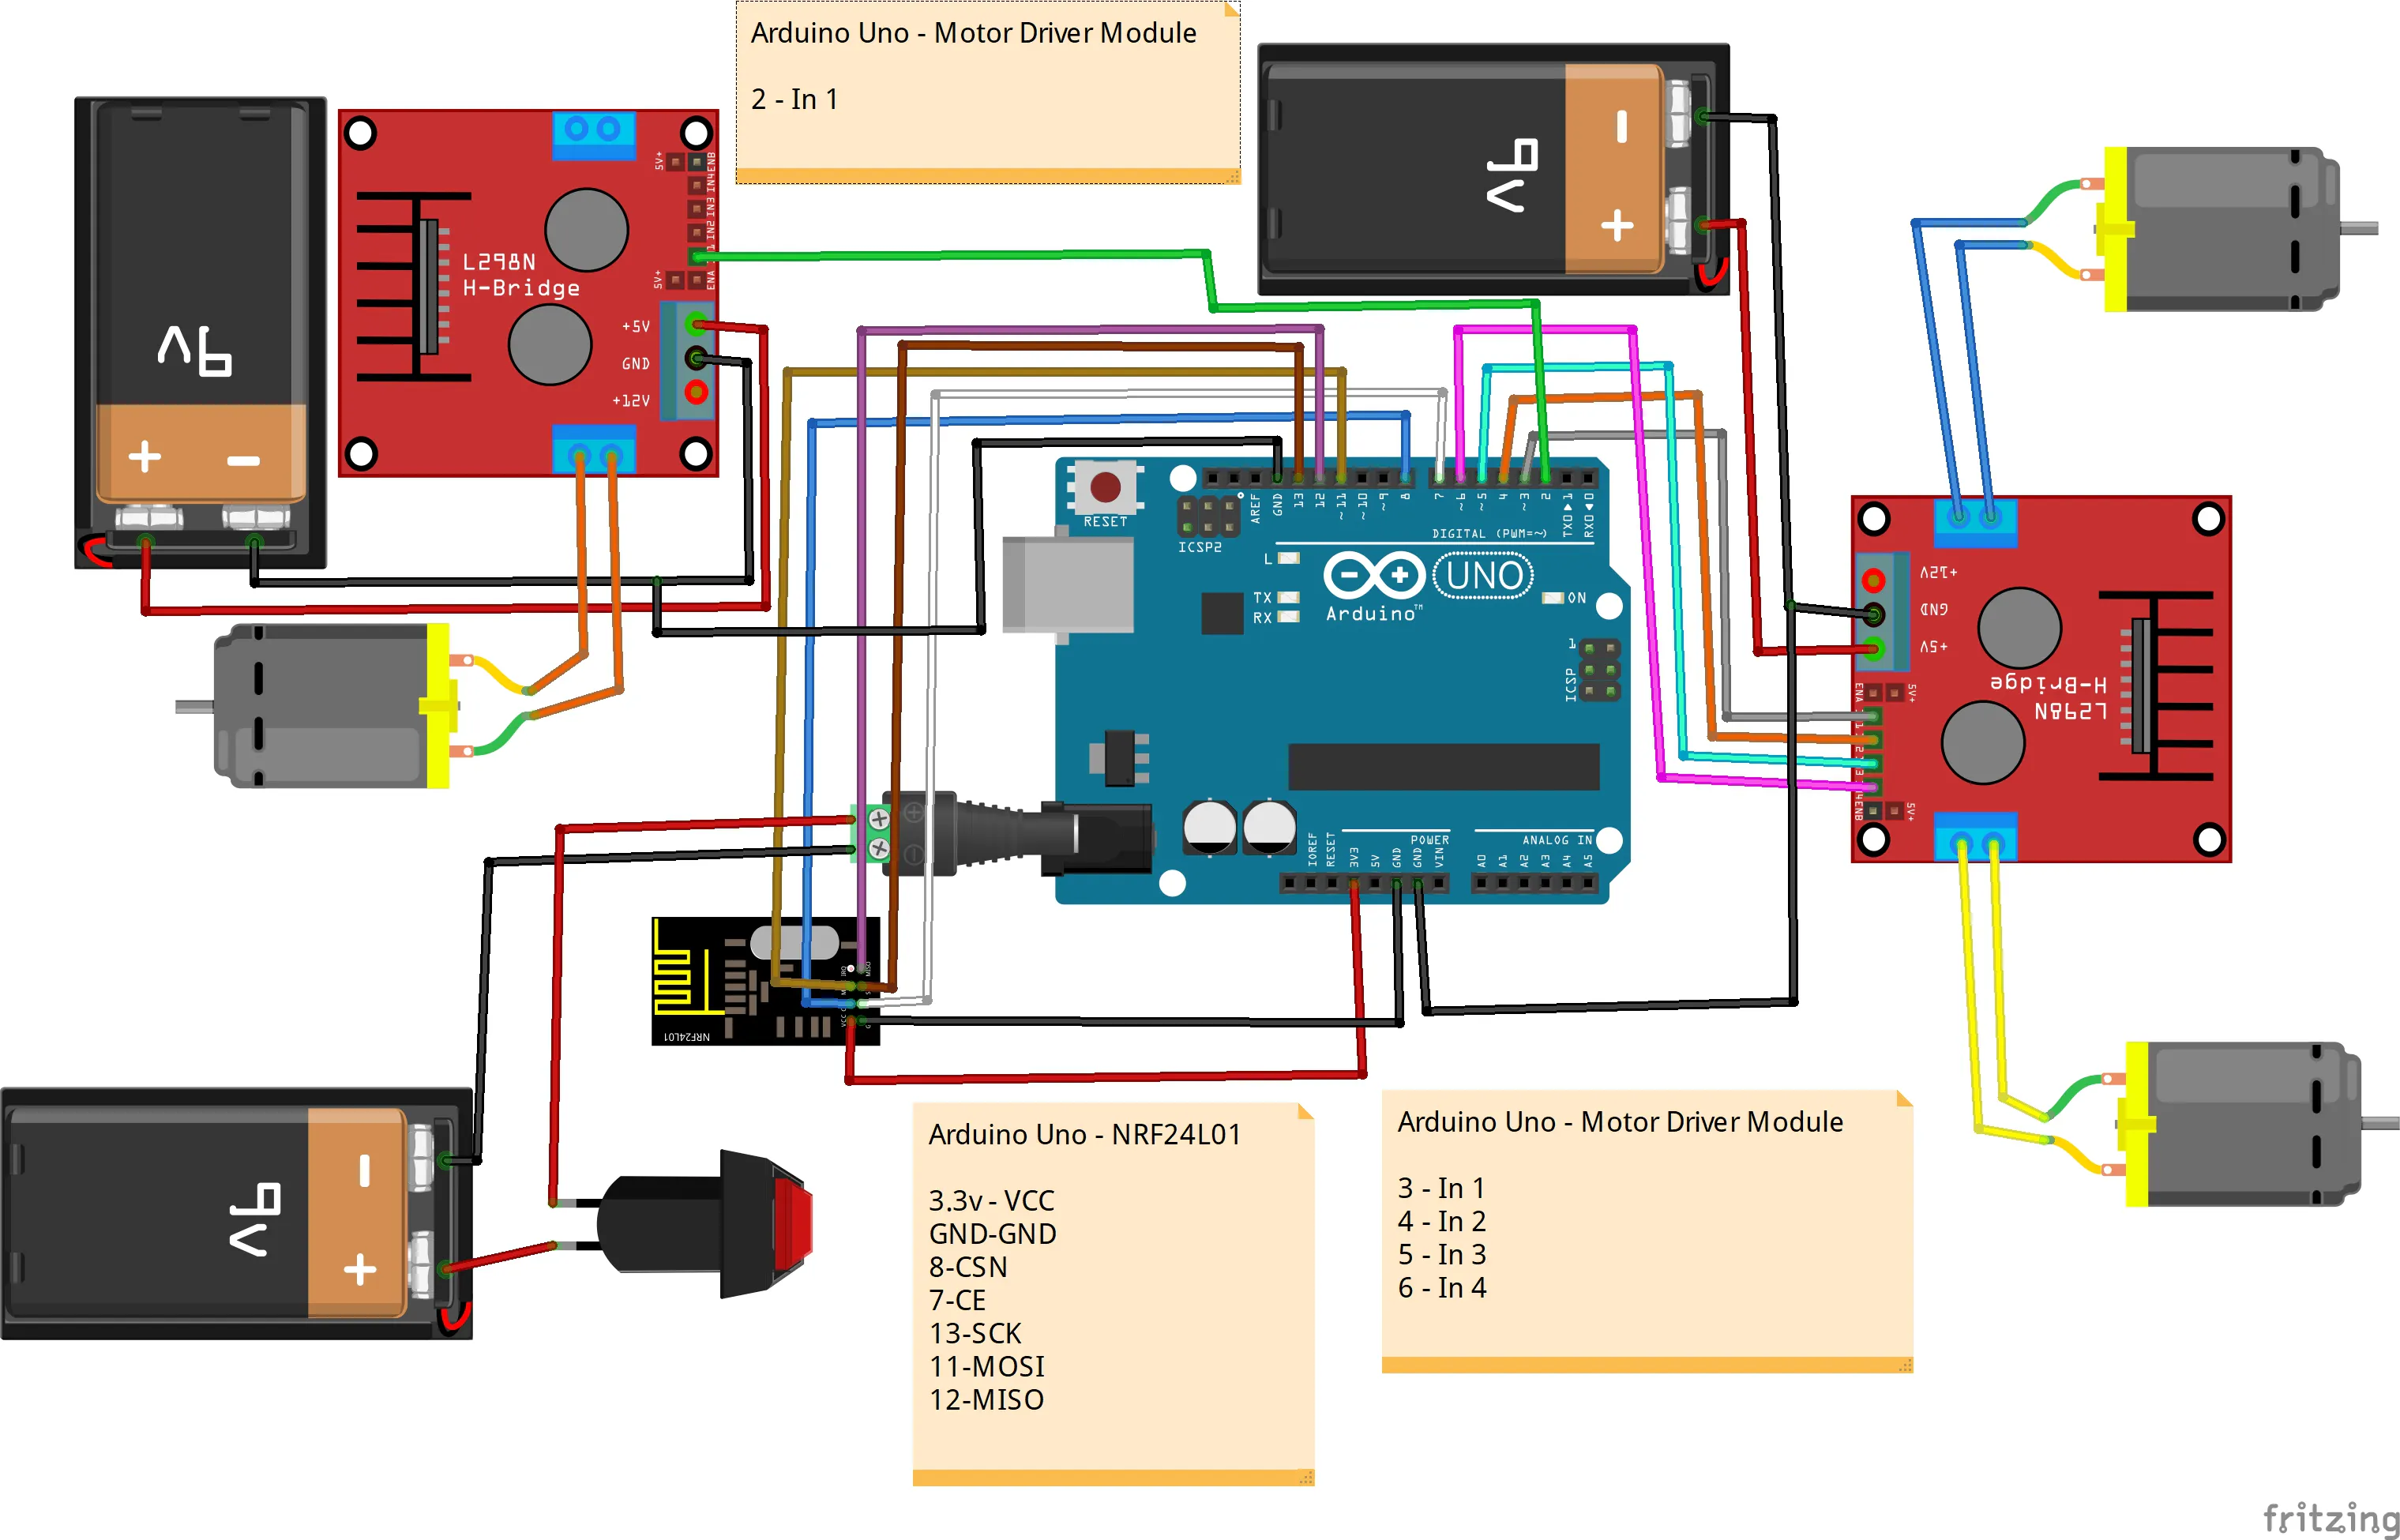
Step 4. Wiring The BattlebotIn this project used 3 x 9 volt alkaline batteries for arduino uno, motors, and spinner. L298N mini motor driver was used for the control of the motors. It receives some 5V signals of the Arduino board, and provide higher voltages for the motors. It also allow the motors to run in both directions, depenting on the combination of those input signals. Each device was connected according to the wiring diagram.
After wiring the circuits, Then you simply glue them or double tape into the body of battlebot, along with your battery pack and arduino uno.
The following image shows the complete wiring diagram of transmitter using Arduino Nano.
After connecting all components then I inserted all these components into the enclosure and sealed it completely using hotglue. NRF24L01 2.4 GHz Transceiver Module can be used for wireless communications at up to 100 meters.
Step 6. TestThe Battlebot
Now, if all goes well, you should be able to control the battlebot with the controller. If the battlebot doesn't work at all you should check the connections of the nRF24L01.
It was fun building these battlebots! I hope this article helped open your eyes to the possibilities buried in all those everyday items around your house. Those boxes you throw away could become your next big project if you think about it.
You can subscribe my channel for the support.
Thank You.
Battle Video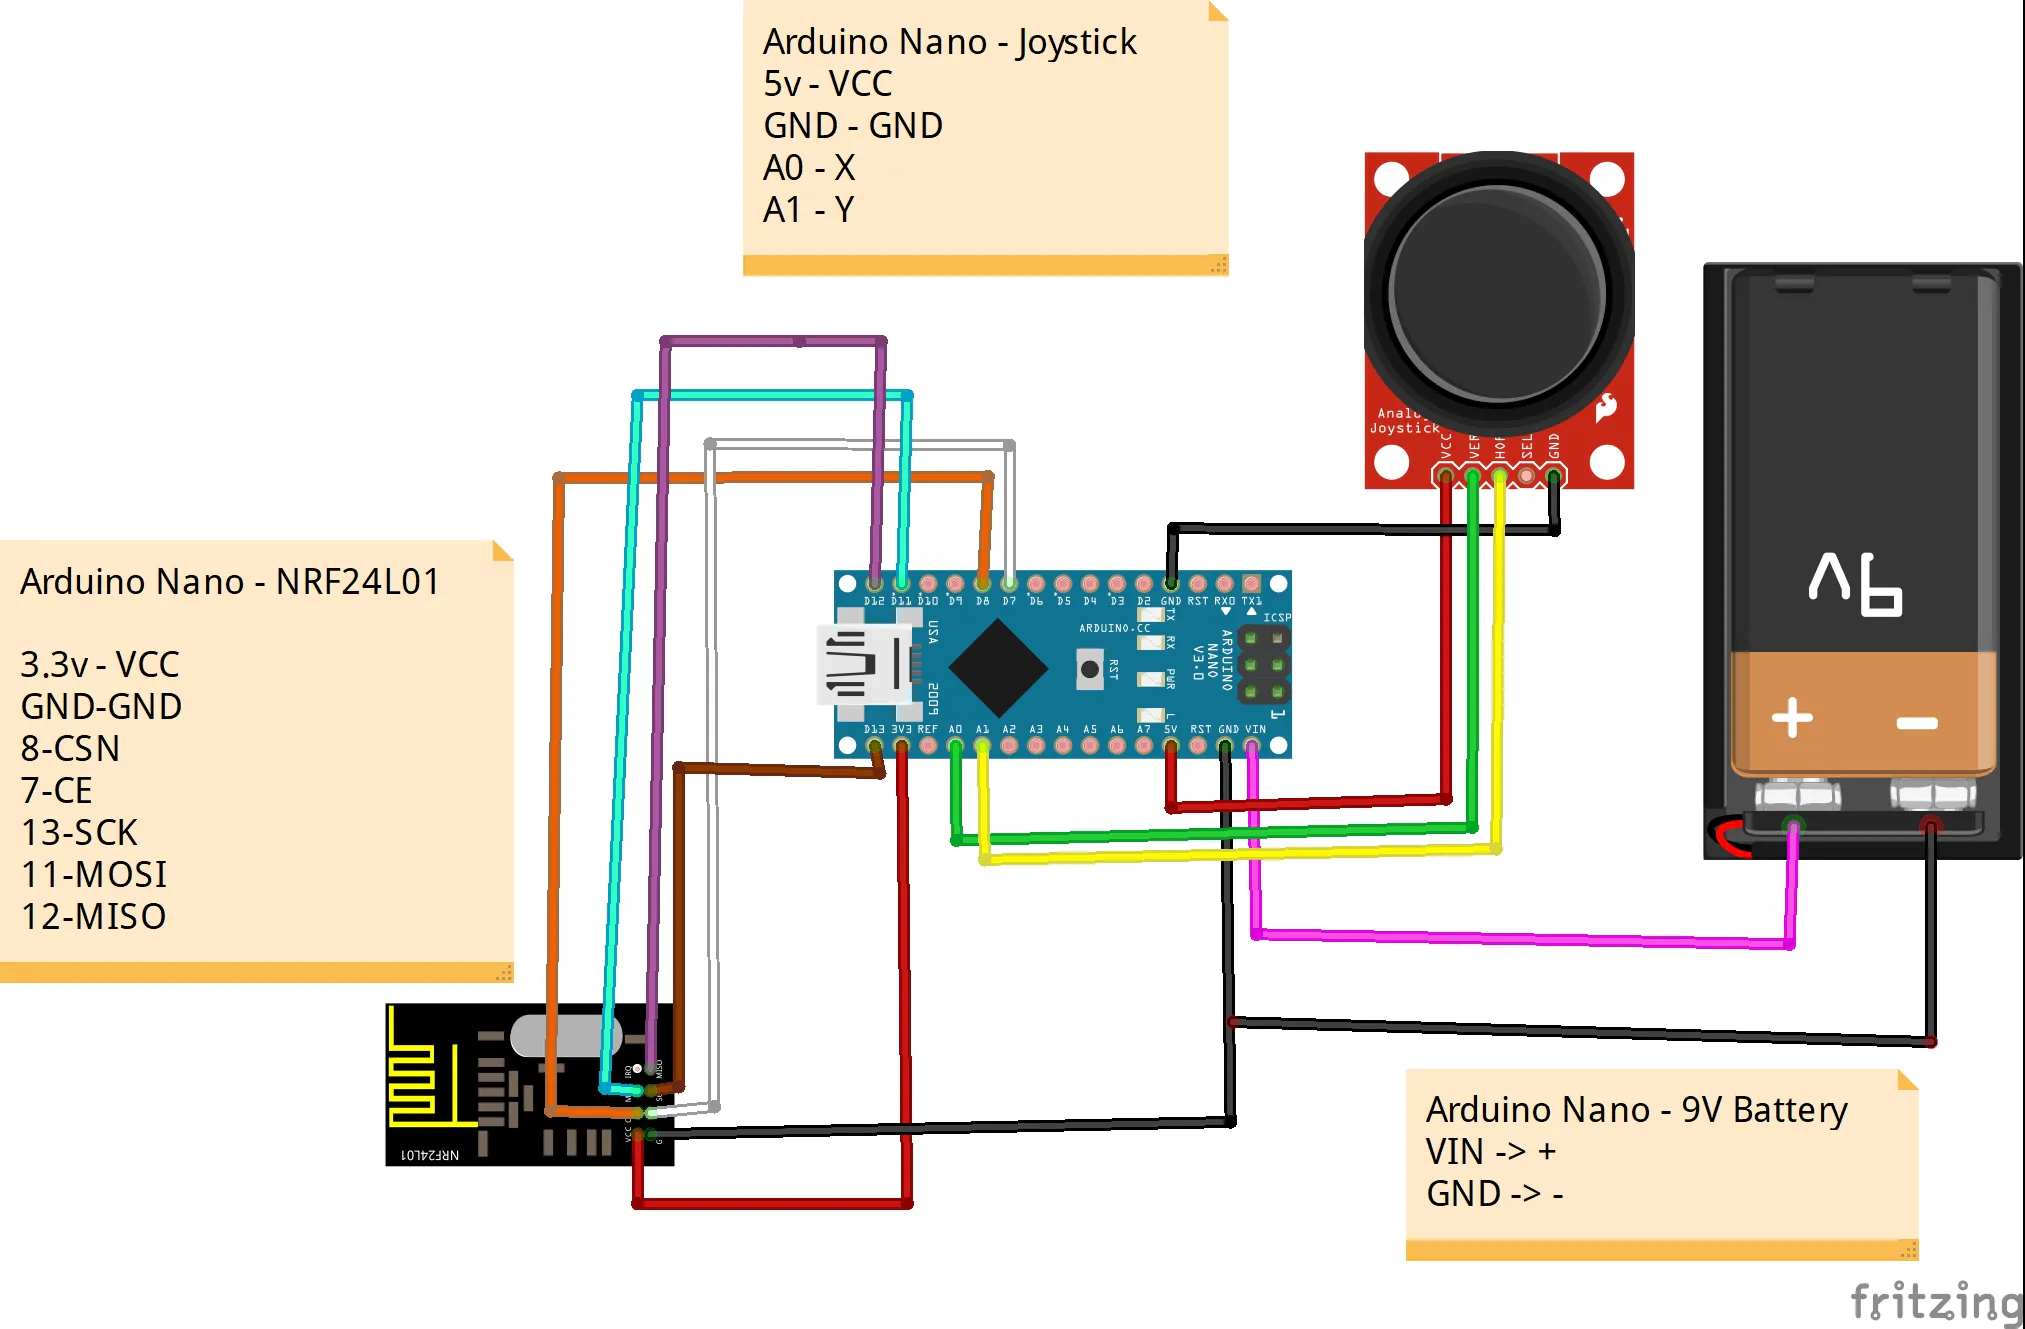


Comments