

Hardware components | ||||||
| × | 1 | ||||
_ztBMuBhMHo.jpg?auto=compress%2Cformat&w=48&h=48&fit=fill&bg=ffffff) |
| × | 1 | |||
| × | 1 | ||||
| × | 1 | ||||
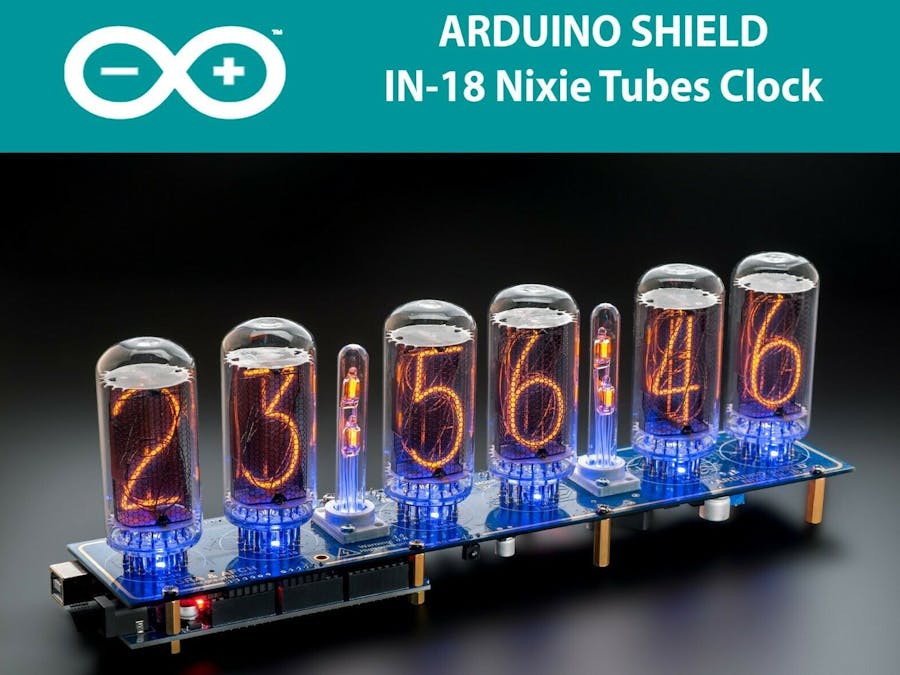
We set out to create a Nixie clock or just an information indicator on the largest ex-Soviet IN-18 tubes as an Arduino shield-compatible with both Uno and Mega boards.
After a long reading of lots of information about IN-18 tubes on the Internet, we found out that there's existing issues with so-called "blow glow" and "poisoning" of the tubes.
These two topics discussed considerably on various forums and the main question stands why such effects occurs.
Among possible causes may be: poor supplying voltage, inappropriate supplying current, tubes wearing, switching schemes flaws, unsuitable types of drivers, imperfect control algorithms, untuned types of multiplexing (dynamic or direct - static) and others.
Considering all listed, it was quiet difficult to understand what actually causes the problems of stable usage of these large and beautiful tubes.
Previously we have dealt successfully with the smaller Nixie tubes such as IN-12 and IN-14 and they had no such problems.
So it goes and we have built the first prototype on ex-Soviet IC K155ID1 SN74141 driver. This particular driver is actually built specially for Nixie tubes, but in spite of that, a number of problems immediately arose. Low brightness of the tubes, "blue glow" in the form of dots, and most importantly and disappointing, a very short tubes lifespan are among of those problems.
We tried both multiplexed and direct tubes control methods. And immediately discarded the scheme with multiplexing because of the low brightness of the tubes and more complex software implementation for this method.
However it has its advantages such as fewer components and as a result lower cost. But we decided to use the scheme with direct control as more progressive.
Next came the stage where we tried almost all of the specialized driver circuits available on the market for managing high-voltage loads for the tubes.
In the process we found out that there were no driver with push-pull outputs that could suit our needs!
For large Nixie tubes such as IN-18, Z5660M, ZM1042, Z568 it takes a drivers with an open collectors (open-collector) or open-drain outputs to work.
That is, those in which one of the output states is a logical zero, and the second is a Z-state.
In addition, the driver should be able to provide the required current for the tubes, which must be at least 10 mA for a direct control circuit scheme and at least 20 mA for a circuit with multiplexing scheme.
In the process of some trails and errors we finaly stoped at HV5122PJ microcircuit in the PLCC44 package that has meet all our requirements at most. It has 32 outputs wich allows assembling the clock on 6 Nixie tubes with 4 separating dots (e. g. Columns) using only two of those microcircuits.
One tube requires 10 control output legs and 6 Nixie tubes therefore requires 60 output legs. Since two drivers, with 32 legs each, have 64 terminals overall, it means we have 4 terminals left for individual control for each of the 4 dividing points.
Clocks assembled according to the scheme with direct control of the tubes and based on two IC registers HV5122PJ had no problems with "blue glow" dots and low level of tubes brightness.
However, after some time of testing we found out that the lifespan of the tubes is quiet short and therefore not enough for end users.
Upon usage initially, the current on each anode on the tubes was about 6 mA, we reduced it to 4 mA, this has slightly prolonged the lifespan of the tubes but also reduced the brightness.
Still the lifespan of the tubes remained extremely short, far less than stated by the tubes manufacturers. Then came another issue. After about 3 to 4 months of continuous usage of the tubes, the so-called "poisoning" effect began to manifest itself.
This occurs as a partial or complete fading of individual characters of the Tube.
Increasing the tubes supplyig voltage from 170 volts to 195 volts extended for several more months the lifespan of the tubes, but still that was not satisfying and demanded a search for a solution to that issue. On the Internet we found information that a "poisoned" tubes can be "restored" by passing an increased current through them from 5 to 10 times the nominal.
For IN-18 tubes, according to various datasheets, the rated currents indicated in range of 6 to 8 mA, so we implemented brief passing of 30 to 80 mA through the tubes.
This way we managed to "restore" several tubes but this method of restoration was very inconvenient, so the idea then came to implement an automatic recovery procedure using the shield's board means bypassing the anode resistors shim resistance.
This scheme would require an additional 6 switches for each anode of the tube.
Therefore we decided to implement brief increase of tubes current using the PWM principle.
At the same time the brightness of the tubes using this scheme did not affect the brightness!
So at the end the lifespan of the tubes finally increased SIGNIFICANTLY in comparison to the manufacturers statements!!!


Comments