

Hardware components | ||||||
 |
| × | 1 | |||
| × | 1 | ||||
| × | 1 | ||||
 |
| × | 1 | |||
 |
| × | 8 | |||
 |
| × | 1 | |||
| × | 3 | ||||
 |
| × | 4 | |||
 |
| × | 1 | |||
 |
| × | 1 | |||
| × | 1 | ||||
| × | 1 | ||||
| × | 1 | ||||
| × | 1 | ||||
| × | 1 | ||||
| × | 1 | ||||
Software apps and online services | ||||||
 |
| |||||
| ||||||
Hand tools and fabrication machines | ||||||
 |
| |||||
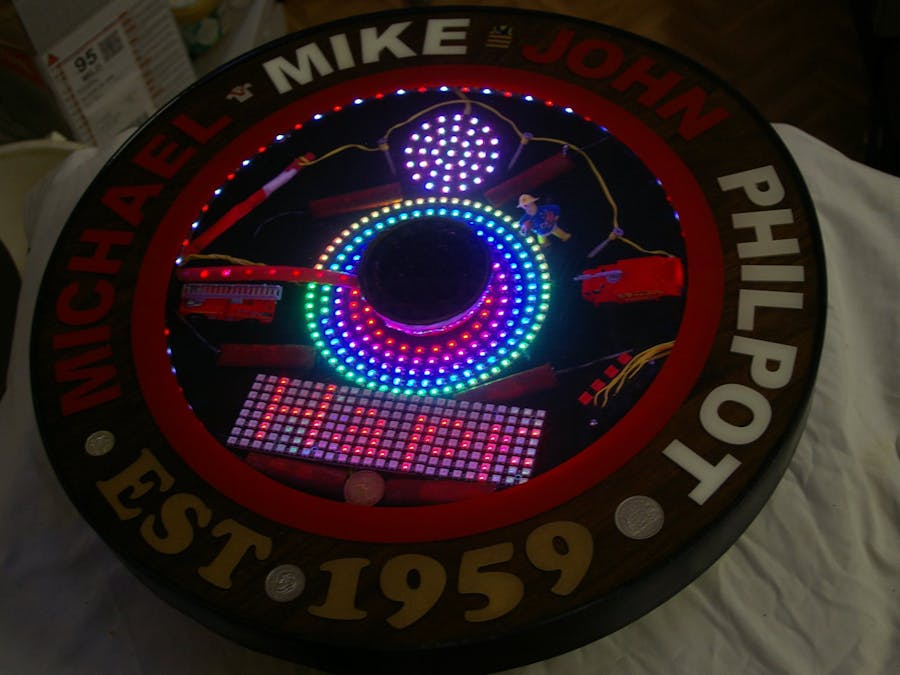
Jim does the mechanicals on many of my projects so at some point it comes time to return all those favors. He is a rather talented artisan in both kinetic and static sculptors, this is the story of one of those pieces. It's actually a lazy Susan, you know a rotating table that food goes on. But before we go any further I must point out that in amongst Jim's many skill he is licenced Pyro-Technician.
So Jim appears one day at my office with a long shopping list of items he wants to work together and the metal base of what will be one of his pieces. It turns out to be a birthday present for a guy who does fireworks displays and is conveniently also in the fire brigade. So the thing we are to make needs to look and sound like fireworks but not actually explode or catch fire. Before I can say "HOW MANY LEDS?" he's ordered a truckload of neopixels on eBay. I'm busy doing the math in my head and saying "ummm what substation are we powering this from". So a quick cup of coffee on the deck later while looking at my lights and different brightness levels via the mobile phone interface. We figure we can do this all at about 1/16 or 1/8 brightness and power as people will be looking directly at it on a table top.
Turns out the whole thing needs to be battery powered, about this stage I'm having visions of a giant Catherine wheel powered by overloaded LiPol batteries. So a quick browse on eBay for the lithium power pack case and 18650 batteries. We decided in the absence of a real plan will set ourselves an amps budget (the limit of the power pack) and try to live within it.. Assuming we don't turn all led's on at once or two brightly we should be OK, anyhow that comes down to a math problem and we can spread sheet it later.
Due to there being lots of different physical configurations of neopixels we decided to run them all on 4 strings. 3 normal and 1 for the matrix display. I designed a simple sequencer to coordinate the four lighting effects and to start the selected sound effect. Web pages where then constructed for managing the text message elements and the sequence setup. The pattern setup page was salvaged from my deck lights project and given quick lick of paint. Never used 4 strings at once before, so the first port of call was "is this even possible" ? Answer turns out to be YES but not all pins on the ESP8266 are created equal !
The MP3 player attaches to the secondary serial port and we do a software swap to this port after boot up. That way I can get diagnostics on the usb and drive the MP3 player without having to unhook for downloading code. The MP3 Player is a neat device, don't think my code did it justice. Would like to revisit this and implement conditional sequence advance for completion of a sound tracks.
We did have a lot of trouble with the DFRobot board. We ended up putting extra files on the micro sd card as it refused to play the last track if we didn't.. We followed the first data sheet then we downloaded all the other versions of the sheet. Then we gave up reading and started guessing. After about half an hour we guessed good enough to form a basic understanding and get the board to something like what it was told.
Another New Tool / PageYou will notice an eeprom page, this is a neat diagnostic as I did have issues with saving data. Took me ages to work out until I looked in the memory... DUH try reading instead of writing when you startup ! Anyhow time was short and timing was everything so our critical path was to get an operating 4 string controller for Jim to test with BEFORE he poured the liquid glass. Then the real programming work would start.
Physical ConstructionThe real magic of Jim's work is that most things are recycled. This project starts with the lid of an old bitchumen tin a old thrust race from a 450KW motor and some scrap metal. This is the base for "lazy susan", from there a large amount of imagination is applied.
The camera hasn't picked this up but one of Jim's trade marks is that all the coins in the sculpture will show significant dates in the persons life. He goes to great length to select the correct coins for the job, denomination and type are important parts of the story. All the nick nacks embedded will each hold a story or incident in the persons life. It looks random but there will be a meaning in every piece.
Safety FirstOk - I feel much better now, the fireworks items being inerted and reconstituted out of less reactive materials. I was working on this for over a week before Jim handed me these photos. Gave a whole new meaning to your code bombing out.
So yeah, we do actually take our safety seriously. Below you can see the "fast match" which was cut open and a neopixel strip inserted in place of the gunpowder. You can also see the inside of the 3" shell.
Apparently it's VERY important for the job to be level from the first pour. So out with the level and onto the trusty adjustable stand.
It's epoxy time and I'm looking at the things to be embedded in the liquid glass. The scariest is the 3" mortar shell centerpiece which Jim assures me has been "mostly" inerted. My immediate suggestion was that we keep the wiring away from some of the other stuff as I'm fairly certain that gunpowder and electronics have known incompatibilities. We decided on using old "det wire" for some of the internal connections as it gives that feel that the thing might actually be dangerous. The liquid glass is a slow business that requires great patients, many small steps.
There is quite an art in pouring the liquid glass. It is exothermic cure so to much in any place can cause it to overheat. The pour has to be done incrementally with the final pour needing to be perfectly level.
All embedded items need to be glued or fixed in place first as they may float or move during a pour. All the LED rings where set on rubber spacers and fixed by super glue and the first epoxy pour being drizzled over them.
Now the ESP8266 is 3.3V and the neopixels are 5V and we hook them together, now what was that logic high voltage as a percentage ?. So yeah it all worked on the bench from the laptop USB. But an issue arose where it wouldn't work off the battery pack. Eventually I plugged it into the bench supply and all was revealed with the help of an accurate meter. I assumed that at 5.1V we just run out of High state signal margin (0.7 x Vdd). Putting a diode in series with the 5V rail of the Neopixels fixed the issue, dropping the voltage to 4.5V ish. I even ran the neopixels down to around 4.0 and it still worked. So here is me thinking that the 5V neopixels means 5.0 like other 5V stuff but they really mean 3.5 to 5.3 volts. We could have just used level translators but there would be fun in that. As always it pays to refresh your mind by reading the spec sheets before each project.
Jim says I need to thank Modustrial Maker for the heads up on how to cut an MDF ring for neopixels. This technique got a big thumbs up and was used to make the inner part where the strip component of LED where mounted.
Application Programming / Media ContentNow with the basics done it was time to put data into the program to make it do what Jim wanted. MP3 files needed to be found and edited and saved to a micro SD card for co-ordination with the light effects. As time went on I did program much more of Jim's spreadsheet into the "factory setup" code. This was due to changes that altered the data structures and hence tending to screw up all Jim's hard work. That way he could get quickly back to the sound and light show as he imagined it. If I made structural changes to the code to include more features he was not loosing work. So Jim took over at this point, tinkering via the web interface of the ESP8266 and the rest as they say "is history".
I've seen Jim work many times but I still marvel as he turns a collection of scrap became a piece of art. Anyhow we both had a ball doing this, we definitely played to each others strengths. Hope you enjoyed it as well.
As always, happy coding!


Comments