Ryan Chan
Published © GPL3+

Simple Programmable Robotic Arm

Make a simple and programmable servo arm out of readily available materials!

BeginnerShowcase (no instructions)2 hours285,810
Simple Programmable Robotic Arm

Things used in this project

Hardware components

Arduino UNO
Arduino UNO
Can be any 5V Arduino board such as the mega
×1
Breadboard (generic)
×1
Jumper wires (generic)
×1
Rotary potentiometer (generic)
×3
Pushbutton switch 12mm
SparkFun Pushbutton switch 12mm
×3
LED (generic)
LED (generic)
×5
Resistor 221 ohm
Resistor 221 ohm
×5
Capacitor 10 µF
Capacitor 10 µF
Optional; you don't need it if you don't have it
×1
Servos (Tower Pro MG996R)
I recommend micro servos as they draw less power
×3
Resistor 10k ohm
Resistor 10k ohm
×2

Software apps and online services

Arduino IDE
Arduino IDE

Hand tools and fabrication machines

Hot glue gun (generic)

Story

Read more

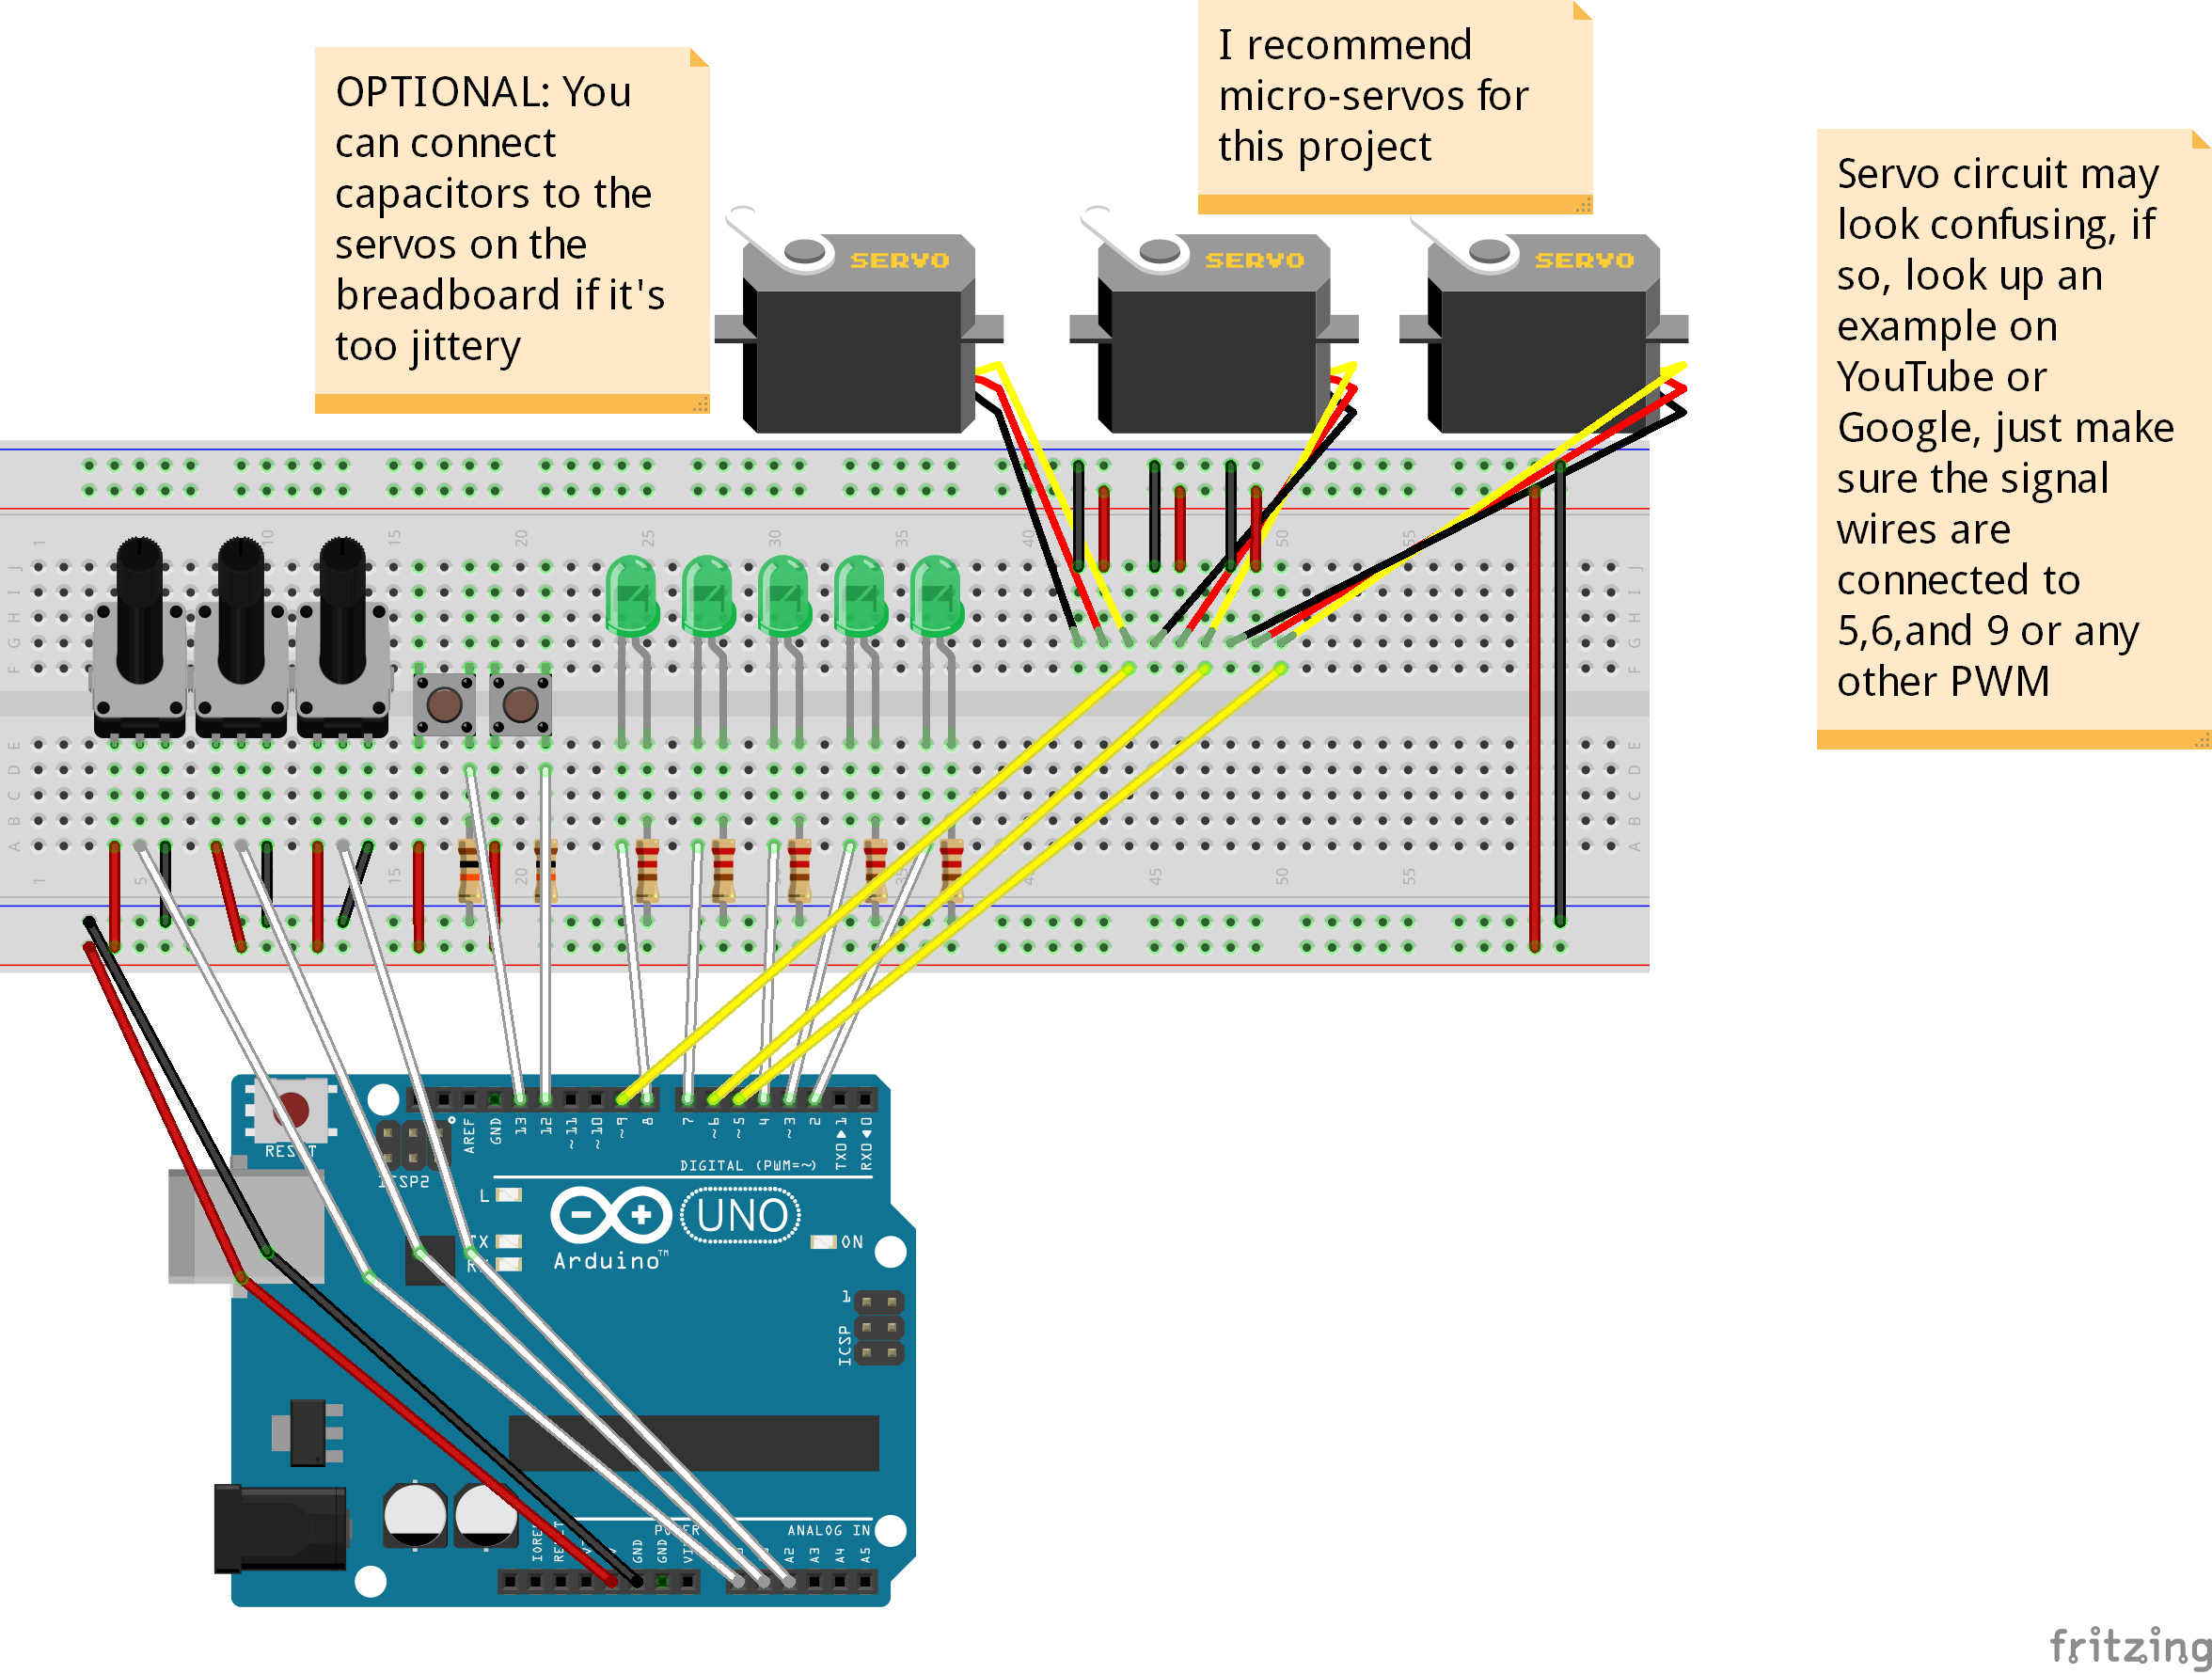
Schematics

Schematics

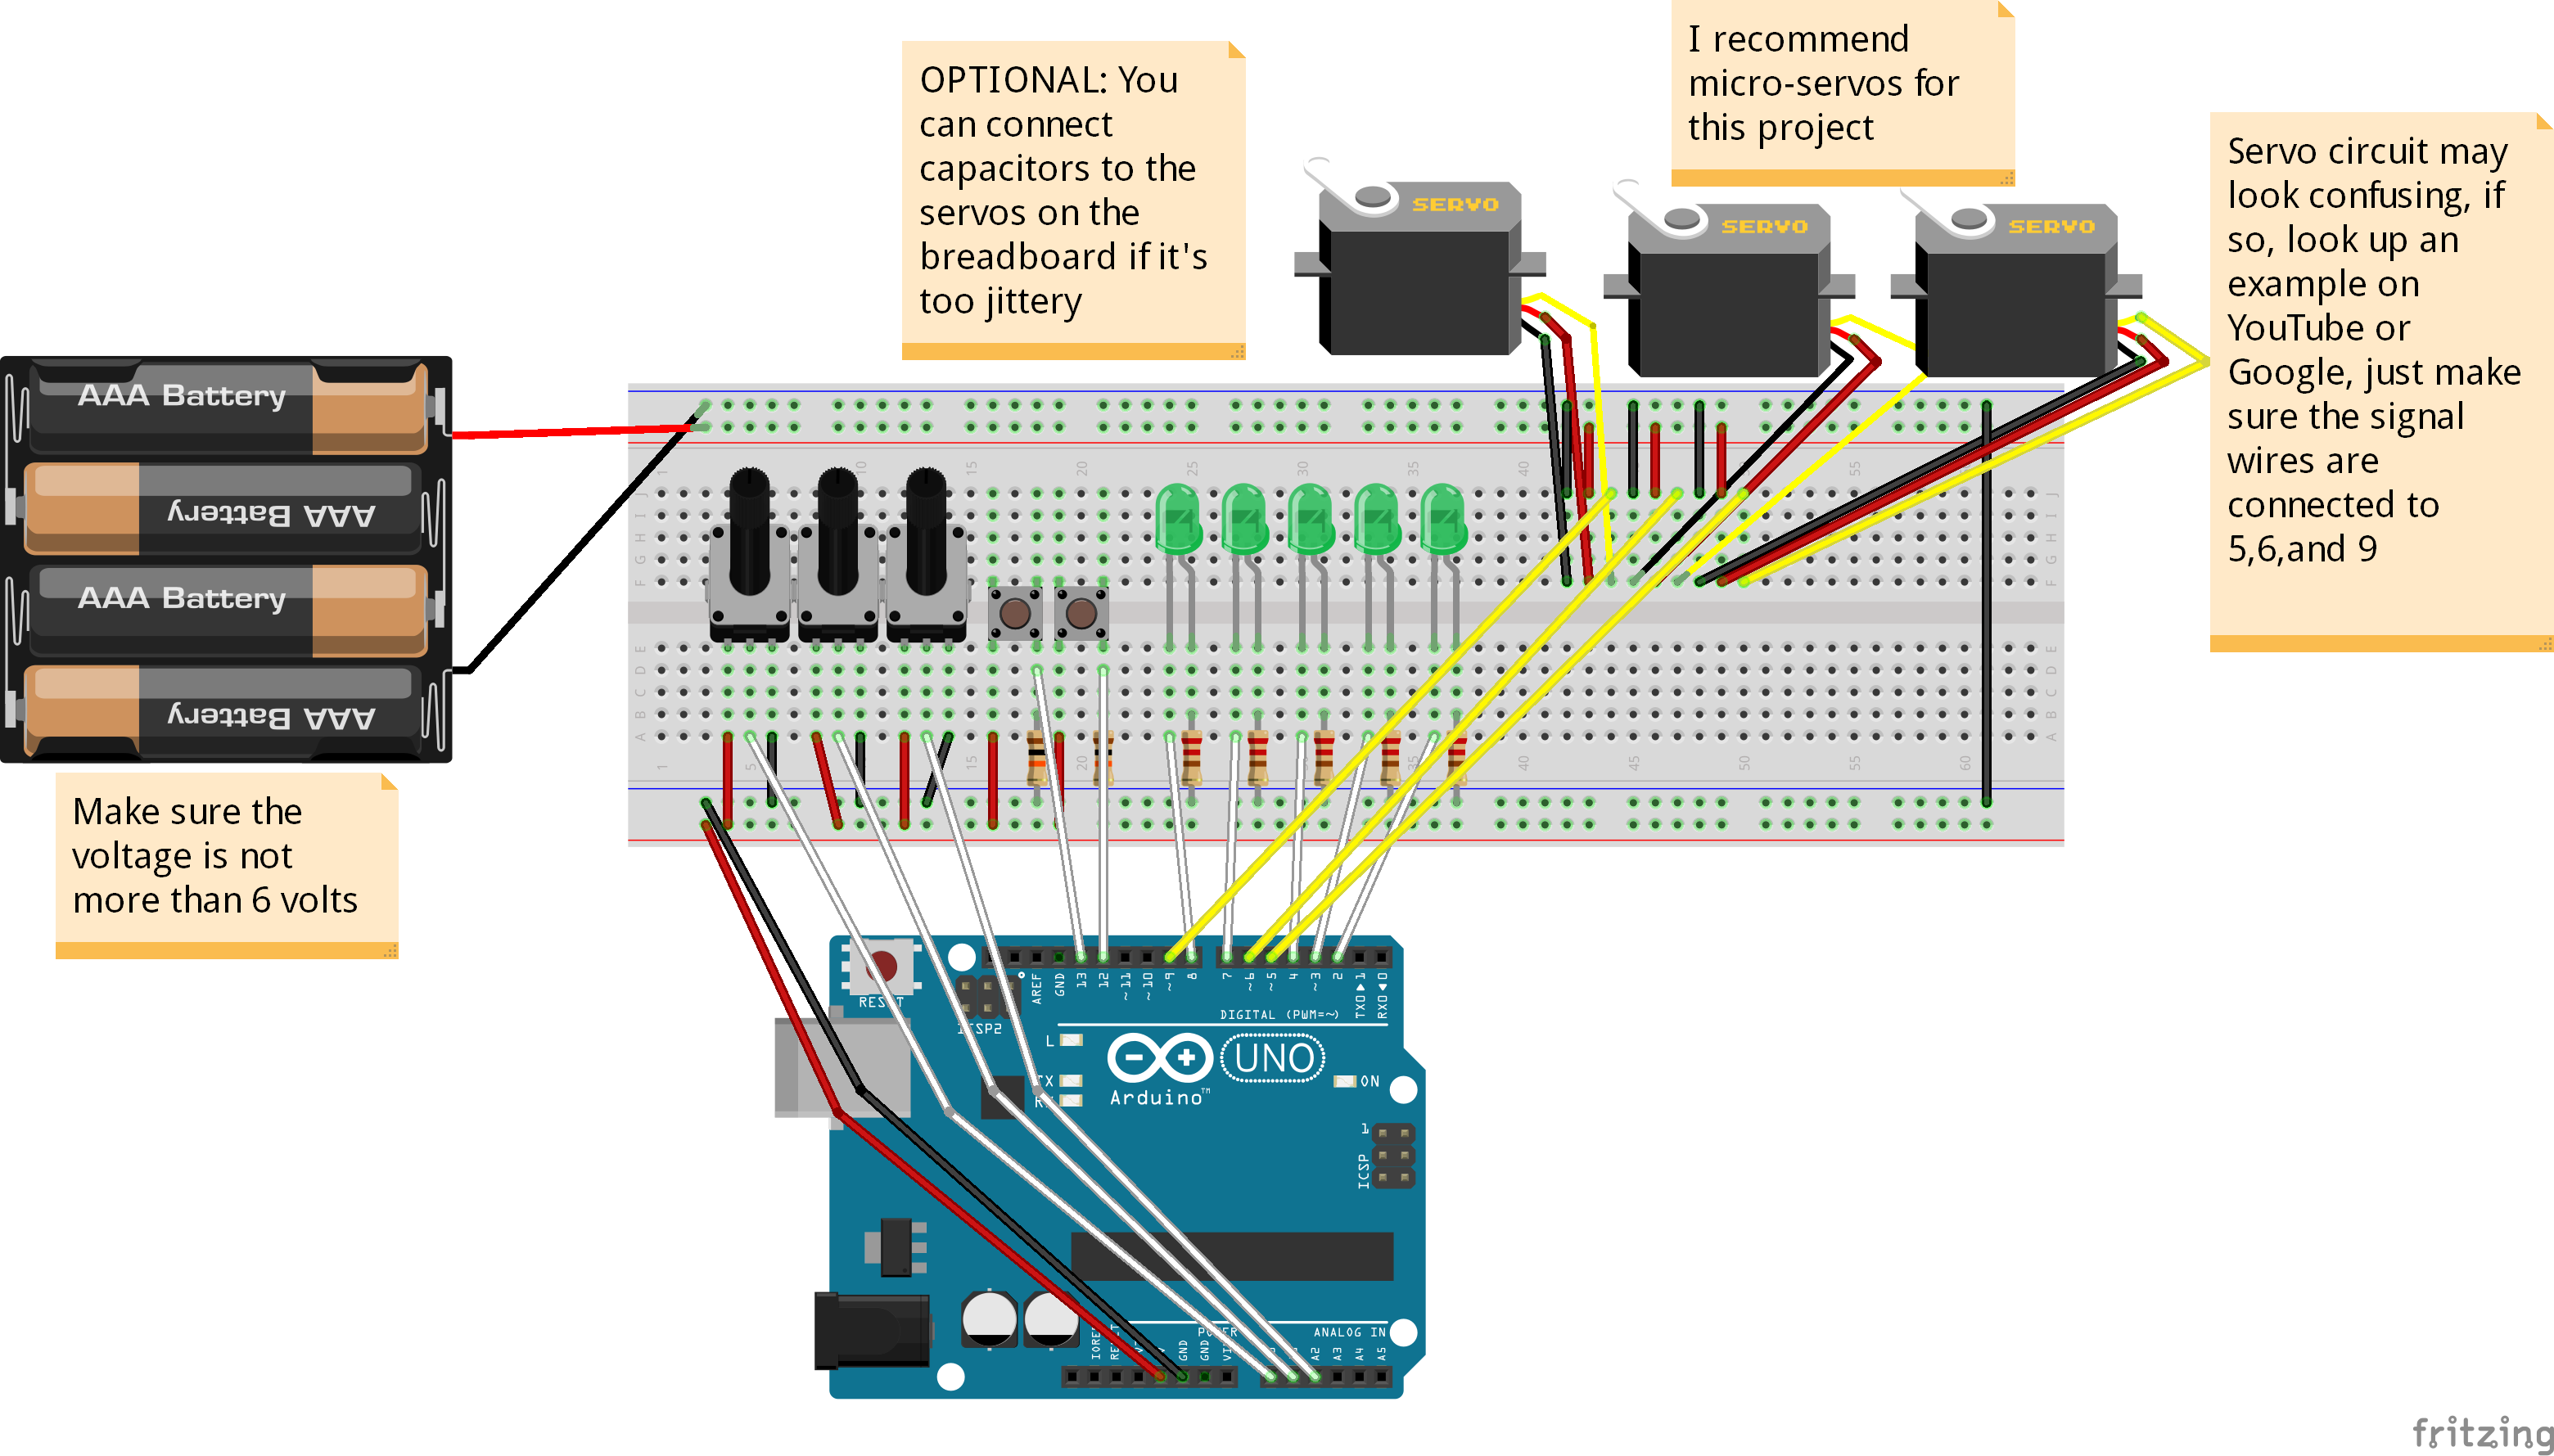
Schematics for External Power for the Servos

Code

Servo Arm Code

Arduino
There are comments explaining everything in the code, but it is pretty inefficient, I challenge you to make it more efficient!
//Code written by Ryan Chan; it is pretty inefficient, but gets the job done, I challenge you to make it more efficient!

//*IMPORTANT CHANGES IN VERSION 2: LEDs 4 and 5 have been moved to pins 7 and 8 respectively; Buttons 1 and 2 have been moved to pins 12 and 13 respectively. This is to make wiring easier.

#include <Servo.h>

Servo servo1; //Servos
Servo servo2;
Servo servo3;

const int LED1 = 2; //LEDs
const int LED2 = 3;
const int LED3 = 4;
const int LED4 = 7;
const int LED5 = 8;

const int button1 = 12; //Buttons
const int button2 = 13;

int button1Presses = 0; //Button values
boolean button2Pressed = false;

const int pot1 = A0; //Potentimeters
const int pot2 = A1; 
const int pot3 = A2;

int pot1Val; //Potentimeter values
int pot2Val;
int pot3Val;
int pot1Angle;
int pot2Angle;
int pot3Angle;

int servo1PosSaves[] = {1,1,1,1,1}; //position saves
int servo2PosSaves[] = {1,1,1,1,1};
int servo3PosSaves[] = {1,1,1,1,1};

void setup() {
  servo1.attach(5); // Set up everything and will run once; attach servos and define the pin modes
  servo2.attach(6);
  servo3.attach(9);
  
  pinMode(LED1, OUTPUT);
  pinMode(LED2, OUTPUT);
  pinMode(LED3, OUTPUT);
  pinMode(LED4, OUTPUT);
  pinMode(LED5, OUTPUT);
  pinMode(button1, INPUT);
  pinMode(button2, INPUT);

  Serial.begin(9600);
}

void loop() {
  // put your main code here, to run repeatedly: 
  pot1Val = analogRead(pot1); // This will read the values from the potentimeters and store it...
  pot1Angle = map(pot1Val, 0, 1023, 0, 179); // ... and this will map the values from the potentiometers to values the servos can use and store it for later use
  pot2Val = analogRead(pot2); 
  pot2Angle = map(pot2Val, 0, 1023, 0, 179);
  pot3Val = analogRead(pot3);
  pot3Angle = map(pot3Val, 0, 1023, 0, 179);
  
  servo1.write(pot1Angle); // These will make the servos move to the mapped angles
  servo2.write(pot2Angle);
  servo3.write(pot3Angle);
  
  if(digitalRead(button1) == HIGH){ // This will check how many times button1 is pressed and save the positions to an array depending on how many times it is pressed; switch/case works like a if statement
    button1Presses++;
    switch(button1Presses){
      case 1:
        servo1PosSaves[0] = pot1Angle;
        servo2PosSaves[0] = pot2Angle;
        servo3PosSaves[0] = pot3Angle;
        digitalWrite(LED1, HIGH);
        Serial.println("Pos 1 Saved");
        break;
      case 2:
         servo1PosSaves[1] = pot1Angle;
         servo2PosSaves[1] = pot2Angle;
         servo3PosSaves[1] = pot3Angle;
         digitalWrite(LED2, HIGH);
         Serial.println("Pos 2 Saved");
         break;
      case 3:
         servo1PosSaves[2] = pot1Angle;
         servo2PosSaves[2] = pot2Angle;
         servo3PosSaves[2] = pot3Angle;
         digitalWrite(LED3, HIGH);
         Serial.println("Pos 3 Saved");
         break;
       case 4:
         servo1PosSaves[3] = pot1Angle;
         servo2PosSaves[3] = pot2Angle;
         servo3PosSaves[3] = pot3Angle;
         digitalWrite(LED4, HIGH);
         Serial.println("Pos 4 Saved");
         break;
       case 5:
         servo1PosSaves[4] = pot1Angle;
         servo2PosSaves[4] = pot2Angle;
         servo3PosSaves[4] = pot3Angle;
         digitalWrite(LED5, HIGH);
         Serial.println("Pos 5 Saved");
         break;
    }
  }

  if(digitalRead(button2) == HIGH){ // Pretty self-explnatory here
    button2Pressed = true;   
  }
  
  if(button2Pressed){ // if the boolean button2Press is true, then the servos will run though all their saved positions
    for(int i = 0; i < 5; i++){
        servo1.write(servo1PosSaves[i]);
        servo2.write(servo2PosSaves[i]);
        servo3.write(servo3PosSaves[i]);
        Serial.println(" potentimeter Angles: ");
        Serial.println(servo1PosSaves[i]);
        Serial.println(servo2PosSaves[i]);
        Serial.println(servo3PosSaves[i]);
        delay(1050);
      }
  }
  delay(300);
} 

Credits

Ryan Chan

Ryan Chan

9 projects • 228 followers
I like turtles. I also like robots.

Comments