


Hardware components | ||||||
 |
| × | 1 | |||
| × | 1 | ||||
 |
| × | 1 | |||
 |
| × | 1 | |||
Software apps and online services | ||||||
 |
| |||||
Hand tools and fabrication machines | ||||||
 |
| |||||
In this project, I built a simple RGB LED circuit using an Arduino UNO. The purpose of this project was to understand how an RGB LED works and how an Arduino can be used to control its individual color channels.
Although this is a beginner-level project, it gave me hands-on experience with breadboard prototyping, LED control, resistors, jumper-wire connections, and Arduino programming.
This is my second Arduino project and another small step toward building my foundation in embedded systems and electronics. ⚡
Components RequiredArduino UNO
- Arduino UNO
RGB LED
- RGB LED
Breadboard
- Breadboard
Jumper wires
- Jumper wires
Resistors
- Resistors
USB cable
- USB cable
An RGB LED contains three individual LED channels:
Red
- Red
Green
- Green
Blue
- Blue
By connecting these channels to different digital pins of the Arduino and controlling them through code, different colors can be produced.
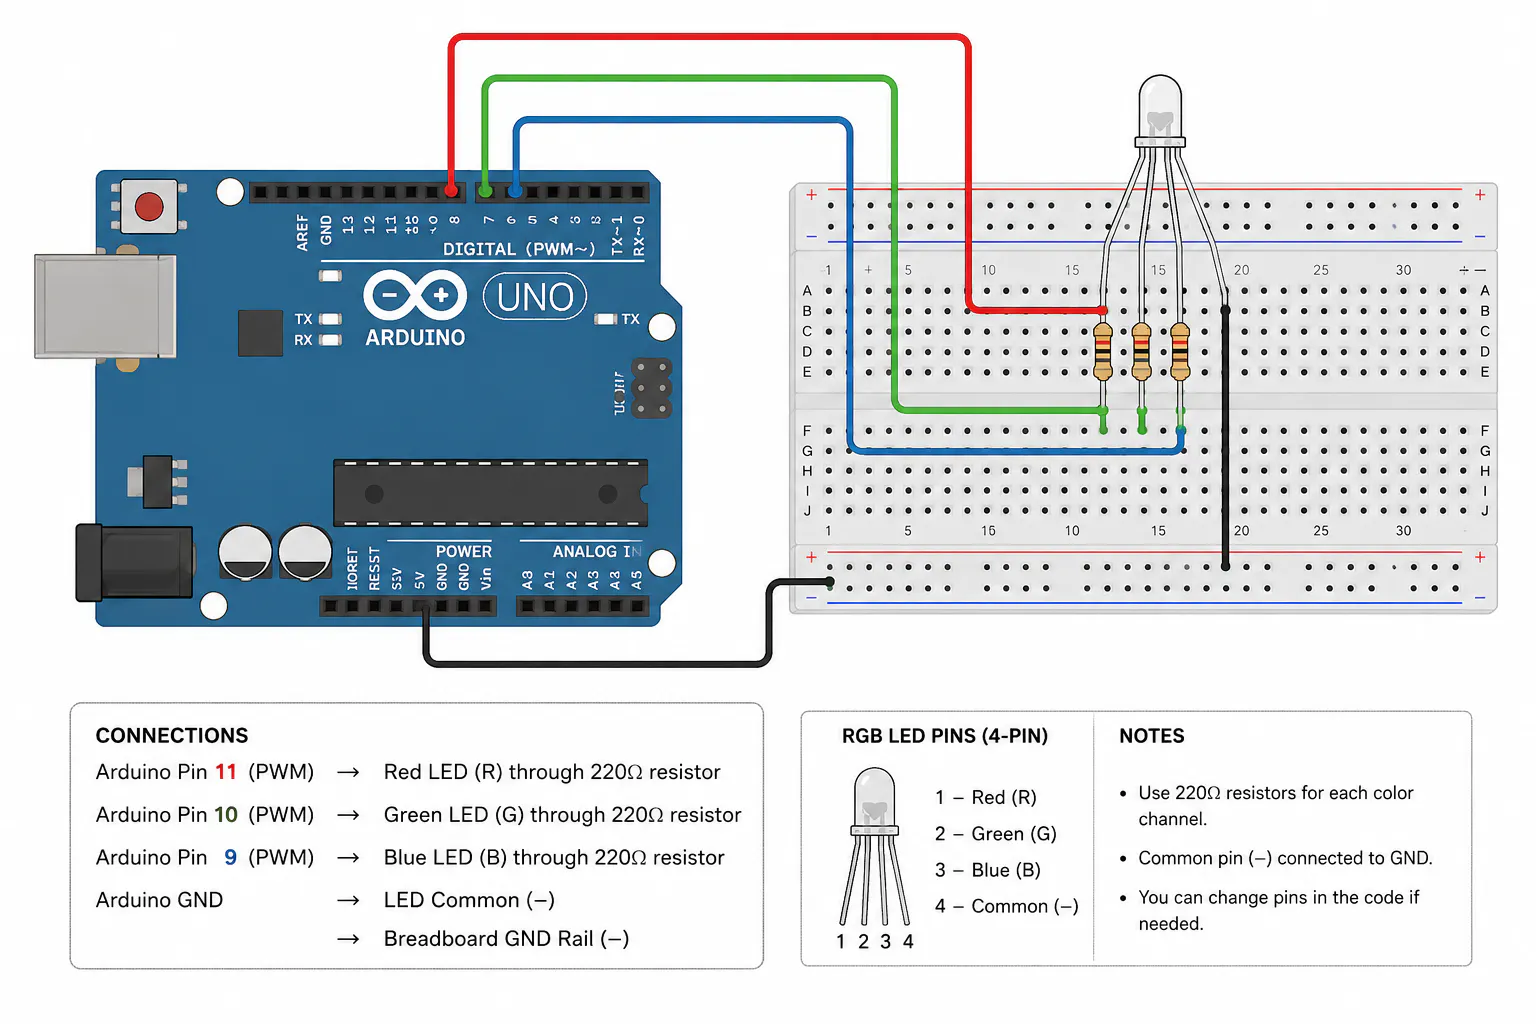
The RGB LED is connected to the Arduino through a breadboard. Resistors are used with the LED channels to limit the current and protect the LED.
The Arduino sends HIGH and LOW signals to the RGB channels according to the program. By changing which channels are turned ON or OFF, the LED can blink in different colors.
Circuit ConnectionsThe RGB LED is placed on the breadboard and connected to the Arduino UNO using jumper wires.
Each RGB channel is connected through a resistor to an Arduino digital output pin. The common pin of the RGB LED is connected appropriately according to the type of RGB LED being used.
I have included the circuit diagram/blueprint with this project so the connections can be easily followed and recreated.
Arduino CodeThe Arduino program controls the three RGB channels individually. By switching the channels ON and OFF with appropriate delays, the LED produces a blinking color sequence.
The source code is included with this project so that the circuit can be recreated and tested.
What I LearnedThrough this project, I gained practical experience with:
Controlling LEDs using Arduino digital outputs
- Controlling LEDs using Arduino digital outputs
Understanding the working of an RGB LED
- Understanding the working of an RGB LED
Identifying and connecting RGB LED pins
- Identifying and connecting RGB LED pins
Using resistors in LED circuits
- Using resistors in LED circuits
Building circuits on a breadboard
- Building circuits on a breadboard
Using jumper wires for circuit connections
- Using jumper wires for circuit connections
Writing basic Arduino code
- Writing basic Arduino code
Uploading code to an Arduino UNO
- Uploading code to an Arduino UNO
Troubleshooting basic hardware connections
- Troubleshooting basic hardware connections
One of the useful parts of this project was understanding that even a simple circuit requires careful wiring.
While working with the RGB LED, I had to pay attention to the LED pin configuration, resistor connections, Arduino pin numbers, and breadboard connections. Checking each connection helped me understand how hardware and software work together in an embedded system.
Project FilesThe following files are included with this project:
Arduino source code
- Arduino source code
Circuit diagram
- Circuit diagram
Project images
- Project images
These files are provided so that anyone interested can understand the circuit and recreate the project.
ConclusionThis project may be simple, but it represents an important step in my learning journey. Building small circuits like this helps me understand the fundamentals before moving toward more advanced Arduino, electronics, robotics, and embedded-systems projects.
I’m looking forward to building more projects and gradually moving from simple LED circuits to sensors, motors, automation, robotics, and more complex embedded systems. 🚀
If you're also learning Arduino, I hope this project helps you get started with your own RGB LED experiment!
If you enjoyed this project, feel free to follow me on Hackster to see more of my Arduino, electronics, and embedded-systems projects. I’ll be sharing more projects as I continue learning and building! ⚡🤖
Your support and feedback are always appreciated. ❤️
ABRISH FATIMA
 Abrish Fatimaaah

Comments