Ravi ParmarRupin Chheda
Published © GPL3+

Smart IoT Postbox with the idIoTware Shield

Next generation postbox is here!! Smart IoT postbox will keep you informed about new envelopes dropped inside a postbox by the mailman.

IntermediateFull instructions provided1 hour8,526
Smart IoT Postbox with the idIoTware Shield

Things used in this project

Hardware components

Arduino UNO
Arduino UNO
×1
idIoTware Shield
idIoTware Shield
×1
ESP8266 ESP-01
Espressif ESP8266 ESP-01
×1
Generic Jumper (0.1")
×3
9V 1A Switching Wall Power Supply
×1
Postbox
×1
USB-A to B Cable
USB-A to B Cable
×1
idIoTware Shield
×1

Software apps and online services
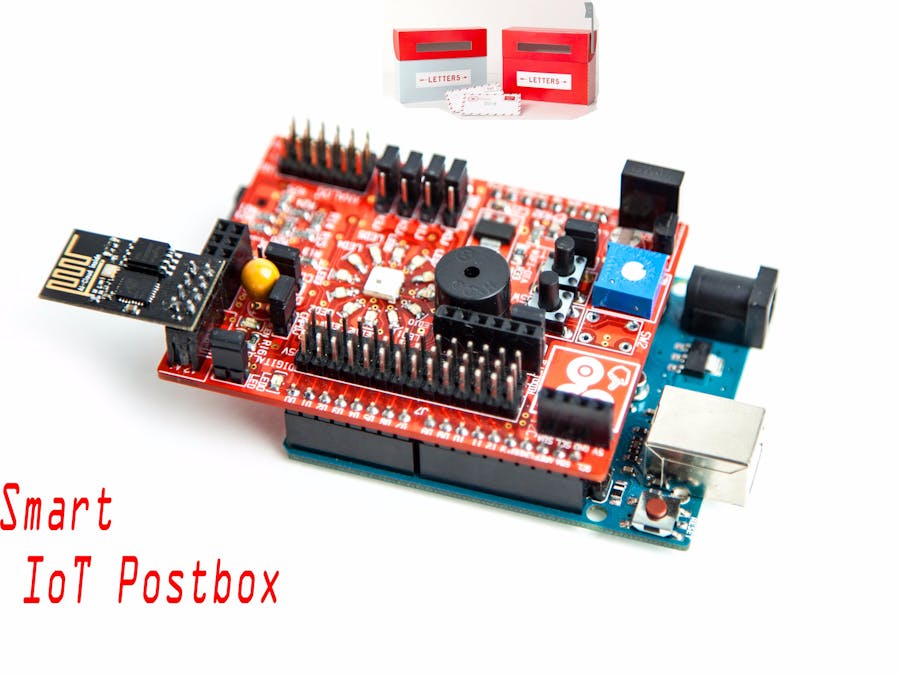
Arduino IDE
Arduino IDE
Maker service
IFTTT Maker service

Story

Read more

Custom parts and enclosures

PostBox

We made our own postbox using cardboard box and chart paper.

Schematics

idiotware-shield

Code

Smart Iot Postbox

Arduino
/*
    WiFi POSTBOX
    
    In this example we are using ESP8266 and IdIoTWare Shield and Arduino Board. LDR on IdIoTWare shield 
    is used as sensor to detect letter in the letterbox. WS2812 Led (addressable RGB LED) 
    on IdIoTWare shield is continuously ON (WHITE Color) and reflects light on LDR. As 
    soon as new letter dropped in postbox light intensity on LDR changes due to reflection 
    and event gets triggered.
    Here we are using IFTTT to trigger an event.
    
    IFTTT is a free web-based service that allows users to create chains of simple conditional statements,
    called "recipes", which are triggered based on changes to other web services such as Gmail, Facebook,
    Instagram, and many more.IFTTT is an abbreviation of "If This Then That"
    Create account on IFTTT and create your recipe.
    
    We are using Maker and Gmail channel to trigger an event.
    
    If there is new letter in postbox, Arduino will send POST request to maker channel.  
    if Maker then Gmail
    If Maker Event "New Letter", then send an email from "abcd@gmail.com" 
      
*/

#include <Adafruit_NeoPixel.h>
#include "idIoTwareShield.h" // sets up and initialize idIoTwareShield
#include <Wire.h>         // Require for I2C communication
idIoTwareShield fs;             // Instanciate CGShield instance

#include <ELClient.h>
#include <ELClientRest.h>
char buff[128];

// Initialize a connection to esp-link using the normal hardware serial port both for
// SLIP and for debug messages.
ELClient esp(&Serial, &Serial);

// Initialize a REST client on the connection to esp-link
ELClientRest rest(&esp);

boolean wifiConnected = false;

// Callback made from esp-link to notify of wifi status changes
// Here we print something out and set a global flag
void wifiCb(void *response) 
    {
      ELClientResponse *res = (ELClientResponse*)response;
      if (res->argc() == 1) 
         {
           uint8_t status;
           res->popArg(&status, 1);

           if(status == STATION_GOT_IP) 
             {
               Serial.println("WIFI CONNECTED");  //Wifi gets connected at this place
               wifiConnected = true;
             } 
           else 
             {
               Serial.print("WIFI NOT READY: ");//Wifi not connected,check connection
               Serial.println(status);
               wifiConnected = false;
             }
         }
    }

void setup() 
    {
      Serial.begin(9600);   // the baud rate here needs to match the esp-link config
      color(255,255,255);   // set white color 
      Serial.println("EL-Client starting!");

      // Sync-up with esp-link, this is required at the start of any sketch and initializes the
      // callbacks to the wifi status change callback. The callback gets called with the initial
      // status right after Sync() below completes.
      esp.wifiCb.attach(wifiCb); // wifi status change callback, optional (delete if not desired)
      bool ok;
      do 
       {
         ok = esp.Sync();      // sync up with esp-link, blocks for up to 2 seconds
         if (!ok) Serial.println("EL-Client sync failed!");
       } while(!ok);
      Serial.println("EL-Client synced!");

      // Get immediate wifi status info for demo purposes. This is not normally used because the
      // wifi status callback registered above gets called immediately. 
      esp.GetWifiStatus();
      ELClientPacket *packet;
      if((packet=esp.WaitReturn()) != NULL) 
        {
          Serial.print("Wifi status: ");
          Serial.println(packet->value);
        }

      // Set up the REST client to talk to www.maker.ifttt.com, this doesn't connect to that server,
      // it just sets-up stuff on the esp-link side
      int err = rest.begin("maker.ifttt.com");
      if(err != 0) 
        {
          Serial.print("REST begin failed: ");
          Serial.println(err);
          while(1) ;
        }
      Serial.println("EL-REST ready");
      
    }

void loop() 
    {
     new_letter();
    }
 
// this function detects the new letter
int new_letter()
   { 
    
      int light_value = analogRead(A3); delay(10);
      int light_value1 = analogRead(A3);delay(10);  
      Serial.println(light_value1);
      if(light_value1 >= 510)    //if there is change in light value (New Letter)
        { 
          sprintf(buff, "/trigger/new_letter/with/key/XXXXXXXXXXXXXXXXXX");//replace with your Maker channel's API Key
          logToMaker();  //Log to Maker using commands under void LogToMaker()
          // print to the serial port too:              
          Serial.print("New Letter!!");
                   
        }
        delay(50);   
   } 
 
//function to send POST request to Maker channel    
void logToMaker()
    {
           // process any callbacks coming from esp_link
      esp.Process();

     
      // if we're connected make an HTTP request
      if(wifiConnected) 
        {  Serial.println("wifi connected!!");
          // Request  from the previously set-up server
          rest.get((const char*)buff);

          char response[266];
          uint16_t code = rest.waitResponse(response, 266);
          if(code == HTTP_STATUS_OK)     //check for response for HTTP request  
            {
             Serial.println("ARDUINO: GET successful:");
             Serial.println(response);
            } 
          else 
            {
             Serial.print("ARDUINO: GET failed: ");
             Serial.println(code);
            }
          
        }
        
    }   

Credits

Ravi Parmar

Ravi Parmar

13 projects • 42 followers
I am an Electronics and telecom graduate engineer with passion in embedded technology and making new stuff .
Rupin Chheda

Rupin Chheda

35 projects • 83 followers
Resident Maker at CuriosityGym! Electronics Engineer, CAD Modeller, Educator

Comments