


Hardware components | ||||||
_baVEVgguW1.jpg?auto=compress%2Cformat&w=48&h=48&fit=fill&bg=ffffff) |
| × | 1 | |||
 |
| × | 1 | |||
| × | 1 | ||||
| × | 1 | ||||
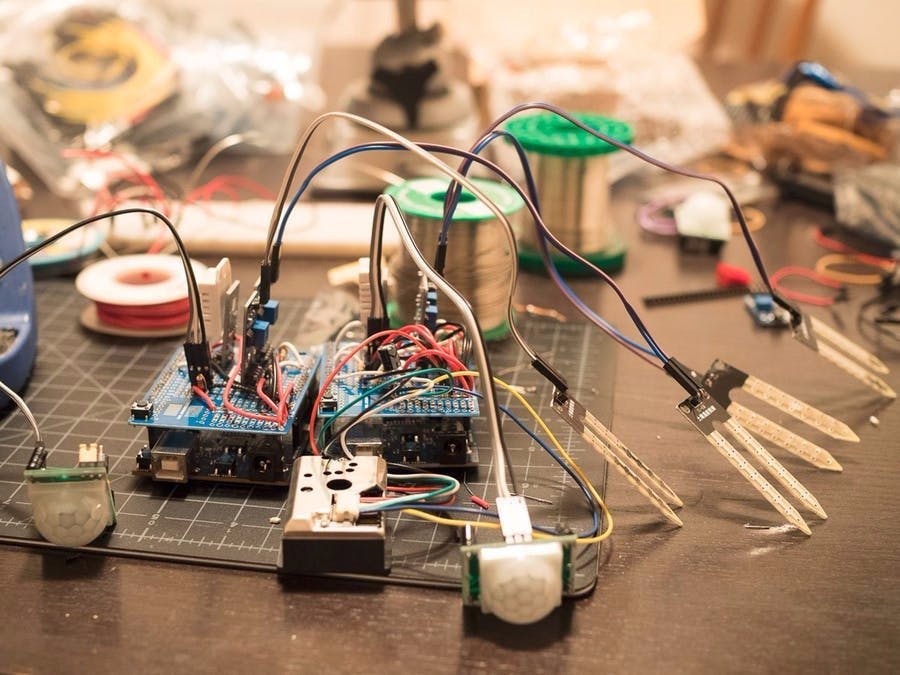
For the April 2017 of the Hackster Hardware Hangout - Santa Monica, we decided to do a project that demonstrated the interaction between BLE and the Physical Web. Partially inspired by this project (which co-organizer Lance recreated and demonstrated), I decided to reuse the soil moisture, temperature, humidity, and dust detection sensors used in two otherprojects to create a Arduino 101 BLE sensor that interacts with the Physical Web. Notable differences between this project and the "Lend Me Your Ears..." project are that I've set up the Arduino to advertise as an Eddystone Beacon, we're reading characteristics using web bluetooth as opposed to writing them, and I'm not using the excellent Annyang voice recognition library.
Physical Web? What's That?The Physical Web is a really cool way of thinking about you can extend interactions between objects and the world wide web. Devices that are connected to the Physical Web broadcast a URL using the Eddystone protocol specification. Nearby devices (primarily devices running Chrome or Google Nearby) can then discover these URLs and display them to users. There are some restrictions on the URLs that are broadcast - they have to be short, and they have to be hosted on a secure https connection. User bneedhamia on github figured out how to setup an Arduino 101 to broadcast the Eddystone protocol. The "Lend Me Your Ears..." project did a great job of explaining how the new Web Bluetooth APIs work for writing characteristics (and using the Annyang service), but didn't integrate the Eddystone URL, and also didn't show how to read/subscribe to BLE characteristics either. This project broadcasts the Eddystone URL, which can then be discovered by nearby users. They can then open the URL and interact with the sensor receiving updates to the changing environmental conditions via Web Bluetooth.
The Arduino SketchAs mentioned earlier, the Arduino sketch is based off of the sketch found here which sets up the Arduino 101 to broadcast the Eddystone protocol. Notable changes to the sketch include changing the URL to point to a goo.gl shortened link (which points to the hosted github pages static site), and setting up services for the Dust Sensor, the Soil Moisture Sensors, and the Temp/Humidity sensor along with defining the pins and objects used by the sensors.
URL
const char* MY_URL = "https://goo.gl/Z5hA1b";
the comment from the copied sketch above the URL says that it only supports lower-case urls, however I didn't experience any issues using mixed case urls (and goo.gl links are case sensitive).
Services/Characteristics
BLEService dustService("00001234-0000-1000-8000-00805f9b34fb");
BLEFloatCharacteristic dustCharacteristic("00001234-0000-1000-8000-00805f9b34fc", BLERead | BLENotify);
BLEService soilService("00001234-0000-1000-8000-00805f9b34fd");
BLEIntCharacteristic soilCharacteristic1("00001234-0000-1000-8000-00805f9b34fe", BLERead | BLENotify);
BLEIntCharacteristic soilCharacteristic2("00001234-0000-1000-8000-00805f9b34ff", BLERead | BLENotify);
BLEService tempHumService("00001234-0000-1000-8000-00805f9b3501");
BLEFloatCharacteristic tempCharacteristic("00001234-0000-1000-8000-00805f9b3502", BLERead | BLENotify);
BLEFloatCharacteristic humCharacteristic("00001234-0000-1000-8000-00805f9b3503", BLERead | BLENotify);
Constants/Objects
/*
* Sharp Dust Sensor Pin Values and
* timing constants.
*
*/
const int dustPin = A2;
const int samplingTime = 280;
const int deltaTime = 40;
const int sleepTime = 9680;
float voMeasured = 0;
float calcVoltage = 0;
float dustDensity = 0;
/*
* Soil Conductivity Probes
* Analog pin locations
*
*/
const int soilPin1 = A0;
const int soilPin2 = A1;
/*
 * DHT22
 */
 #define DHTPIN 2
 #define DHTTYPE DHT22
 DHT dht(DHTPIN, DHTTYPE);
Minor changes were made to the setup() function as well - these changes initialized the additional services/characteristics and their respective values, and also include a call to the DHT's begin() method to start the temperature/humidity sensor.
setup() BLE Characteristics and Services
 //add dust service and char
 ble.setAdvertisedServiceUuid(dustService.uuid());
 ble.addAttribute(dustService);
 ble.addAttribute(dustCharacteristic);
 //add soil sensor service and char
 ble.setAdvertisedServiceUuid(soilService.uuid());
 ble.addAttribute(soilService);
 ble.addAttribute(soilCharacteristic1);
 ble.addAttribute(soilCharacteristic2);
 //add temp/hum service
 ble.setAdvertisedServiceUuid(tempHumService.uuid());
 ble.addAttribute(tempHumService);
 ble.addAttribute(tempCharacteristic);
 ble.addAttribute(humCharacteristic);
 //initialize soil/dust/temp/hum chars to 0
 dustCharacteristic.setValue(0);
 soilCharacteristic1.setValue(0);
 soilCharacteristic2.setValue(0);
 tempCharacteristic.setValue(0);
 humCharacteristic.setValue(0);
Most of the loop() function was replaced. Inside of the loop(), there are calls to functions named readDust(), readSoil(), and readTempHum(). These functions read the values of their respective sensors and make changes to their associated BLE Characteristics.
readDust()
void readDust()
{
  delayMicroseconds(samplingTime);
 voMeasured = analogRead(dustPin); // read the dust value
 delayMicroseconds(deltaTime);
 delayMicroseconds(sleepTime);
 // 0 - 3.3V mapped to 0 - 1023 integer values
 calcVoltage = voMeasured * (3.3 / 1024);
 // linear eqaution taken from http://www.howmuchsnow.com/arduino/airquality/
 // Chris Nafis (c) 2012
 dustDensity = (0.17 * calcVoltage - 0.1)*1000;
 boolean dustChanged = (dustCharacteristic.value() != dustDensity);
 if (dustChanged) {
   dustCharacteristic.setValue(dustDensity);
 }
 delay(1000);
}
readSoil()
void readSoil()
{
 int soilValue1 = analogRead(soilPin1);
 int soilValue2 = analogRead(soilPin2);
 boolean soilChanged = (soilCharacteristic1.value() != soilValue1) || (soilCharacteristic2.value() != soilValue2);
 if (soilChanged) {
   soilCharacteristic1.setValue(soilValue1);
   soilCharacteristic2.setValue(soilValue2);
 }
}
readTempHum()
void readTempHum()
{
 delay(3000);
 float h = dht.readHumidity();
 float t = dht.readTemperature(true);
 if (isnan(h) || isnan(t))
 {
   return;
 }
 tempCharacteristic.setValue(t);
 humCharacteristic.setValue(h);
}
For some reason, I could not get the sketch to Compile/Upload with the most recent version of the Arduino 101 hardware library, so I manually set the version to 1.0.6 using the Arduino Boards Manager. Once I made this minor change, the sketch uploaded successfully and my 101 successfully started broadcasting the URL.
The Web Bluetooth PageThe URL broadcast by the 101 points to a static page hosted via github pages. This is a convenient and free way to host a static page over https - making it perfect for our needs. I made some changes to the "Lend me your ears" project to make it display updated sensor values from the Arduino 101. Notably, in the index.html file, a div was added with heading elements for the measurements made by the Arduino 101.
   <div>
     <h2>Dust Level:</h2><br>
     <h3 id='fc'></h3><br>
     <h2>Soil Moisture 1:</h2><br>
     <h3 id='fe'></h3><br>
     <h2>Soil Moisture 2:</h2><br>
     <h3 id='ff'></h3><br>
     <h2>Temperature:</h2><br>
     <h3 id='02'></h3><br>
     <h2>Humidity:</h2><br>
     <h3 id='03'></h3><br>
   </div>
Additionally, I changed the name of the BLE control script to "env.js", and removed all of the Annyang code from "app.js" - now the app.js file only listens for the the button click event, and then launches the env.connect() function.
App.js:
/**
* app.js connects index.html and env.js together
* User activty is required for Web Bluetooth the make the connection
*/
let bleSwitch = document.querySelector('#bleSwitch');
bleSwitch.addEventListener('click',function(){
 console.log('new switch click, connect');
 env.connect()
     .then(() => console.log('connected'))
     .catch(error => { console.log('connect error!: ' + error);
   });
});
Env.js: Connect
connect(){
       return navigator.bluetooth.requestDevice({
        acceptAllDevices: true,
        optionalServices: [this.serviceUUIDs[0], this.serviceUUIDs[1], this.serviceUUIDs[2] ]
       })
       .then(device => {
           this.device = device;
           return device.gatt.connect();
       })
       .then(server => {
           this.server = server;
           return server.getPrimaryServices();
       })
       .then(services => {
         let queue = Promise.resolve();
         services.forEach(service => {
           queue = queue.then(_ => service.getCharacteristics().then(characteristics => {
             characteristics.forEach(characteristic => {
               characteristic.startNotifications().then(_ => {
                 console.log(characteristic.uuid);
                 characteristic.addEventListener('characteristicvaluechanged', this.handleCharChange);
               });
       });
     }));
   });
   return queue;
 })
The connect function uses the navigator.bluetooth.requestDevice function to search for BLE devices that can be connected to. Once the user authorizes the application to connect to the device, we use server.getPrimaryServices() to get a list of all the services offered by the device. We then loop over the services and discover all of their characteristics. For each of the characteristics discovered, we then enable notifications with startNotifications() and add an event listener for when the 'characteristicvaluechanged' event fires. This event handler follows:
 handleCharChange(event){
   var elementId = event.target.uuid.substr(-2);
   if ((elementId === 'fe')||(elementId === 'ff')){
     document.getElementById(elementId).innerHTML = event.target.value.getUint32(0, true);
     console.log("int change: " + event.target.value.getUint32(0, true));
   } else {
     document.getElementById(elementId).innerHTML = event.target.value.getFloat32(0,true).toFixed(2);
     console.log("float change: " + event.target.value.getFloat32(0,true));
   }
First, we determine what characteristic has emitted the notification event by grabbing the last 2 characters of it's uuid (which correspond to the id's of the headings on index.html. We then determine if the characteristic is either an integer (soil moisture characteristic) or float (temperature, humidity, or dust) and use the respective getUint32() or getFloat32() on the notification value to get the value of the notification. The first value in the getUint32/getFloat32 call is the byte offset, which in our case is 0. The second value is a boolean used to determine whether or not the value is little-endian. Our values are, so we have to set this value to true. The innerHTML of the corresponding heading element (found using the last two char's of the uuid) is then changed to reflect the new value.
Going Forward...While this is a pretty straightforward demonstration of Physical Web and Web Bluetooth working in concert, there are some improvements that need to be made. Notably, we're only subscribing to the characteristic changes - we don't actually do an initial read of the sensor state. That could be added in the service/characteristics loop. Additionally, the html/css of the web page aren't that great as I was focused more on getting the code functional, but this should serve as a pretty basic tutorial for getting up and running with Web Bluetooth, Physical Web, and the Arduino 101.

Comments