


Hardware components | ||||||
 |
| × | 1 | |||
 |
| × | 1 | |||
 |
| × | 1 | |||
 |
| × | 1 | |||
Software apps and online services | ||||||
| ||||||
Introduction to Raspberry Pi Pico
Driving the LCD with Raspberry Pi Pico on a free Pico Simulator
Further tasks that can be accomplished
Read more(skip to LCD section, if you are already familiar with the chip)
Raspberry Pi Pico is a little, fast, and versatile board built using RP2040, a brand new microcontroller chip devised by Raspberry Pi in the UK. You can have a look at the datasheet of Pico. You will find the getting started guide on Pi Pico here.
Below are the features of the RP2040 microcontroller:
- Dual ARM Cortex-M0+ @ 133MHz
- 264kB on-chip SRAM in six independent banks
- Support for up to 16MB of off-chip Flash memory via dedicated QSPI bus
- DMA controller
- Fully-connected AHB crossbar
- Interpolator and integer divider peripherals
- On-chip programmable LDO to generate core voltage
- 2 on-chip PLLs to generate USB and core clocks
- 30 GPIO pins, 4 of which can be used as analogue inputs
- Peripherals ◦ 2 UARTs ◦ 2 SPI controllers ◦ 2 I2C controllers ◦ 16 PWM channels ◦ USB 1.1 controller and PHY, with host and device support ◦ 8 PIO state machines
Naming convention - Hint: more versions coming soon??
You will find the pinout details of the MCU below
You can access the project link here: https://wokwi.com/arduino/projects/297920315128807945
Feel free to come up with your versions of the project and share them in the comments!
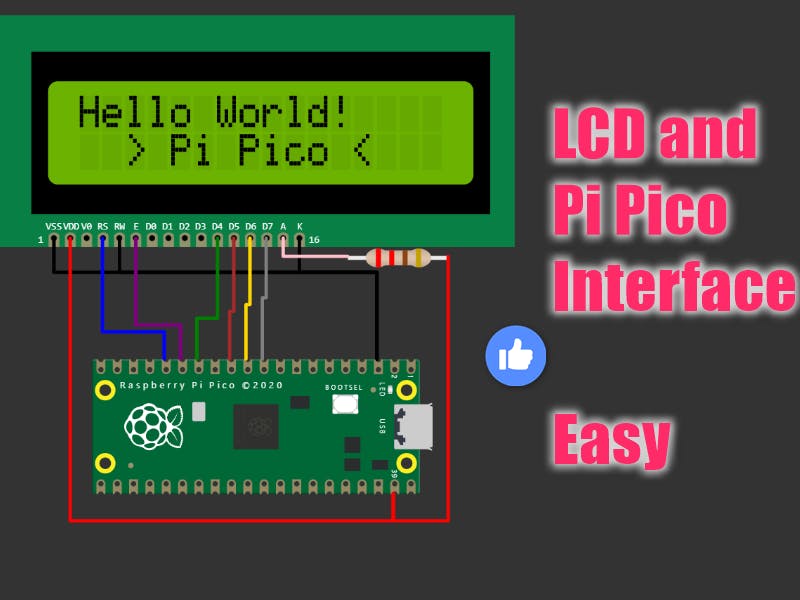
A brief overview of the LCD1602 component- An LCD display with 2 lines, 16 characters per line.
- The LCD1602 comes in 2 possible configurations: I2C configuration and standard configuration. The I2C configuration is usually simpler to use
- The I2C configuration simulates a PCF8574T chip that controls the LCD module.
- Normally, you wouldn't have to worry about this as the LiquidCrystal_I2C library takes care of the communication with the chip.
- Normally, you'd configure the chip in 4-bit parallel mode, which means you only need to connect RS, E, D4, D5, D6, and D7 pins to Arduino.‡ If you need to control the backlight, connect the anode to an I/O pin. Otherwise, connect it to the supply voltage. For a real circuit, you'd also need a current-limiting resistor
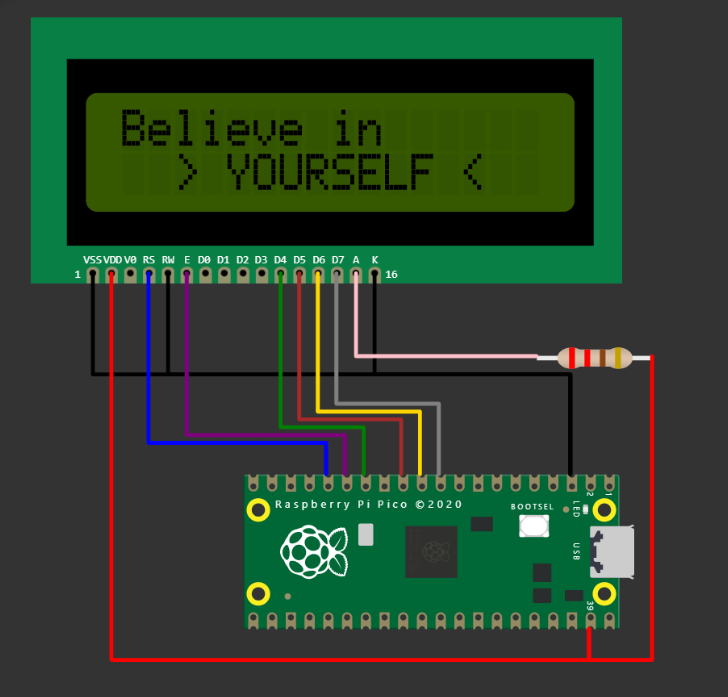
// LCD1602 and Pi Pico!
#include <LiquidCrystal.h>
LiquidCrystal lcd(12, 11, 10, 9, 8, 7);
void setup() {
lcd.begin(16, 2);
lcd.print("Hello World!");
lcd.setCursor(2, 1);
lcd.print("> Pi Pico <");
}
void loop() {
lcd.begin(16, 2);
lcd.print("Everything is");
lcd.setCursor(2, 1);
lcd.print("> POSSIBLE <");
delay(2000);
lcd.begin(16, 2);
lcd.print("Believe in ");
lcd.setCursor(2, 1);
lcd.print("> YOURSELF <");
delay(2000);
}LCD and Pi Pico simulation on Wokwi Arduino Simulator
- Build your own MENU or navigation systems
- Build your own custom LCD character on the Pi Pico simulator and share the link/project with others
- Make PI Pico generate a random number and display it on screen every 10 seconds


Comments