


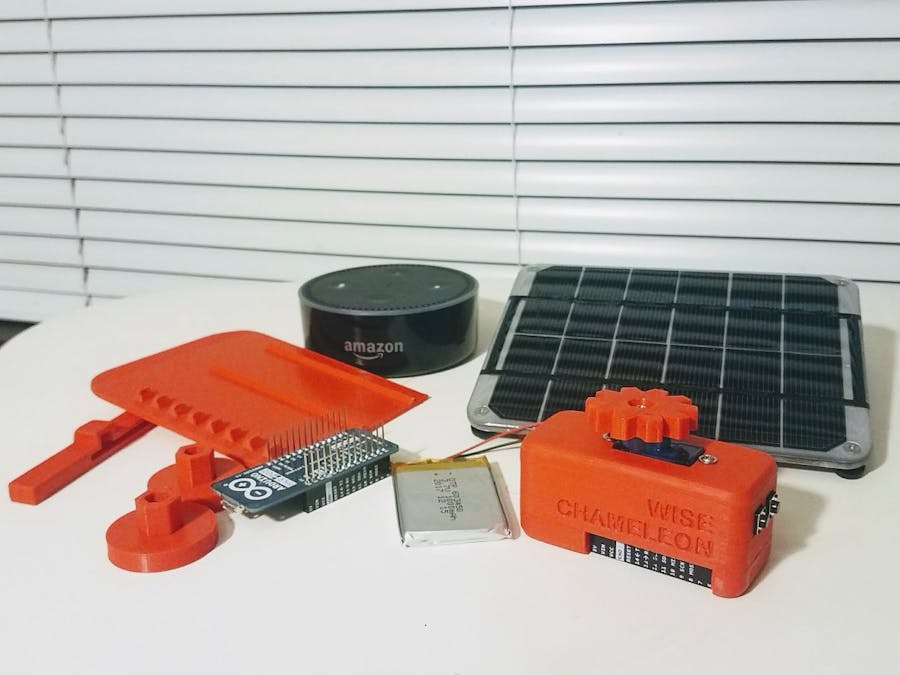
Hardware components | ||||||
 |
| × | 1 | |||
| × | 1 | ||||
Software apps and online services | ||||||
| ||||||
 |
| |||||
| ||||||
Hand tools and fabrication machines | ||||||
 |
| |||||
Update: We are so excited to have won the competition, thanks to everybody who supported us and of course to the judges. :) We are already continuing development on this project to make it more user-friendly, easier to adopt and of course add more attachments so it can do more cool stuff. Please check back frequently and let us know what you think of our progress.
IoT for the WIN!Let's do something different in the smart home space! Something next level not just turning on lights. Let's see if we can get it to a kick-startable level!
After some discussion on various topics, we pinned down our starting project definition to "smart device controlled modular actuators."
We would like to produce a ready-to-use device which will have a servo/motor head that can accept adapters (3D-printed or molded) and triggered by an app or smart hub.
This will leverage on a couple of things, first the modularity that will be very exciting for growing makers community and 3D printer owners, and also the growing smart home DIY electronics. This will be helpful in transforming non-smart devices (blinds, etc) and also come up with new applications (watering plants) through various adapters.
ComponentsA board capable of:
- Running a motor/servo
- WiFi communication with Alexa/Google/Smart Hub
- Power management for handling battery/solar/DC Power
- Servo/motor
- Power source
- Use case defined attachments
- Website - ios/android app
- Alexa skill integration
We use Arduino MKR1000 board connected to the Adafruit.IO device cloud. And Alexa skills is developed as an AWS Lambda function that implements amazons Smart Home Skill Kit Inteface. In particular it implements the PowerController and PowerLevelController as well as custom scenes.
Used components:
- AWS Lambda -
- cloudwatch logs, to debug alexa req / resp mss
- Amazon Developer Account (where Lambda definition and publish abilities lie)
- Adafruit.io the device cloud to control our Arduinos
- Test echo virtual device (just sign in as chameleon wise developer account) - https://echosim.io/
Here be the AWS Lambda code that Implements the Alexa Smart Home Skill API needed for integration of Chameleon Wise's /dev device (alexa controlled servo).
Detailed info on the Smart Home Skill API is here: https://developer.amazon.com/docs/smarthome/understand-the-smart-home-skill-api.html
Deployment:
$ cd AlexaSmarthomeAPI_Chameleon$ pip install requests -t .$ pip install nodb -t .
Now since our alexa skill is python3 and nodb doesn't support python3 make the following changes to AlexaSmartHomeAPI_Chameleon/nodb/__init__.py
line 69 -> bytesIO.write(bytes(serialized, 'utf-8')) line 241 -> if index in obj: line 264 -> return self.hash_function(bytes(index_value, 'utf-8')).hexdigest()
once the file is modified you are read to deploy to Lambda from AlexaSmarthomeAPI_Chameleon directory do:
$ zip -r python.zip .
This will zip everything up, then navigate to the Lambda page
Under Function Code select Upload a Zip File then select the python.zip file upload it and click save. Now you can test it out.
There are three things to test
- Discovery... navigate to
https://alexa.amazon.com/spa/index.html#applianceslogin with the chameleonwise user - Forget all device
- Click discover A device called moto should appear (if you are using the smart phone app, you will get a device controler for this guy that looks like a power switch). Your now setup and ready to go
To test out the functionality use the following uterance
Alexa turn moto on alexa turn moto off alexa setup power level to 100 on moto
Debugging:
To check whats happening with the Lambda, check out the CloudWatch Logs
Use Cases
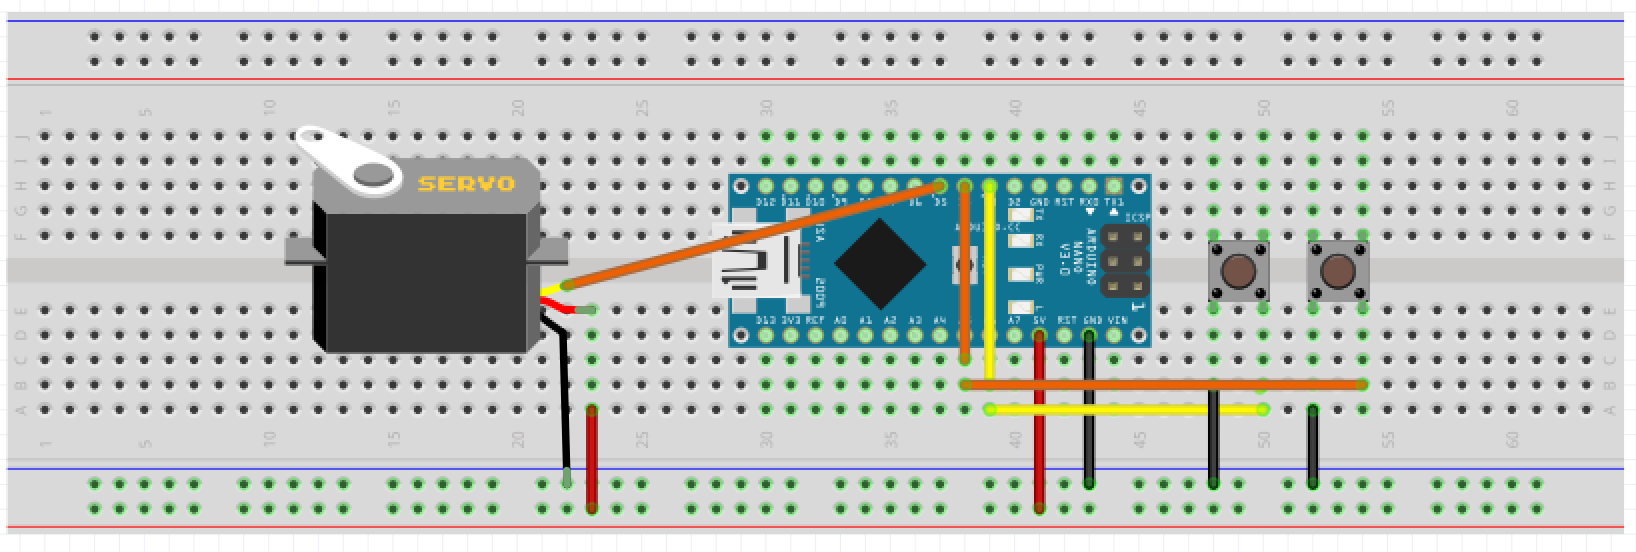
After testing the system on breadboard, we made a case for MKR1000 and continuous servo (check our thingiverse page for the 3D models https://www.thingiverse.com/wise_chameleon/designs). Soldering was a bit tedious, but eventually worked.
Designed an adapter for the blind wand, and also one with a gear that can be used on a sliding door, which we used for a pet feeder.
We documented all our code and steps on our GitHub repo
https://github.com/WiseChameleon/ChameleonAlexa
Here is a video tour of the project.
Useful documentation URLS:
- How Skill Kit Dev docs -https://developer.amazon.com/docs/smarthome/understand-the-smart-home-skill-api.html
- custom scenes - https://developer.amazon.com/docs/smarthome/provide-scenes-in-a-smart-home-skill.html
- Adafruit.io (v2) REST API Docs - https://io.adafruit.com/api/docs/#section/Authentication
- Adafruit IO tutorial (we use REST from Lambda and MQTT from MKR1000) - https://learn.adafruit.com/adafruit-io-basics-servo
Sketch (mkr1000 was replaced)


Koray Kirli

jeremy johnson


Comments